Super Smash Bros. 4

Bowser (SSB4)/Down throw: Difference between revisions

From SmashWiki, the Super Smash Bros. wiki
Jump to navigationJump to search
(Undid edit by Serpent King: eh.)
m (turning some unknowns into knowns)
Line 32: Line 32:
|sfx=Kick
|sfx=Kick
|direct=1
|direct=1
|i24=63
|hitbits=63
|i25=0
|i25=0
|i26=15
|i26=15
Line 40: Line 40:
|absorbable=0
|absorbable=0
|rehit=0
|rehit=0
|i32=0
|piercing=0
|i33=0
|i33=0
|i34=3
|i34=3
|i35=1
|i35=1
|i36=0
|heedless=0
|i37=0
|noff=0
|i38=0
|nogfx=0
|i39=0
|flinchless=0
|i40=0
|i40=0
}}
}}
Line 75: Line 75:
|sfx=Kick
|sfx=Kick
|direct=1
|direct=1
|i24=63
|hitbits=63
|i25=0
|i25=0
|i26=15
|i26=15
Line 83: Line 83:
|absorbable=0
|absorbable=0
|rehit=0
|rehit=0
|i32=0
|piercing=0
|i33=0
|i33=0
|i34=3
|i34=3
|i35=1
|i35=1
|i36=0
|heedless=0
|i37=0
|noff=0
|i38=0
|nogfx=0
|i39=0
|flinchless=0
|i40=0
|i40=0
}}
}}

Revision as of 15:37, February 4, 2018

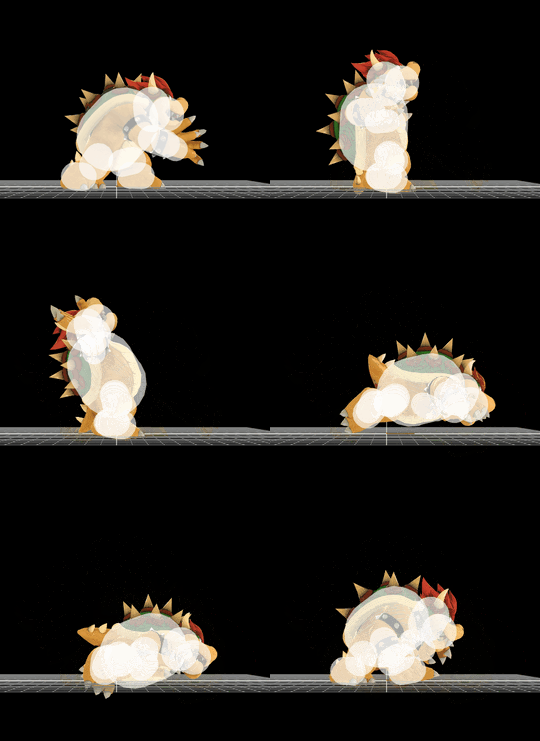
Hitbox visualization showing Bowser's down throw.

Overview

Bowser places the opponent on the ground and crushes them with a belly flop. Although it deals an impressive 12% damage with high base knockback, it possesses too high ending lag to be followed up, unlike most other down throws, while its knockback scaling is also too low for it to KO reliably, requiring the opponent to be at over 190% for it to reliably near the edge even with maximum rage. Bowser's other throws also outperform it in damage racking, as his forward throw and back throw deal the same amount of damage with better KO ability, while his up throw allows him to rack up significantly more damage out of a combo. Lastly, it has a long duration of nearly one second before the opponent is released, giving them more than enough time to react with proper DI. As a result of this, Bowser's down throw is often perceived as useless, due to its lack of utility over his other throws. In doubles play, however, it sees some use as a potential edgeguarding and KO option against bystanders, as its hitbox before releasing the grabbed opponent is significantly stronger than the throw itself and launches at a perfectly horizontal semi-spike angle, making it difficult for them to survive near the edge at high percentages.

Hitboxes

Hit 1

ID Part Rehit rate Damage SD Angle BK KS FKV Radius Bone Offset SDIx T% Clang Rebound Type Effect G A Sound Direct Hit bits Blockable Reflectable Absorbable Piercing Heedless No GFX Flinchless Stretch
0 0 0 10% 0 AngleIcon0.png Standard 0 100 0 9.6 12 -0.5 3.2 0.0 1.0x 1.0x 0% HitboxTableIcon(NoClang).png HitboxTableIcon(Rebound).png Body (type) Normal (effect) HitboxTableIcon(GroundedTrue).png HitboxTableIcon(AerialTrue).png L Kick SpecialsDirect.png 63 HitboxTableIcon(Blockable).png HitboxTableIcon(Unreflectable).png HitboxTableIcon(Unabsorbable).png HitboxTableIcon(False).png HitboxTableIcon(False).png HitboxTableIcon(False).png HitboxTableIcon(False).png
1 0 0 10% 0 AngleIcon0.png Standard 0 100 0 9.6 19 0.0 3.2 0.0 1.0x 1.0x 0% HitboxTableIcon(NoClang).png HitboxTableIcon(Rebound).png Body (type) Normal (effect) HitboxTableIcon(GroundedTrue).png HitboxTableIcon(AerialTrue).png L Kick SpecialsDirect.png 63 HitboxTableIcon(Blockable).png HitboxTableIcon(Unreflectable).png HitboxTableIcon(Unabsorbable).png HitboxTableIcon(False).png HitboxTableIcon(False).png HitboxTableIcon(False).png HitboxTableIcon(False).png

Throw

Hitbox type Damage Angle Base knockback Knockback scaling Fixed knockback value Weight dependent Effect Sound
Throw 2% 50° 90 80 0 No Normal (effect) HitboxTableIcon(SoundS).png None

Timing

Invincible 1-8
Hitbox 45-46
Throw 56
Animation length 84
FrameIcon(Lag).png FrameIcon(Lag).png FrameIcon(Lag).png FrameIcon(Lag).png FrameIcon(Lag).png FrameIcon(Lag).png FrameIcon(Lag).png FrameIcon(Lag).png FrameIcon(Lag).png FrameIcon(Lag).png FrameIcon(Lag).png FrameIcon(Lag).png FrameIcon(Lag).png FrameIcon(Lag).png FrameIcon(Lag).png FrameIcon(Lag).png FrameIcon(Lag).png FrameIcon(Lag).png FrameIcon(Lag).png FrameIcon(Lag).png FrameIcon(Lag).png FrameIcon(Lag).png FrameIcon(Lag).png FrameIcon(Lag).png FrameIcon(Lag).png FrameIcon(Lag).png FrameIcon(Lag).png FrameIcon(Lag).png FrameIcon(Lag).png FrameIcon(Lag).png FrameIcon(Lag).png FrameIcon(Lag).png FrameIcon(Lag).png FrameIcon(Lag).png FrameIcon(Lag).png FrameIcon(Lag).png FrameIcon(Lag).png FrameIcon(Lag).png FrameIcon(Lag).png FrameIcon(Lag).png FrameIcon(Lag).png FrameIcon(Lag).png FrameIcon(Lag).png FrameIcon(Lag).png FrameIcon(Hitbox).png FrameIcon(Hitbox).png FrameIcon(Lag).png FrameIcon(Lag).png FrameIcon(Lag).png FrameIcon(Lag).png FrameIcon(Lag).png FrameIcon(Lag).png FrameIcon(Lag).png FrameIcon(Lag).png FrameIcon(LagThrowS).png FrameIcon(LagThrowE).png FrameIcon(Lag).png FrameIcon(Lag).png FrameIcon(Lag).png FrameIcon(Lag).png FrameIcon(Lag).png FrameIcon(Lag).png FrameIcon(Lag).png FrameIcon(Lag).png FrameIcon(Lag).png FrameIcon(Lag).png FrameIcon(Lag).png FrameIcon(Lag).png FrameIcon(Lag).png FrameIcon(Lag).png FrameIcon(Lag).png FrameIcon(Lag).png FrameIcon(Lag).png FrameIcon(Lag).png FrameIcon(Lag).png FrameIcon(Lag).png FrameIcon(Lag).png FrameIcon(Lag).png FrameIcon(Lag).png FrameIcon(Lag).png FrameIcon(Lag).png FrameIcon(Lag).png FrameIcon(Lag).png FrameIcon(Lag).png
FrameIcon(Invincible).png FrameIcon(Invincible).png FrameIcon(Invincible).png FrameIcon(Invincible).png FrameIcon(Invincible).png FrameIcon(Invincible).png FrameIcon(Invincible).png FrameIcon(Invincible).png FrameIcon(Vulnerable).png FrameIcon(Vulnerable).png FrameIcon(Vulnerable).png FrameIcon(Vulnerable).png FrameIcon(Vulnerable).png FrameIcon(Vulnerable).png FrameIcon(Vulnerable).png FrameIcon(Vulnerable).png FrameIcon(Vulnerable).png FrameIcon(Vulnerable).png FrameIcon(Vulnerable).png FrameIcon(Vulnerable).png FrameIcon(Vulnerable).png FrameIcon(Vulnerable).png FrameIcon(Vulnerable).png FrameIcon(Vulnerable).png FrameIcon(Vulnerable).png FrameIcon(Vulnerable).png FrameIcon(Vulnerable).png FrameIcon(Vulnerable).png FrameIcon(Vulnerable).png FrameIcon(Vulnerable).png FrameIcon(Vulnerable).png FrameIcon(Vulnerable).png FrameIcon(Vulnerable).png FrameIcon(Vulnerable).png FrameIcon(Vulnerable).png FrameIcon(Vulnerable).png FrameIcon(Vulnerable).png FrameIcon(Vulnerable).png FrameIcon(Vulnerable).png FrameIcon(Vulnerable).png FrameIcon(Vulnerable).png FrameIcon(Vulnerable).png FrameIcon(Vulnerable).png FrameIcon(Vulnerable).png FrameIcon(Vulnerable).png FrameIcon(Vulnerable).png FrameIcon(Vulnerable).png FrameIcon(Vulnerable).png FrameIcon(Vulnerable).png FrameIcon(Vulnerable).png FrameIcon(Vulnerable).png FrameIcon(Vulnerable).png FrameIcon(Vulnerable).png FrameIcon(Vulnerable).png FrameIcon(Vulnerable).png FrameIcon(Vulnerable).png FrameIcon(Vulnerable).png FrameIcon(Vulnerable).png FrameIcon(Vulnerable).png FrameIcon(Vulnerable).png FrameIcon(Vulnerable).png FrameIcon(Vulnerable).png FrameIcon(Vulnerable).png FrameIcon(Vulnerable).png FrameIcon(Vulnerable).png FrameIcon(Vulnerable).png FrameIcon(Vulnerable).png FrameIcon(Vulnerable).png FrameIcon(Vulnerable).png FrameIcon(Vulnerable).png FrameIcon(Vulnerable).png FrameIcon(Vulnerable).png FrameIcon(Vulnerable).png FrameIcon(Vulnerable).png FrameIcon(Vulnerable).png FrameIcon(Vulnerable).png FrameIcon(Vulnerable).png FrameIcon(Vulnerable).png FrameIcon(Vulnerable).png FrameIcon(Vulnerable).png FrameIcon(Vulnerable).png FrameIcon(Vulnerable).png FrameIcon(Vulnerable).png FrameIcon(Vulnerable).png
Legend (1 square = 1 frame)
Lag
Lag time
FrameIcon(Vulnerable).png
Vulnerable
Invincibility
Invincible
ThrowThrow
Throw point