Captain Falcon (SSB)/Back throw: Difference between revisions

From SmashWiki, the Super Smash Bros. wiki
Jump to navigationJump to search
m (Description added.)
Tag: Mobile edit
m (→‎Overview: Added hitbox visualization & minor grammar improvements.)
 
Line 1: Line 1:
==Overview==
==Overview==
He kicks the opponent back, causing 16%. This throw has much more [[knockback]] than his [[Captain Falcon (SSB)/Forward throw|forward throw]] but is generally not used for combos. The most common use is to [[edgeguard]] after a quick ledge snap, especially to {{SSB|Yoshi}} and {{SSB|Pikachu}} at higher percents though at lower percents, forward throw is better as it leads to better edgeguard scenarios. The other use is to back throw someone onto a platform leading to a free [[Captain Falcon (SSB)/Up smash|up smash]].
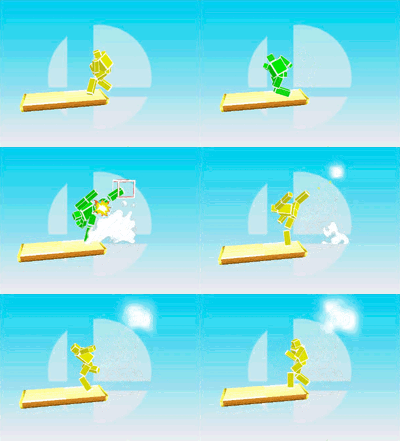
[[File:Captain Falcon Back Throw Hitbox Smash 64.gif|thumb|Hitbox visualization of Captain Falcon's back throw.]]
Captain Falcon kicks the opponent back, dealing 16%. This throw has much more [[knockback]] than his {{mvsub|Captain Falcon|SSB|forward throw}} but is generally not used for combos. The most common use is to [[edgeguard]] after a quick ledge snap, especially against {{SSB|Yoshi}} and {{SSB|Pikachu}} at higher percents, though, at lower percents, forward throw is better as it leads to better edgeguard scenarios. The other use is to back throw someone onto a platform leading to a free [[Captain Falcon (SSB)/Up smash|up smash]].
 
==Throw and Hitbox Data==
{{SSB64HitboxTableHeader}}

Latest revision as of 16:46, December 15, 2024

Overview[edit]

Hitbox visualization of Captain Falcon's back throw.

Captain Falcon kicks the opponent back, dealing 16%. This throw has much more knockback than his forward throw but is generally not used for combos. The most common use is to edgeguard after a quick ledge snap, especially against Yoshi and Pikachu at higher percents, though, at lower percents, forward throw is better as it leads to better edgeguard scenarios. The other use is to back throw someone onto a platform leading to a free up smash.

Throw and Hitbox Data[edit]

ID Part Damage SD Angle BK KS FKV Radius Bone Offset Clang Effect G A Sound
Hitbox
0 0 10% 0 Sakurai angle 30 80 0 100 26 200 0 0 HitboxTableIcon(NoClang).png Normal (effect) HitboxTableIcon(GroundedTrue).png HitboxTableIcon(AerialTrue).png L Kick
1 0 10% 0 Sakurai angle 30 80 0 70 25 0 0 0 HitboxTableIcon(NoClang).png Normal (effect) HitboxTableIcon(GroundedTrue).png HitboxTableIcon(AerialTrue).png L Kick
Bone Damage Angle BK KS FKV Effect
Throw 16% Sakurai angle 100 50 0 Normal (effect)
Release 6% Sakurai angle 0 100 0 Normal (effect)

Timing[edit]

Invincibility 4-19
Hitbox 12-19
Throw Release 20
Animation length 43
FrameIcon(Lag).png FrameIcon(Lag).png FrameIcon(Lag).png FrameIcon(Lag).png FrameIcon(Lag).png FrameIcon(Lag).png FrameIcon(Lag).png FrameIcon(Lag).png FrameIcon(Lag).png FrameIcon(Lag).png FrameIcon(Lag).png FrameIcon(Hitbox).png FrameIcon(Hitbox).png FrameIcon(Hitbox).png FrameIcon(Hitbox).png FrameIcon(Hitbox).png FrameIcon(Hitbox).png FrameIcon(Hitbox).png FrameIcon(HitboxThrowS).png FrameIcon(LagThrowE).png FrameIcon(Lag).png FrameIcon(Lag).png FrameIcon(Lag).png FrameIcon(Lag).png FrameIcon(Lag).png FrameIcon(Lag).png FrameIcon(Lag).png FrameIcon(Lag).png FrameIcon(Lag).png FrameIcon(Lag).png FrameIcon(Lag).png FrameIcon(Lag).png FrameIcon(Lag).png FrameIcon(Lag).png FrameIcon(Lag).png FrameIcon(Lag).png FrameIcon(Lag).png FrameIcon(Lag).png FrameIcon(Lag).png FrameIcon(Lag).png FrameIcon(Lag).png FrameIcon(Lag).png FrameIcon(Lag).png
FrameIcon(Vulnerable).png FrameIcon(Vulnerable).png FrameIcon(Vulnerable).png FrameIcon(Invincible).png FrameIcon(Invincible).png FrameIcon(Invincible).png FrameIcon(Invincible).png FrameIcon(Invincible).png FrameIcon(Invincible).png FrameIcon(Invincible).png FrameIcon(Invincible).png FrameIcon(Invincible).png FrameIcon(Invincible).png FrameIcon(Invincible).png FrameIcon(Invincible).png FrameIcon(Invincible).png FrameIcon(Invincible).png FrameIcon(Invincible).png FrameIcon(Invincible).png FrameIcon(Vulnerable).png FrameIcon(Vulnerable).png FrameIcon(Vulnerable).png FrameIcon(Vulnerable).png FrameIcon(Vulnerable).png FrameIcon(Vulnerable).png FrameIcon(Vulnerable).png FrameIcon(Vulnerable).png FrameIcon(Vulnerable).png FrameIcon(Vulnerable).png FrameIcon(Vulnerable).png FrameIcon(Vulnerable).png FrameIcon(Vulnerable).png FrameIcon(Vulnerable).png FrameIcon(Vulnerable).png FrameIcon(Vulnerable).png FrameIcon(Vulnerable).png FrameIcon(Vulnerable).png FrameIcon(Vulnerable).png FrameIcon(Vulnerable).png FrameIcon(Vulnerable).png FrameIcon(Vulnerable).png FrameIcon(Vulnerable).png FrameIcon(Vulnerable).png
Legend (1 square = 1 frame)
Lag
Lag time
Hitbox
Hitbox
FrameIcon(Vulnerable).png
Vulnerable
Invincibility
Invincible
ThrowThrow
Throw point