Welcome to SmashWiki! Log in or create an account and join the community, and don't forget to read this first!
Notices
The Skill parameter has been removed from Smasher infoboxes, and in its place are the new "Best historical ranking" and "Best tournament result" parameters. SmashWiki needs help adding these new parameters to Smasher infoboxes, refer to the guidelines here for what should be included in these new parameters.
When adding results to Smasher pages, include each tournament's entrant number in addition to the player's placement, and use the {{Trn}} template with the matching game specified. Please also fix old results on Smasher pages that do not abide to this standard. Refer to our Smasher article guidelines to see how results tables should be formatted.
Check out our project page for ongoing projects that SmashWiki needs help with.
Super Smash Bros.

Captain Falcon (SSB)/Up tilt

From SmashWiki, the Super Smash Bros. wiki
Jump to navigationJump to search

Overview[edit]

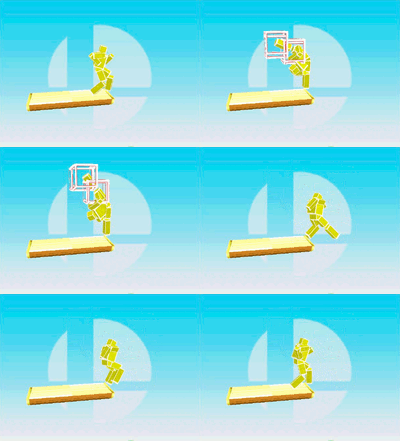
The hitboxes of Captain Falcon's up tilt.

Captain Falcon raises his leg high and drops it like an axe, with the attack consisting of two hits; the first deals 9%, and the second deals 14%. This means it can deal a maximum of 23% damage, giving it the highest damage output of any tilt attack in the game. This attack is unique because it can hit opponents behind, and at the start of the move, above Falcon. It also has large range both above and in front of Falcon, outranging his up smash and forward smash respectively. The move in general is somewhat slow, however, with average to above average startup and ending lag. Its startup is usually too much to allow the move to be used in most combos at lower percentages. The move is often used in the "tent" portion of Hyrule Castle to aid Falcon's wall chaingrabs, as a forward throw or back throw can lead straight into an up tilt and then a regrab. It has some situational use in normal combos, and is particularly useful against large characters, since the hits can connect easily on them to rack up high damage. It can additionally hit and edgeguard characters hanging on the edge, due to its hitbox extending below the platform; its decent horizontal knockback makes it a viable way to gimp opponents.

Hitboxes[edit]

ID Part Damage SD Angle BK KS FKV Radius Bone Offset Clang Effect G A Sound
Hit 1
0 0 9% 0 Sakurai angle 10 100 0 120 14 -20 0 0 HitboxTableIcon(Clang).png Normal (effect) HitboxTableIcon(GroundedTrue).png HitboxTableIcon(AerialTrue).png M Kick
1 0 9% 0 Sakurai angle 10 100 0 120 13 180 0 0 HitboxTableIcon(Clang).png Normal (effect) HitboxTableIcon(GroundedTrue).png HitboxTableIcon(AerialTrue).png M Kick
Hit 2
0 1 14% 0 Sakurai angle 20 100 0 120 14 -20 0 0 HitboxTableIcon(Clang).png Normal (effect) HitboxTableIcon(GroundedTrue).png HitboxTableIcon(AerialTrue).png L Kick
1 1 14% 0 Sakurai angle 20 100 0 120 13 180 0 0 HitboxTableIcon(Clang).png Normal (effect) HitboxTableIcon(GroundedTrue).png HitboxTableIcon(AerialTrue).png L Kick

Timing[edit]

Hit 1 8-17
Hit 2 18-23
Animation length 39
FrameIcon(Lag).png FrameIcon(Lag).png FrameIcon(Lag).png FrameIcon(Lag).png FrameIcon(Lag).png FrameIcon(Lag).png FrameIcon(Lag).png FrameIcon(Hitbox).png FrameIcon(Hitbox).png FrameIcon(Hitbox).png FrameIcon(Hitbox).png FrameIcon(Hitbox).png FrameIcon(Hitbox).png FrameIcon(Hitbox).png FrameIcon(Hitbox).png FrameIcon(Hitbox).png FrameIcon(HitboxChangeS).png FrameIcon(HitboxChangeE).png FrameIcon(Hitbox).png FrameIcon(Hitbox).png FrameIcon(Hitbox).png FrameIcon(Hitbox).png FrameIcon(Hitbox).png FrameIcon(Lag).png FrameIcon(Lag).png FrameIcon(Lag).png FrameIcon(Lag).png FrameIcon(Lag).png FrameIcon(Lag).png FrameIcon(Lag).png FrameIcon(Lag).png FrameIcon(Lag).png FrameIcon(Lag).png FrameIcon(Lag).png FrameIcon(Lag).png FrameIcon(Lag).png FrameIcon(Lag).png FrameIcon(Lag).png FrameIcon(Lag).png

Similar moves[edit]