Palutena (SSB4)/Grab: Difference between revisions
(Iit was taking the page forever to make, so I decided to leave the last two hitboxes till the end.) |
SuperSqank (talk | contribs) |
||
| (12 intermediate revisions by 6 users not shown) | |||
| Line 1: | Line 1: | ||
{{ArticleIcons|ssb4=y}} | {{ArticleIcons|ssb4=y}} | ||
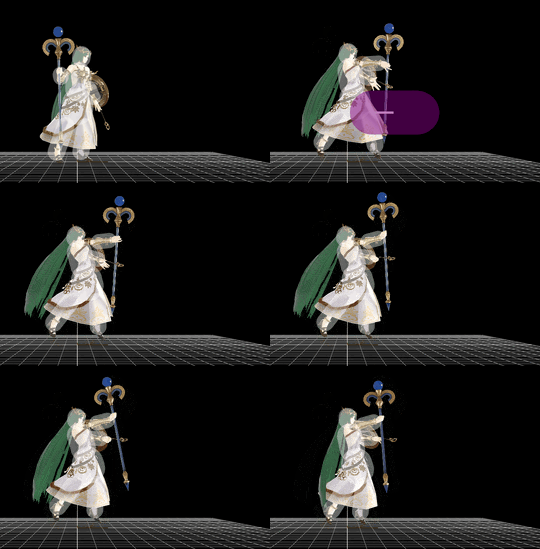
[[File:PalutenaGrab.gif|thumb|270px|Hitbox visualization showing Palutena's grab.]] | |||
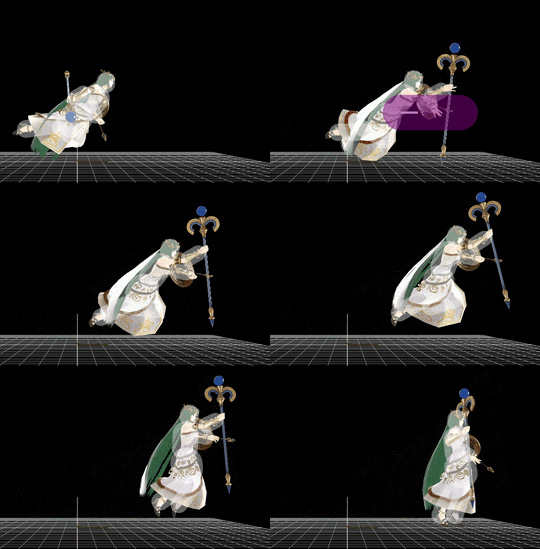
[[File:PalutenaGrabDash.gif|thumb|270px|Hitbox visualization showing Palutena's dash grab.]] | |||
[[File:PalutenaGrabPivot.gif|thumb|270px|Hitbox visualization showing Palutena's pivot grab.]] | |||
==Overview== | ==Overview== | ||
Palutena rises her arms and uses her staff's magic to telekinetically clinch the opponent. All of her grabs have fairly large, disjointed range, having overall the second largest non-tether, disjointed grab range (losing to {{SSB4|Greninja}}). Her grab game is a fundamental part of her metagame, since most of the damage she inflicts starts from a grab, often pummeling the opponent before she throws them. A large number of Palutena's conversions come off a grab, then a [[Palutena (SSB4)/Down throw|down throw]] to set the opponent for a combo involving her aerials. | Palutena rises her arms and uses her staff's magic to telekinetically clinch the opponent. All of her grabs have fairly large, disjointed range, having overall the second largest non-tether, disjointed grab range (losing to {{SSB4|Greninja}}). Her grab game is a fundamental part of her metagame, since most of the damage she inflicts starts from a grab, often pummeling the opponent before she throws them. A large number of Palutena's conversions come off a grab, then a [[Palutena (SSB4)/Down throw|down throw]] to set the opponent for a combo involving her aerials. | ||
Palutena's standing grab is typically her most used one, since it has large range alongside fast startup and decent ending lag. Her pivot grab (turn-around grab) is, as with most other characters, her grab with the largest range, although it suffers from higher ending lag than other grabs. Her dash grab is often considered to be unanimously her worst grab, since it lacks the overall range of her standing and pivot grabs in relation to her position, and like most dash grabs, it suffers from hefty ending lag. As a result, both her dash and pivot grabs should be used | Palutena's standing grab is typically her most used one, since it has large range alongside fast startup and decent ending lag. Her pivot grab (turn-around grab) is, as with most other characters, her grab with the largest range, although it suffers from higher ending lag than other grabs. Her dash grab is often considered to be unanimously her worst grab, since it lacks the overall range of her standing and pivot grabs in relation to her position, and like most dash grabs, it suffers from hefty ending lag. As a result, both her dash and pivot grabs should be used sparingly, although the former does benefit when roll-canceled, and the latter benefits from good spacing. Overall, this is one of Palutena's most used moves in her moveset, and one of the reasons her grab and throw game is considered to be among the most solid ones in the metagame. | ||
== | ==Update history== | ||
Palutena's grabs have got a mix of buffs and nerfs in game updates, but they are considered to be slightly buffed as a whole. | |||
In the initial 3DS version, Palutena's pivot grab used to be considered among the best in the game due to its range being incredibly large and disjointed. Following this, update [[1.0.4]] and the Wii U release of the game nerfed its range, putting it more in-line with other characters' pivot grab ranges, which hindered her grab game (although it still remained highly disjointed). | |||
|- | On the other hand, Palutena's grabs also suffered from heavier ending lag that most others, apart from having slower startup than the average one of a regular grab (such as {{SSB4|Mario}} or {{SSB4|Luigi}}). Update [[1.1.0]] remedied this by reducing the ending lag on all of her grabs, thus making them much less punishable for whiffing and less risky to use, once again improving significantly her grab game. | ||
| 0 | |||
'''{{GameIcon|ssb4-3ds}} [[1.0.4]]/{{GameIcon|ssb4-wiiu}} 1.0.0''' | |||
*{{nerf|Pivot grab z-stretch (-19.4 → -17.4).}} | |||
'''{{GameIcon|ssb4}} [[1.1.0]]''' | |||
{| | *{{buff|Ending lag:}} | ||
**{{buff|Standing grab (FAF 34 → 32)}} | |||
**{{buff|Dash and pivot grab (FAF 42 → 40)}} | |||
| | |||
| | |||
|} | |||
=== | ==Hitboxes== | ||
{{SSB4GrabboxTableHeader}} | |||
| | {{HitboxTableTitle|Standing|12}} | ||
{{SSB4GrabboxTableRow | |||
| | |id=0 | ||
| 0 || 0 | | |r=3.6 | ||
|bn=0 | |||
|ypos=8.0 | |||
|zpos=4.0 | |||
|ystretch=8.0 | |||
|zstretch=11.4 | |||
}} | |||
{{HitboxTableTitle|Running|12}} | |||
{{SSB4GrabboxTableRow | |||
|id=0 | |||
|r=2.9 | |||
|bn=0 | |||
|ypos=8.0 | |||
|zpos=4.0 | |||
|ystretch=8.0 | |||
|zstretch=13.7 | |||
}} | |||
{{HitboxTableTitle|Pivot|12}} | |||
{{SSB4GrabboxTableRow | |||
|id=0 | |||
|r=3.6 | |||
|bn=0 | |||
|ypos=8.0 | |||
|zpos=-4.0 | |||
|ystretch=8.0 | |||
|zstretch=-17.4 | |||
}} | |||
|} | |} | ||
| Line 38: | Line 62: | ||
{|class="wikitable" | {|class="wikitable" | ||
|- | |- | ||
! | !Grabboxes | ||
|7-8 | |7-8 | ||
|- | |||
!Interruptible | |||
|32 | |||
|- | |- | ||
!Animation length | !Animation length | ||
| | |44 | ||
|} | |} | ||
{{FrameStripStart}} | {{FrameStripStart}} | ||
{{FrameStrip|t=Lag|c=6}}{{FrameStrip|t= | {{FrameStrip|t=Lag|c=6}}{{FrameStrip|t=Grab|c=2}}{{FrameStrip|t=Lag|c=23}}{{FrameStrip|t=Interruptible|c=13}} | ||
|- | |- | ||
{{FrameStripEnd}} | {{FrameStripEnd}} | ||
| Line 53: | Line 80: | ||
{|class="wikitable" | {|class="wikitable" | ||
|- | |- | ||
! | !Grabboxes | ||
|9-10 | |9-10 | ||
|- | |||
!Interruptible | |||
|40 | |||
|- | |- | ||
!Animation length | !Animation length | ||
| | |44 | ||
|} | |} | ||
{{FrameStripStart}} | {{FrameStripStart}} | ||
{{FrameStrip|t=Lag|c=8}}{{FrameStrip|t= | {{FrameStrip|t=Lag|c=8}}{{FrameStrip|t=Grab|c=2}}{{FrameStrip|t=Lag|c=29}}{{FrameStrip|t=Interruptible|c=5}} | ||
| | |||
{{FrameStripEnd}} | {{FrameStripEnd}} | ||
| Line 68: | Line 97: | ||
{|class="wikitable" | {|class="wikitable" | ||
|- | |- | ||
! | !Grabboxes | ||
|10-11 | |10-11 | ||
|- | |||
!Interruptible | |||
|40 | |||
|- | |- | ||
!Animation length | !Animation length | ||
| | |48 | ||
|} | |} | ||
{{FrameStripStart}} | {{FrameStripStart}} | ||
{{FrameStrip|t=Lag|c=9}}{{FrameStrip|t= | {{FrameStrip|t=Lag|c=9}}{{FrameStrip|t=Grab|c=2}}{{FrameStrip|t=Lag|c=28}}{{FrameStrip|t=Interruptible|c=9}} | ||
| | |||
{{FrameStripEnd}} | {{FrameStripEnd}} | ||
{{FrameIconLegend|lag=y|grab=y}} | |||
{{MvSubNavPalutena|g=SSB4}} | {{MvSubNavPalutena|g=SSB4}} | ||
[[Category:Palutena (SSB4)]] | [[Category:Palutena (SSB4)]] | ||
[[Category:Grabs (SSB4)]] | [[Category:Grabs (SSB4)]] | ||
Latest revision as of 06:30, February 12, 2023
Overview[edit]
Palutena rises her arms and uses her staff's magic to telekinetically clinch the opponent. All of her grabs have fairly large, disjointed range, having overall the second largest non-tether, disjointed grab range (losing to Greninja). Her grab game is a fundamental part of her metagame, since most of the damage she inflicts starts from a grab, often pummeling the opponent before she throws them. A large number of Palutena's conversions come off a grab, then a down throw to set the opponent for a combo involving her aerials.
Palutena's standing grab is typically her most used one, since it has large range alongside fast startup and decent ending lag. Her pivot grab (turn-around grab) is, as with most other characters, her grab with the largest range, although it suffers from higher ending lag than other grabs. Her dash grab is often considered to be unanimously her worst grab, since it lacks the overall range of her standing and pivot grabs in relation to her position, and like most dash grabs, it suffers from hefty ending lag. As a result, both her dash and pivot grabs should be used sparingly, although the former does benefit when roll-canceled, and the latter benefits from good spacing. Overall, this is one of Palutena's most used moves in her moveset, and one of the reasons her grab and throw game is considered to be among the most solid ones in the metagame.
Update history[edit]
Palutena's grabs have got a mix of buffs and nerfs in game updates, but they are considered to be slightly buffed as a whole.
In the initial 3DS version, Palutena's pivot grab used to be considered among the best in the game due to its range being incredibly large and disjointed. Following this, update 1.0.4 and the Wii U release of the game nerfed its range, putting it more in-line with other characters' pivot grab ranges, which hindered her grab game (although it still remained highly disjointed).
On the other hand, Palutena's grabs also suffered from heavier ending lag that most others, apart from having slower startup than the average one of a regular grab (such as Mario or Luigi). Update 1.1.0 remedied this by reducing the ending lag on all of her grabs, thus making them much less punishable for whiffing and less risky to use, once again improving significantly her grab game.
![]() 1.0.4/
1.0.4/![]() 1.0.0
1.0.0
 Pivot grab z-stretch (-19.4 → -17.4).
 Ending lag:
 Standing grab (FAF 34 → 32)
 Dash and pivot grab (FAF 42 → 40)
Hitboxes[edit]
| ID | Radius | Bone | Offset | Stretch | G | A | |||||
|---|---|---|---|---|---|---|---|---|---|---|---|
| Standing | |||||||||||
| 0 | 3.6 | 0 | 0.0 | 8.0 | 4.0 | 0.0 | 8.0 | 11.4 | |||
| Running | |||||||||||
| 0 | 2.9 | 0 | 0.0 | 8.0 | 4.0 | 0.0 | 8.0 | 13.7 | |||
| Pivot | |||||||||||
| 0 | 3.6 | 0 | 0.0 | 8.0 | -4.0 | 0.0 | 8.0 | -17.4 | |||
Timing[edit]
Standing grab[edit]
| Grabboxes | 7-8 |
|---|---|
| Interruptible | 32 |
| Animation length | 44 |
Dash grab[edit]
| Grabboxes | 9-10 |
|---|---|
| Interruptible | 40 |
| Animation length | 44 |
Pivot grab[edit]
| Grabboxes | 10-11 |
|---|---|
| Interruptible | 40 |
| Animation length | 48 |
Lag time |
Grab |
|


