Pac-Man (SSB4)/Up smash: Difference between revisions
Baefeather (talk | contribs) m (Might be good to note) |
SuperSqank (talk | contribs) m (→Update history) |
||
| (11 intermediate revisions by 6 users not shown) | |||
| Line 1: | Line 1: | ||
{{ArticleIcons|ssb4=y}} | {{ArticleIcons|ssb4=y}} | ||
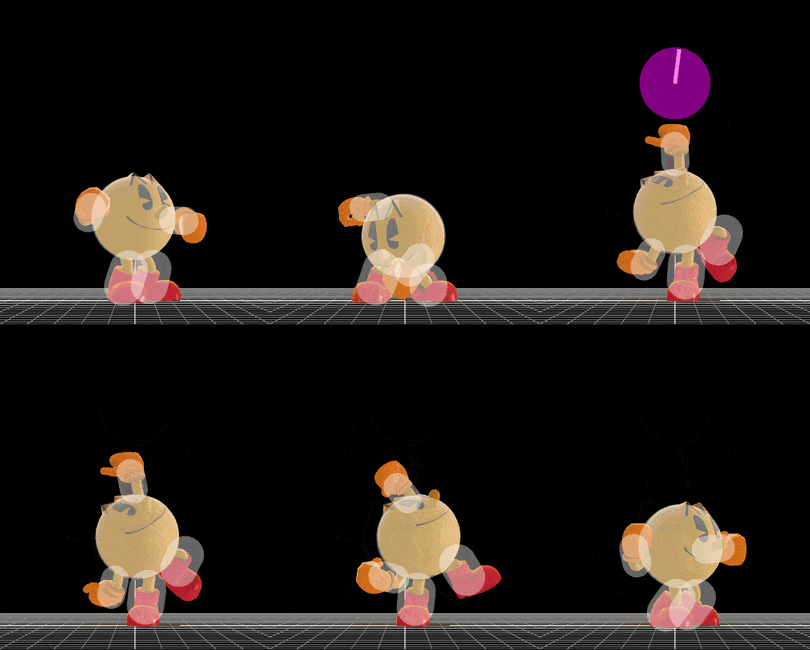
[[File:Pac-ManUpSmash.gif|thumb|270px|Hitbox visualization showing Pac-Man's up smash.]] | |||
{{competitive expertise}} | |||
==Overview== | ==Overview== | ||
Pac-Man thrusts Inky above him in a two-hit fashion, launching opponents upwards. Like all of Pac-Man's other smash attacks, it is able to nullify oncoming projectiles. However, the move has high starting and ending lag, making it hard to hit and easy to [[punishment|punish]]. However, it is the fastest of Pac-Man's smash attacks, making it slightly safer to use than the other two. | |||
Pac-Man thrusts Inky above him in a two-hit fashion, launching opponents upwards. Like all of Pac-Man's other smash attacks, it is able to nullify oncoming projectiles. | |||
==Update history== | |||
Pac Man's up smash was initially noticeably more effective in the initial release of the game, as it had much less ending lag. This not only made it much safer, but it also made up smash a reliable combo tool at lower percents. In version [[1.0.4]] however (1.0.1 on Wii U), the move received much more ending lag, which greatly hindered the move, as it became more punishable and it overall has less utility. The move would later be improved in version [[1.1.5]] where it received a slight increase in knockback, but the move is still overall inferior to how it was in the initial release of the game. | |||
'''{{GameIcon|ssb4-3ds}} [[1.0.4]]/{{GameIcon|ssb4-wiiu}} 1.0.1''' | |||
*{{nerf|Ending lag (FAF 38 → 50).}} | |||
'''{{GameIcon|ssb4}} [[1.1.5]]''' | |||
*{{buff|Second hit knockback scaling (95 clean)/90 (late) → 97/92).}} | |||
==Hitboxes== | ==Hitboxes== | ||
{{ | {{SSB4HitboxTableHeader}} | ||
{| | {{HitboxTableTitle|Hit 1|42}} | ||
{{SSB4HitboxTableRow | |||
| | |id=0 | ||
| | |part=1 | ||
|damage={{ChargedSmashDmgSSB4|3}} | |||
|angle=115 | |||
|bk=95 | |||
|ks=20 | |||
|fkv=0 | |||
|r=3.5 | |||
|bn=0 | |||
|xpos=0.0 | |||
|ypos=8.5 | |||
|zpos=8.0 | |||
|type=Typeless | |||
|sdi=1.0 | |||
|trip=0 | |||
|sfx=Punch | |||
|slvl=S | |||
}} | |||
{{HitboxTableTitle|Hit 2 (clean)|42}} | |||
{{SSB4HitboxTableRow | |||
|id=0 | |||
|part=0 | |||
|damage={{ChargedSmashDmgSSB4|14}} | |||
|angle=83 | |||
|bk=32 | |||
|ks=97 | |||
|fkv=0 | |||
|r=6.0 | |||
|bn=1000 | |||
|xpos=0.0 | |||
|ypos=6.0 | |||
|zpos=0.0 | |||
|rebound=f | |||
|type=Typeless | |||
|sdi=1.0 | |||
|trip=0 | |||
|sfx=Punch | |||
|slvl=L | |||
}} | |||
{{HitboxTableTitle|Hit 2 (late)|42}} | |||
{{SSB4HitboxTableRow | |||
|id=0 | |||
|part=0 | |||
|damage={{ChargedSmashDmgSSB4|8}} | |||
|angle=83 | |||
|bk=32 | |||
|ks=92 | |||
|fkv=0 | |||
|r=4.0 | |||
|bn=1000 | |||
|xpos=0.0 | |||
|ypos=6.0 | |||
|zpos=0.0 | |||
|rebound=f | |||
|type=Typeless | |||
|sdi=1.0 | |||
|trip=0 | |||
|sfx=Punch | |||
|slvl=M | |||
}} | |||
|} | |} | ||
==Timing== | ==Timing== | ||
{|class="wikitable" | {|class="wikitable" | ||
!Charges between | |||
|6-7 | |||
|- | |- | ||
! | !Hit 1 | ||
|13 | |13 | ||
|- | |- | ||
! | !Hit 2 clean | ||
|16-18 | |16-18 | ||
|- | |- | ||
! | !Hit 2 late | ||
|19-26 | |19-26 | ||
|- | |||
!Interruptible | |||
|50 | |||
|- | |- | ||
!Animation length | !Animation length | ||
| | |59 | ||
|} | |} | ||
{{FrameStripStart}} | {{FrameStripStart}} | ||
{{FrameStrip|t=Lag|c= | {{FrameStrip|t=Lag|c=6|e=LagChargeS}}{{FrameStrip|t=Lag|c=6|s=LagChargeE}}{{FrameStrip|t=Hitbox|c=1}}{{FrameStrip|t=Lag|c=2}}{{FrameStrip|t=Hitbox|c=3|e=HitboxChangeS}}{{FrameStrip|t=Hitbox|c=8|s=HitboxChangeE}}{{FrameStrip|t=Lag|c=23}}{{FrameStrip|t=Interruptible|c=10}} | ||
{{FrameStripEnd}} | {{FrameStripEnd}} | ||
{{FrameIconLegend|lag=y|hitbox=y}} | {{FrameIconLegend|lag=y|charge=y|hitbox=y|hitboxchange=y|interruptible=y}} | ||
{{MvSubNavPac-Man|g=SSB4}} | {{MvSubNavPac-Man|g=SSB4}} | ||
[[Category:Pac-Man (SSB4)]] | [[Category:Pac-Man (SSB4)]] | ||
[[Category:Up smashes (SSB4)]] | [[Category:Up smashes (SSB4)]] | ||
Latest revision as of 10:51, March 3, 2023
Overview[edit]
Pac-Man thrusts Inky above him in a two-hit fashion, launching opponents upwards. Like all of Pac-Man's other smash attacks, it is able to nullify oncoming projectiles. However, the move has high starting and ending lag, making it hard to hit and easy to punish. However, it is the fastest of Pac-Man's smash attacks, making it slightly safer to use than the other two.
Update history[edit]
Pac Man's up smash was initially noticeably more effective in the initial release of the game, as it had much less ending lag. This not only made it much safer, but it also made up smash a reliable combo tool at lower percents. In version 1.0.4 however (1.0.1 on Wii U), the move received much more ending lag, which greatly hindered the move, as it became more punishable and it overall has less utility. The move would later be improved in version 1.1.5 where it received a slight increase in knockback, but the move is still overall inferior to how it was in the initial release of the game.
![]() 1.0.4/
1.0.4/![]() 1.0.1
1.0.1
 Ending lag (FAF 38 → 50).
 Second hit knockback scaling (95 clean)/90 (late) → 97/92).
Hitboxes[edit]
Timing[edit]
| Charges between | 6-7 |
|---|---|
| Hit 1 | 13 |
| Hit 2 clean | 16-18 |
| Hit 2 late | 19-26 |
| Interruptible | 50 |
| Animation length | 59 |
Lag time |
Charge interval |
Hitbox |
Hitbox change |
Interruptible |
|

