Bowser (SSBM)/Back roll: Difference between revisions
Mariogeek2 (talk | contribs) (Created page with "{{ArticleIcons|ssbm=y}} thumb|300px|Hurtbox visualization showing Bowser's spot dodge. ==Overview== {{Competitive expertise}} ==Timing== {|class="wikitable" !Intangible |4-19 |- !Animation length |39 |} {{FrameStripStart}} {{FrameStrip|t=Vulnerable|c=3}}{{FrameStrip|t=Intangible|c=16}}{{FrameStrip|t=Vulnerable|c=20}} {{FrameStripEnd}} {{FrameIconLegend|vulnerable=y|intangible=y}} {{MvSubNavBowser|g=SSBM}} Category:Bowser (SSBM) C...") Tag: Mobile edit |
Mariogeek2 (talk | contribs) m (→Timing: Added glide toss window) |
||
| (One intermediate revision by the same user not shown) | |||
| Line 2: | Line 2: | ||
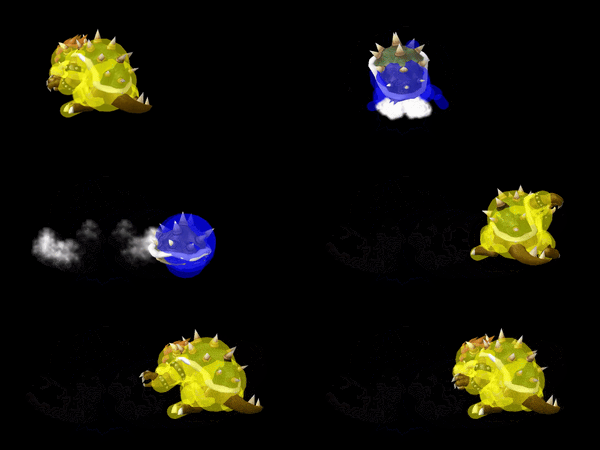
[[File:BowserBackRollSSBM.gif|thumb|300px|Hurtbox visualization showing Bowser's spot dodge.]] | [[File:BowserBackRollSSBM.gif|thumb|300px|Hurtbox visualization showing Bowser's spot dodge.]] | ||
==Overview== | ==Overview== | ||
{{ | Bowser retreats into his shell, becoming fully [[intangible]], before spinning along the ground backwards in a manner similar to the animation of his {{mvsub|Bowser|SSBM|down smash}}. The move is the worst back roll in all of ''Melee'': while it has the median [[start-up]] and number of intangibility [[frame]]s, it has the 2nd-highest [[end lag]] of any back roll (only behind {{mvsub|Samus|SSBM|back roll|poss=y}}), and the [[Roll#Back_rolls|shortest distance traveled]]. Even if it did not have such horrible stats, Bowser has a far superior [[out of shield]] and escape option in the form of grounded [[Bowser (SSBM)/Up special|Whirling Fortress]], which grants Bowser frame-1 intangibility while also putting out a hitbox, and can even have its end lag cancelled by [[Fortress hogging]]. This all leaves Bowser's back roll with no practical use, making it an ''avoid-at-all-cost'' move. | ||
==Timing== | ==Timing== | ||
| Line 8: | Line 8: | ||
!Intangible | !Intangible | ||
|4-19 | |4-19 | ||
|- | |||
!Glide toss window | |||
|2-6 | |||
|- | |- | ||
!Animation length | !Animation length | ||
| Line 14: | Line 17: | ||
{{FrameStripStart}} | {{FrameStripStart}} | ||
{{FrameStrip|t=Vulnerable|c=3}}{{FrameStrip|t=Intangible|c=16}}{{FrameStrip|t=Vulnerable|c=20}} | !Intangibility {{FrameStrip|t=Vulnerable|c=3}}{{FrameStrip|t=Intangible|c=16}}{{FrameStrip|t=Vulnerable|c=20}} | ||
|- | |||
!Glide toss {{FrameStrip|t=Blank|c=1}}{{FrameStrip|t=Continuable|c=5}}{{FrameStrip|t=Blank|c=33}} | |||
{{FrameStripEnd}} | {{FrameStripEnd}} | ||
{{FrameIconLegend|vulnerable=y|intangible=y}} | {{FrameIconLegend|vulnerable=y|intangible=y|continuable=y}} | ||
{{MvSubNavBowser|g=SSBM}} | {{MvSubNavBowser|g=SSBM}} | ||
[[Category:Bowser (SSBM)]] | [[Category:Bowser (SSBM)]] | ||
[[Category:Dodges (SSBM)]] | [[Category:Dodges (SSBM)]] | ||
Latest revision as of 11:12, December 20, 2024
Overview[edit]
Bowser retreats into his shell, becoming fully intangible, before spinning along the ground backwards in a manner similar to the animation of his down smash. The move is the worst back roll in all of Melee: while it has the median start-up and number of intangibility frames, it has the 2nd-highest end lag of any back roll (only behind Samus's back roll), and the shortest distance traveled. Even if it did not have such horrible stats, Bowser has a far superior out of shield and escape option in the form of grounded Whirling Fortress, which grants Bowser frame-1 intangibility while also putting out a hitbox, and can even have its end lag cancelled by Fortress hogging. This all leaves Bowser's back roll with no practical use, making it an avoid-at-all-cost move.
Timing[edit]
| Intangible | 4-19 |
|---|---|
| Glide toss window | 2-6 |
| Animation length | 39 |
| Intangibility | |||||||||||||||||||||||||||||||||||||||
|---|---|---|---|---|---|---|---|---|---|---|---|---|---|---|---|---|---|---|---|---|---|---|---|---|---|---|---|---|---|---|---|---|---|---|---|---|---|---|---|
| Glide toss |
Vulnerable |
Intangible |
Continuable |
|
