Fox (SSBM)/Dash attack: Difference between revisions
No edit summary |
Mariogeek2 (talk | contribs) m (→Timing: replaced FrameStrips with FrameStripBGMelee.) Tag: Mobile edit |
||
| (4 intermediate revisions by 3 users not shown) | |||
| Line 4: | Line 4: | ||
==Overview== | ==Overview== | ||
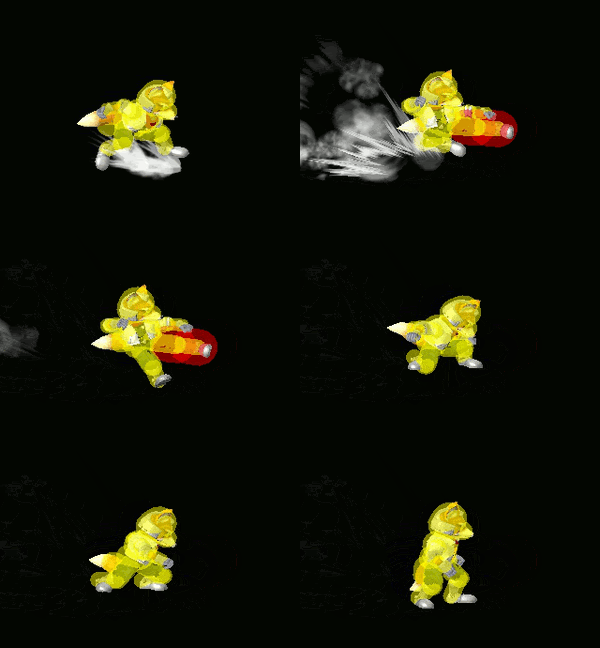
Fox does a running kick. Due to its long range, slight increase in movement speed at the start of the animation, and 4 frame startup, Fox's dash attack makes for an excellent whiff punishing option, albeit with weaknesses. Its low knockback makes it easily ASDI-down teched until well-over 100% for most of the cast, and its high endlag can make it unsafe on hit at low percents regardless of the opponent using crouch-cancelling or being in the air. Within combos and on a successful hit on an airborne opponent, it serves as an excellent combo starter and one of Fox's key kill confirms. Against fast-fallers, it will easily combo into upsmash in its kill percent range on everything except [[DI]] away, which Fox can instead opt to do a tech-chase into upsmash from instead. Against mid-fallers and some floaties (such as Doctor Mario, Peach, and Luigi), it can true combo into up air at kill percent. Altogether, a move with some inherent risk attached due to its vulnerability to crouch cancelling and ASDI-down, but excellent reward when used correctly. | Fox does a running kick. Due to its long range, slight increase in movement speed at the start of the animation, and 4 frame startup, Fox's dash attack makes for an excellent whiff punishing option, albeit with weaknesses. Its low knockback makes it easily ASDI-down teched until well-over 100% for most of the cast, and its high endlag can make it unsafe on hit at low percents regardless of the opponent using crouch-cancelling or being in the air. Within combos and on a successful hit on an airborne opponent, it serves as an excellent combo starter and one of Fox's key kill confirms. Against fast-fallers, it will easily combo into upsmash in its kill percent range on everything except [[DI]] away, which Fox can instead opt to do a tech-chase into upsmash from instead. Against mid-fallers and some floaties (such as Doctor Mario, Peach, and Luigi), it can true combo into up air at kill percent. Altogether, a move with some inherent risk attached due to its vulnerability to crouch cancelling and ASDI-down, but excellent reward when used correctly. | ||
==Hitboxes== | ==Hitboxes== | ||
{{MeleeHitboxTableHeader}} | {{MeleeHitboxTableHeader}} | ||
| Line 74: | Line 75: | ||
!Late hit | !Late hit | ||
|8-17 | |8-17 | ||
|- | |||
!Boost grab window | |||
|2-4 | |||
|- | |- | ||
!Interruptible | !Interruptible | ||
| Line 83: | Line 87: | ||
{{FrameStripStart}} | {{FrameStripStart}} | ||
{{FrameStrip|t=Lag|c=3}}{{FrameStrip|t=Hitbox|c=4|e=HitboxChangeS}}{{FrameStrip|t=Hitbox|c=10|s=HitboxChangeE}}{{FrameStrip|t=Lag|c=18}}{{FrameStrip|t=Interruptible|c=4}} | !Hitboxes {{FrameStrip|t=Lag|c=3}}{{FrameStrip|t=Hitbox|c=4|e=HitboxChangeS}}{{FrameStrip|t=Hitbox|c=10|s=HitboxChangeE}}{{FrameStrip|t=Lag|c=18}}{{FrameStrip|t=Interruptible|c=4}} | ||
|- | |||
!Boost grab {{FrameStripBGMelee|al=39}} | |||
{{FrameStripEnd}} | {{FrameStripEnd}} | ||
{{FrameIconLegend|lag=y|hitbox=y|hitboxchange=y|interruptible=y}} | {{FrameIconLegend|lag=y|hitbox=y|hitboxchange=y|interruptible=y|continuable=y}} | ||
==Similar moves== | |||
*{{mvsub|Falco|SSBM|dash attack|poss=y}} | |||
{{MvSubNavFox|g=SSBM}} | {{MvSubNavFox|g=SSBM}} | ||
[[Category:Fox (SSBM)]] | [[Category:Fox (SSBM)]] | ||
[[Category:Dash attacks (SSBM)]] | [[Category:Dash attacks (SSBM)]] | ||
Latest revision as of 13:04, January 10, 2025
Overview[edit]
Fox does a running kick. Due to its long range, slight increase in movement speed at the start of the animation, and 4 frame startup, Fox's dash attack makes for an excellent whiff punishing option, albeit with weaknesses. Its low knockback makes it easily ASDI-down teched until well-over 100% for most of the cast, and its high endlag can make it unsafe on hit at low percents regardless of the opponent using crouch-cancelling or being in the air. Within combos and on a successful hit on an airborne opponent, it serves as an excellent combo starter and one of Fox's key kill confirms. Against fast-fallers, it will easily combo into upsmash in its kill percent range on everything except DI away, which Fox can instead opt to do a tech-chase into upsmash from instead. Against mid-fallers and some floaties (such as Doctor Mario, Peach, and Luigi), it can true combo into up air at kill percent. Altogether, a move with some inherent risk attached due to its vulnerability to crouch cancelling and ASDI-down, but excellent reward when used correctly.
Hitboxes[edit]
Timing[edit]
| Clean hit | 4-7 |
|---|---|
| Late hit | 8-17 |
| Boost grab window | 2-4 |
| Interruptible | 36 |
| Animation length | 39 |
| Hitboxes | |||||||||||||||||||||||||||||||||||||||
|---|---|---|---|---|---|---|---|---|---|---|---|---|---|---|---|---|---|---|---|---|---|---|---|---|---|---|---|---|---|---|---|---|---|---|---|---|---|---|---|
| Boost grab |
Lag time |
Hitbox |
Hitbox change |
Continuable |
Interruptible |
Similar moves[edit]

