[dismiss]
| Welcome to SmashWiki! Log in or create an account and join the community, and don't forget to read this first! |
| Notices |
|---|
| SmashWiki will be experiencing a server migration on April 16th, 2025, expected to begin at 7:00 am (EDT) and lasting for up to 12 hours. The wiki may be entirely unavailable during that time. |
Daisy (SSBU)/Neutral attack/Hit 1: Difference between revisions
From SmashWiki, the Super Smash Bros. wiki
Jump to navigationJump to search
m (→Hitboxes) |
m (Eliminating awkward byte-saving method) |
||
| (6 intermediate revisions by 4 users not shown) | |||
| Line 1: | Line 1: | ||
{{ArticleIcons|ssbu=y}} | {{ArticleIcons|ssbu=y}} | ||
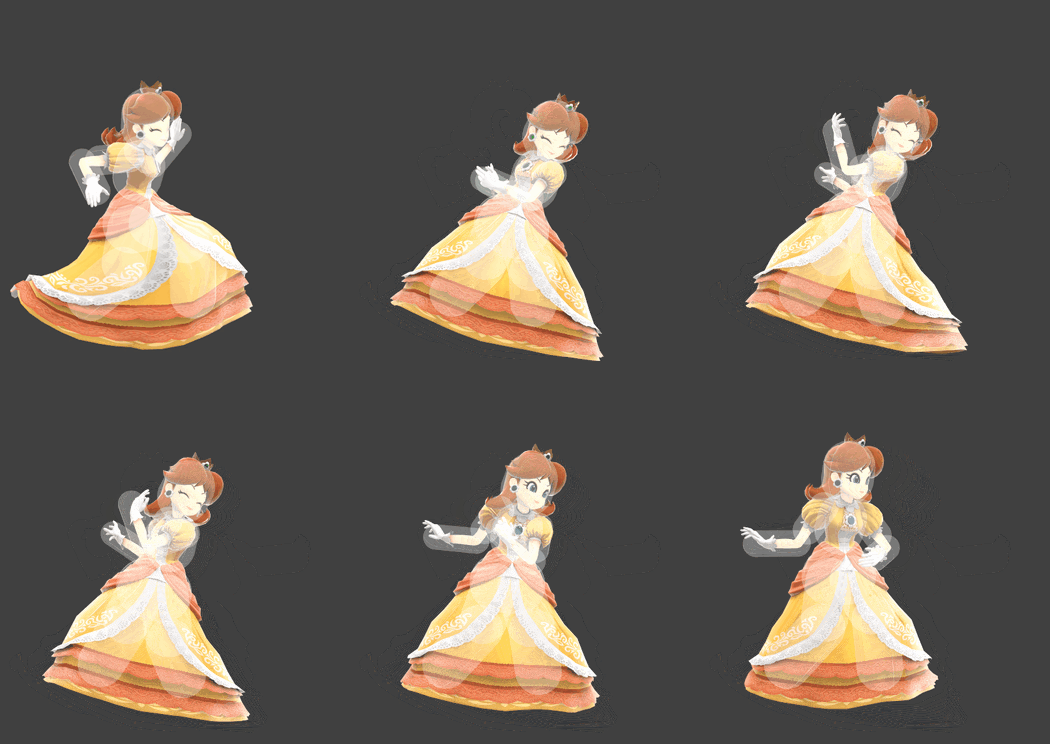
[[File: | [[File:DaisyJab1SSBU.gif|thumb|350px|Hitbox visualization showing Daisy's first jab.]] | ||
==Overview== | ==Overview== | ||
Daisy slaps inwards with the | Daisy slaps inwards with the {{rollover|leading arm|left arm if facing right, vice versa|?}}. The first hit of neutral attack deals 2.0% damage. | ||
While pressuring the opponent's shield, neutral attack's first hit can be used to attack the opponent before they act [[out of shield]] along with the second hit. However | While pressuring the opponent's shield, neutral attack's first hit can be used to attack the opponent before they act [[out of shield]] along with the second hit. However this option can be countered if the opponent continues shield. The first hit of neutral attack is one of Daisy's fastest out of shield options. It can be used after performing a [[perfect shield]]. If two attacks collide to each other, Daisy can immediately perform neutral attack. Daisy can perform neutral attack after mashing out of the opponent's grab. | ||
At low percentages, neutral aerial can combo into | At low percentages, neutral aerial can combo into neutral attack. The move can set up [[jab reset]]s. | ||
==Update History== | ==Update History== | ||
'''{{GameIcon|ssbu}} {{SSBU|3.1.0}}''' | '''{{GameIcon|ssbu}} {{SSBU|3.1.0}}''' | ||
*{{buff|Neutral attack 1 connects into neutral attack 2 more reliably.}} | *{{buff|Neutral attack 1 connects into neutral attack 2 more reliably.}} | ||
*{{ | *{{newbug|Introduced a minor bug where neutral attack 1 would no longer produce the correct sound unless Peach is also in the match.}} | ||
'''{{GameIcon|ssbu}} {{SSBU|4.0.0}}''' | '''{{GameIcon|ssbu}} {{SSBU|4.0.0}}''' | ||
*{{bugfix|Neutral attack 1 now makes the correct sound, regardless of whether Peach is present in the match or not.}} | *{{bugfix|Neutral attack 1 now makes the correct sound, regardless of whether Peach is present in the match or not.}} | ||
==Hitboxes== | ==Hitboxes== | ||
{{UltimateHitboxTableHeader}} | {{UltimateHitboxTableHeader}} | ||
| Line 21: | Line 22: | ||
|damage=2.0% | |damage=2.0% | ||
|angle=361 | |angle=361 | ||
|af=3 | |||
|bk=30 | |bk=30 | ||
|ks=25 | |ks=25 | ||
| Line 39: | Line 41: | ||
|damage=2.0% | |damage=2.0% | ||
|angle=180 | |angle=180 | ||
|af=3 | |||
|hitbits=Fighter only | |||
|bk=20 | |bk=20 | ||
|ks=15 | |ks=15 | ||
| Line 57: | Line 61: | ||
|damage=2.0% | |damage=2.0% | ||
|angle=180 | |angle=180 | ||
|af=3 | |||
|hitbits=Fighter only | |||
|bk=20 | |bk=20 | ||
|ks=15 | |ks=15 | ||
| Line 75: | Line 81: | ||
|damage=2.0% | |damage=2.0% | ||
|angle=361 | |angle=361 | ||
|af=3 | |||
|bk=30 | |bk=30 | ||
|ks=25 | |ks=25 | ||
| Line 93: | Line 100: | ||
|damage=2.0% | |damage=2.0% | ||
|angle=361 | |angle=361 | ||
|af=3 | |||
|bk=20 | |bk=20 | ||
|ks=15 | |ks=15 | ||
| Line 111: | Line 119: | ||
==Timing== | ==Timing== | ||
{|class="wikitable" | {|class="wikitable" | ||
!Hitboxes | !colspan=2|Hitboxes | ||
|2 | |2 | ||
|- | |- | ||
! | !rowspan=2|Continuability!!Held on hit or tapped | ||
|7 | |7-30 | ||
|- | |- | ||
!Interruptible | !Held without hitting | ||
|14 | |||
|- | |||
!colspan=2|Interruptible | |||
|28 | |28 | ||
|- | |- | ||
!Animation length | !colspan=2|Animation length | ||
|37 | |37 | ||
|} | |} | ||
{{FrameStripStart}} | {{FrameStripStart}} | ||
{{FrameStrip|t=Lag|c=1}}{{FrameStrip|t=Hitbox|c=1}}{{FrameStrip|t=Lag|c=4|e=LagContinuableS}}{{FrameStrip|t=Lag|c= | {{FrameStrip|t=Lag|c=1}}{{FrameStrip|t=Hitbox|c=1}}{{FrameStrip|t=Lag|c=4|e=LagContinuableS}}{{FrameStrip|t=Lag|c=7|s=LagContinuableE|e=LagContinuableS}}{{FrameStrip|t=Lag|c=14|s=LagContinuableE}}{{FrameStrip|t=Interruptible|c=10}} | ||
|- | |||
{{FrameStrip|t=Blank|c=6}}{{FrameStrip|t=Continuable|c=24}}{{FrameStrip|t=Blank|c=7}} | |||
{{FrameStripEnd}} | {{FrameStripEnd}} | ||
{{FrameIconLegend|lag=y|hitbox=y|earliestcontinuable=y|interruptible=y}} | {{FrameIconLegend|lag=y|hitbox=y|earliestcontinuable=y|continuable=y|interruptible=y}} | ||
{{MvSubNavDaisy|g=SSBU}} | {{MvSubNavDaisy|g=SSBU}} | ||
[[Category:Daisy (SSBU)]] | [[Category:Daisy (SSBU)]] | ||
[[Category:Neutral attacks (SSBU)]] | [[Category:Neutral attacks (SSBU)]] | ||
Latest revision as of 17:59, April 15, 2025
Overview[edit]
Daisy slaps inwards with the leading arm. The first hit of neutral attack deals 2.0% damage.
While pressuring the opponent's shield, neutral attack's first hit can be used to attack the opponent before they act out of shield along with the second hit. However this option can be countered if the opponent continues shield. The first hit of neutral attack is one of Daisy's fastest out of shield options. It can be used after performing a perfect shield. If two attacks collide to each other, Daisy can immediately perform neutral attack. Daisy can perform neutral attack after mashing out of the opponent's grab.
At low percentages, neutral aerial can combo into neutral attack. The move can set up jab resets.
Update History[edit]
 Neutral attack 1 connects into neutral attack 2 more reliably.
Introduced a minor bug where neutral attack 1 would no longer produce the correct sound unless Peach is also in the match.
 Neutral attack 1 now makes the correct sound, regardless of whether Peach is present in the match or not.
Hitboxes[edit]
Timing[edit]
| Hitboxes | 2 | |
|---|---|---|
| Continuability | Held on hit or tapped | 7-30 |
| Held without hitting | 14 | |
| Interruptible | 28 | |
| Animation length | 37 | |
Lag time |
Hitbox |
Continuable |
Earliest continuable point |
Interruptible |
|

