Super Smash Bros. Ultimate

Min Min (SSBU)/Neutral attack/Hit 2: Difference between revisions

From SmashWiki, the Super Smash Bros. wiki
Jump to navigationJump to search
m (Added hitstun)
 
(One intermediate revision by the same user not shown)
Line 10: Line 10:
|damage=2.0%
|damage=2.0%
|angle=60
|angle=60
|af=3
|bk=30
|bk=30
|ks=20
|ks=20
|fkv=0
|fkv=0
|setweight=t
|r=3.5
|r=3.5
|bn=top
|bn=top
Line 29: Line 31:
|damage=2.0%
|damage=2.0%
|angle=80
|angle=80
|af=3
|bk=30
|bk=30
|ks=20
|ks=20
|fkv=0
|fkv=0
|setweight=t
|r=4.0
|r=4.0
|bn=top
|bn=top
Line 48: Line 52:
|damage=2.0%
|damage=2.0%
|angle=93
|angle=93
|af=3
|bk=30
|bk=30
|ks=20
|ks=20
|fkv=0
|fkv=0
|setweight=t
|r=4.0
|r=4.0
|bn=top
|bn=top
Line 66: Line 72:


==Timing==
==Timing==
The third jab and rapid jab have different continuability windows, with the latter being shorter and taking priority. The move transitions into the rapid jab if, since the start of the first jab and before the end of the rapid jab window, the attack button has been pressed and released at least 3 times. Otherwise, it transitions into the third jab.
{|class="wikitable"
{|class="wikitable"
!Hitboxes
!colspan=2|Hitboxes
|8-9
|8-9
|-
|-
!Earliest continuable
!rowspan=3|Continuability!!Rapid jab
|15
|14
|-
|-
!Interruptible
!Jab 3 (held on hit or tapped)
|15-31
|-
!Jab 3 (held without hitting)
|18
|-
!colspan=2|Interruptible
|32
|32
|-
|-
!Animation length
!colspan=2|Animation length
|39
|39
|}
|}


{{FrameStripStart}}
{{FrameStripStart}}
{{FrameStrip|t=Lag|c=7}}{{FrameStrip|t=Hitbox|c=2}}{{FrameStrip|t=Lag|c=5|e=LagContinuableS}}{{FrameStrip|t=Lag|c=17|s=LagContinuableE}}{{FrameStrip|t=Interruptible|c=8}}
!Hitboxes {{FrameStrip|t=Lag|c=7}}{{FrameStrip|t=Hitbox|c=2}}{{FrameStrip|t=Lag|c=4|e=LagContinuableS}}{{FrameStrip|t=Lag|c=1|s=LagContinuableM}}{{FrameStrip|t=Lag|c=3|s=LagContinuableE|e=LagContinuableS}}{{FrameStrip|t=Lag|c=14|s=LagContinuableE}}{{FrameStrip|t=Interruptible|c=8}}
|-
!Rapid jab {{FrameStrip|t=Blank|c=13}}{{FrameStrip|t=Continuable|c=1}}{{FrameStrip|t=Blank|c=25}}
|-
!Jab 3 {{FrameStrip|t=Blank|c=14}}{{FrameStrip|t=Continuable|c=17}}{{FrameStrip|t=Blank|c=8}}
{{FrameStripEnd}}
{{FrameStripEnd}}


{{FrameIconLegend|lag=y|hitbox=y|earliestcontinuable=y|interruptible=y}}
{{FrameIconLegend|lag=y|hitbox=y|earliestcontinuable=y|continuable=y|interruptible=y}}


{{MvSubNavMinMin|g=SSBU}}
[[Category:Min Min (SSBU)]]
[[Category:Min Min (SSBU)]]
[[Category:Neutral attacks (SSBU)]]
[[Category:Neutral attacks (SSBU)]]

Latest revision as of 16:25, August 6, 2022

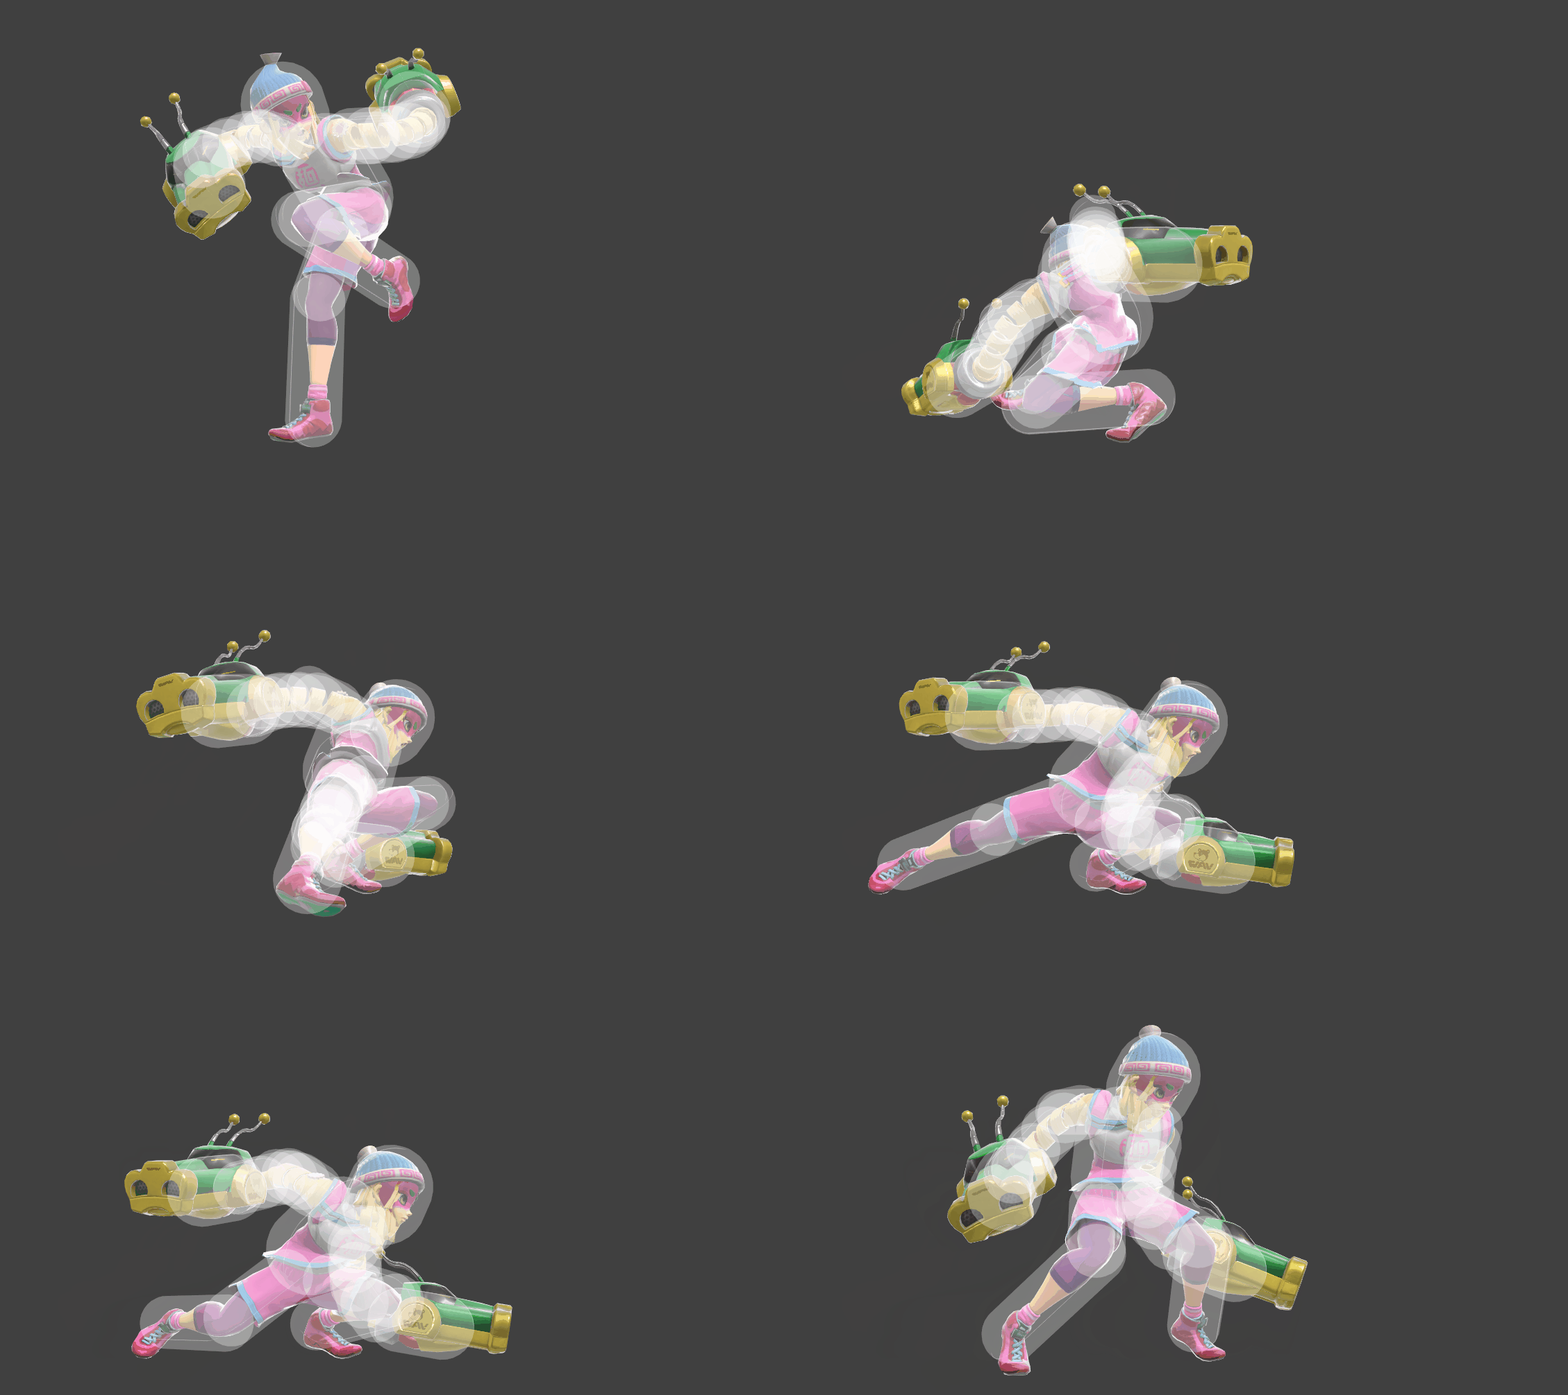
Hitbox visualization showing Min Min's second jab.
Competitive.png This article or section may require competitive expertise.
You can discuss this issue on the talk page or edit this page to improve it.

Overview[edit]

Hitboxes[edit]

ID Part Rehit rate Damage SD Angle Angle type BK KS FKV Set weight Radius Bone Offset SDI× T% Clang Rebound Effect Type G A Sound Direct Hit bits Hit part Blockable Reflectable Absorbable Flinchless No GFX Heedless Hitstun
0 0 0 2.0% 0 AngleIcon60.png Forward 30 20 0 HitboxTableIcon(True).png 3.5 top 0.0 4.0 4.0 1.4× 1.0× 0% HitboxTableIcon(Clang).png HitboxTableIcon(Rebound).png Normal (effect) Foot (type) HitboxTableIcon(GroundedTrue).png HitboxTableIcon(AerialTrue).png S Kick SpecialsDirect.png All All HitboxTableIcon(Blockable).png HitboxTableIcon(Unreflectable).png HitboxTableIcon(Unabsorbable).png HitboxTableIcon(False).png HitboxTableIcon(False).png HitboxTableIcon(False).png +8 frames
1 0 0 2.0% 0 AngleIcon80.png Forward 30 20 0 HitboxTableIcon(True).png 4.0 top 0.0 4.0 9.0 1.4× 1.0× 0% HitboxTableIcon(Clang).png HitboxTableIcon(Rebound).png Normal (effect) Foot (type) HitboxTableIcon(GroundedTrue).png HitboxTableIcon(AerialTrue).png S Kick SpecialsDirect.png All All HitboxTableIcon(Blockable).png HitboxTableIcon(Unreflectable).png HitboxTableIcon(Unabsorbable).png HitboxTableIcon(False).png HitboxTableIcon(False).png HitboxTableIcon(False).png +8 frames
2 0 0 2.0% 0 AngleIcon93.png Forward 30 20 0 HitboxTableIcon(True).png 4.0 top 0.0 4.0 14.0 1.4× 1.0× 0% HitboxTableIcon(Clang).png HitboxTableIcon(Rebound).png Normal (effect) Foot (type) HitboxTableIcon(GroundedTrue).png HitboxTableIcon(AerialTrue).png S Kick SpecialsDirect.png All All HitboxTableIcon(Blockable).png HitboxTableIcon(Unreflectable).png HitboxTableIcon(Unabsorbable).png HitboxTableIcon(False).png HitboxTableIcon(False).png HitboxTableIcon(False).png +8 frames

Timing[edit]

The third jab and rapid jab have different continuability windows, with the latter being shorter and taking priority. The move transitions into the rapid jab if, since the start of the first jab and before the end of the rapid jab window, the attack button has been pressed and released at least 3 times. Otherwise, it transitions into the third jab.

Hitboxes 8-9
Continuability Rapid jab 14
Jab 3 (held on hit or tapped) 15-31
Jab 3 (held without hitting) 18
Interruptible 32
Animation length 39
Hitboxes  FrameIcon(Lag).png FrameIcon(Lag).png FrameIcon(Lag).png FrameIcon(Lag).png FrameIcon(Lag).png FrameIcon(Lag).png FrameIcon(Lag).png FrameIcon(Hitbox).png FrameIcon(Hitbox).png FrameIcon(Lag).png FrameIcon(Lag).png FrameIcon(Lag).png FrameIcon(LagContinuableS).png FrameIcon(LagContinuableM).png FrameIcon(LagContinuableE).png FrameIcon(Lag).png FrameIcon(LagContinuableS).png FrameIcon(LagContinuableE).png FrameIcon(Lag).png FrameIcon(Lag).png FrameIcon(Lag).png FrameIcon(Lag).png FrameIcon(Lag).png FrameIcon(Lag).png FrameIcon(Lag).png FrameIcon(Lag).png FrameIcon(Lag).png FrameIcon(Lag).png FrameIcon(Lag).png FrameIcon(Lag).png FrameIcon(Lag).png FrameIcon(Interruptible).png FrameIcon(Interruptible).png FrameIcon(Interruptible).png FrameIcon(Interruptible).png FrameIcon(Interruptible).png FrameIcon(Interruptible).png FrameIcon(Interruptible).png FrameIcon(Interruptible).png
Rapid jab  FrameIcon(Blank).png FrameIcon(Blank).png FrameIcon(Blank).png FrameIcon(Blank).png FrameIcon(Blank).png FrameIcon(Blank).png FrameIcon(Blank).png FrameIcon(Blank).png FrameIcon(Blank).png FrameIcon(Blank).png FrameIcon(Blank).png FrameIcon(Blank).png FrameIcon(Blank).png FrameIcon(Continuable).png FrameIcon(Blank).png FrameIcon(Blank).png FrameIcon(Blank).png FrameIcon(Blank).png FrameIcon(Blank).png FrameIcon(Blank).png FrameIcon(Blank).png FrameIcon(Blank).png FrameIcon(Blank).png FrameIcon(Blank).png FrameIcon(Blank).png FrameIcon(Blank).png FrameIcon(Blank).png FrameIcon(Blank).png FrameIcon(Blank).png FrameIcon(Blank).png FrameIcon(Blank).png FrameIcon(Blank).png FrameIcon(Blank).png FrameIcon(Blank).png FrameIcon(Blank).png FrameIcon(Blank).png FrameIcon(Blank).png FrameIcon(Blank).png FrameIcon(Blank).png
Jab 3  FrameIcon(Blank).png FrameIcon(Blank).png FrameIcon(Blank).png FrameIcon(Blank).png FrameIcon(Blank).png FrameIcon(Blank).png FrameIcon(Blank).png FrameIcon(Blank).png FrameIcon(Blank).png FrameIcon(Blank).png FrameIcon(Blank).png FrameIcon(Blank).png FrameIcon(Blank).png FrameIcon(Blank).png FrameIcon(Continuable).png FrameIcon(Continuable).png FrameIcon(Continuable).png FrameIcon(Continuable).png FrameIcon(Continuable).png FrameIcon(Continuable).png FrameIcon(Continuable).png FrameIcon(Continuable).png FrameIcon(Continuable).png FrameIcon(Continuable).png FrameIcon(Continuable).png FrameIcon(Continuable).png FrameIcon(Continuable).png FrameIcon(Continuable).png FrameIcon(Continuable).png FrameIcon(Continuable).png FrameIcon(Continuable).png FrameIcon(Blank).png FrameIcon(Blank).png FrameIcon(Blank).png FrameIcon(Blank).png FrameIcon(Blank).png FrameIcon(Blank).png FrameIcon(Blank).png FrameIcon(Blank).png
Legend (1 square = 1 frame)
Lag
Lag time
Hitbox
Hitbox
FrameIcon(Continuable).png
Continuable
FrameIcon(BlankContinuableS).pngFrameIcon(BlankContinuableE).png
Earliest continuable point
Interruptibility
Interruptible