Daisy (SSBU)/Down smash: Difference between revisions
Raul Retana (talk | contribs) mNo edit summary |
Derekblue1 (talk | contribs) (→Overview: edited overview) |
||
| (2 intermediate revisions by 2 users not shown) | |||
| Line 1: | Line 1: | ||
{{ArticleIcons|ssbu=y}} | {{ArticleIcons|ssbu=y}} | ||
[[File:DaisyDSmash.gif|thumb| | [[File:DaisyDSmash.gif|thumb|350px|Hitbox visualization showing Daisy's down smash.]] | ||
==Overview== | ==Overview== | ||
{{See also|Peach (SSBU)/Down smash}} | |||
{{:Peach (SSBU)/Down smash|Daisy}} | |||
==Hitboxes== | ==Hitboxes== | ||
{{UltimateHitboxTableHeader}} | {{UltimateHitboxTableHeader}} | ||
{{HitboxTableTitle|Hits 1-6| | {{HitboxTableTitle|Hits 1-6|50}} | ||
{{UltimateHitboxTableRow | {{UltimateHitboxTableRow | ||
|id=0 | |id=0 | ||
| Line 65: | Line 66: | ||
|slvl=S | |slvl=S | ||
}} | }} | ||
{{HitboxTableTitle|Hit 7| | {{HitboxTableTitle|Hit 7|50}} | ||
{{UltimateHitboxTableRow | {{UltimateHitboxTableRow | ||
|id=0 | |id=0 | ||
| Line 89: | Line 90: | ||
{|class="wikitable" | {|class="wikitable" | ||
!Charges between | !Charges between | ||
| | |2-3 | ||
|- | |- | ||
!Hits 1-6 | !Hits 1-6 | ||
| Line 105: | Line 106: | ||
{{FrameStripStart}} | {{FrameStripStart}} | ||
{{FrameStrip|t=Lag|c= | {{FrameStrip|t=Lag|c=2|e=LagChargeS}}{{FrameStrip|t=Lag|c=3|s=LagChargeE}}{{FrameStrip|t=Hitbox|c=2}}{{FrameStrip|t=Lag|c=2}}{{FrameStrip|t=Hitbox|c=2}}{{FrameStrip|t=Lag|c=2}}{{FrameStrip|t=Hitbox|c=2}}{{FrameStrip|t=Lag|c=2}}{{FrameStrip|t=Hitbox|c=2}}{{FrameStrip|t=Lag|c=2}}{{FrameStrip|t=Hitbox|c=2}}{{FrameStrip|t=Lag|c=2}}{{FrameStrip|t=Hitbox|c=2}}{{FrameStrip|t=Lag|c=2}}{{FrameStrip|t=Hitbox|c=2}}{{FrameStrip|t=Lag|c=23}}{{FrameStrip|t=Interruptible|c=15}} | ||
{{FrameStripEnd}} | {{FrameStripEnd}} | ||
{{FrameIconLegend|lag=y|charge=y|hitbox | {{FrameIconLegend|lag=y|charge=y|hitbox=y|interruptible=y}} | ||
{{MvSubNavDaisy|g=SSBU}} | {{MvSubNavDaisy|g=SSBU}} | ||
[[Category:Daisy (SSBU)]] | [[Category:Daisy (SSBU)]] | ||
[[Category:Down smashes (SSBU)]] | [[Category:Down smashes (SSBU)]] | ||
Latest revision as of 03:33, December 1, 2022
Overview[edit]
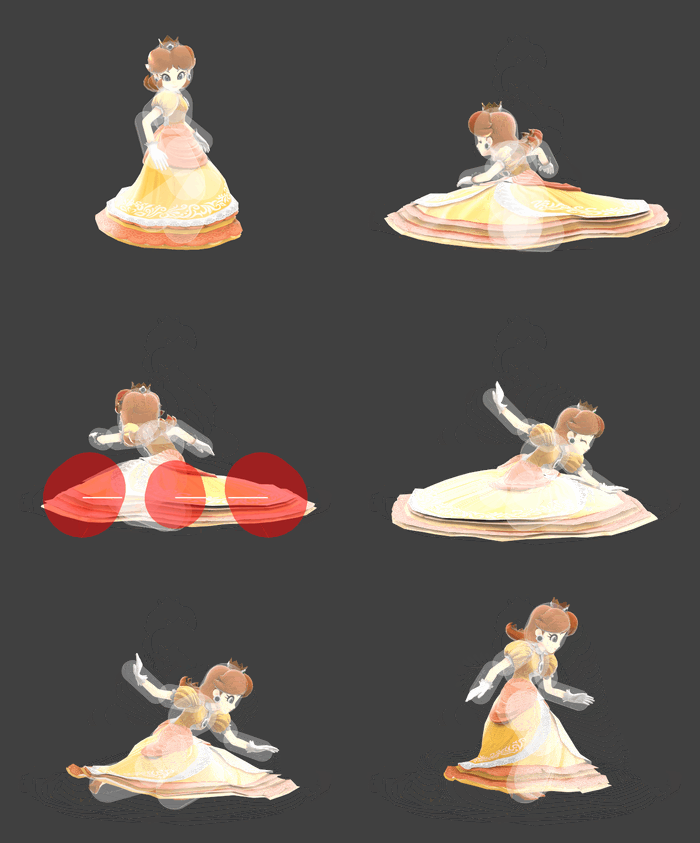
Daisy does a clockwise spin on her left leg and utilizes the edge of her dress. Down smash is a multi-hit smash attack. Each hit deals 2.0% damage (2.8% when fully charged) and the final hit deals 3% damage (4.2% when fully charged). Down smash deals 15% damage in total (21% damage in total). The animation length is longer than forward smash and up smash making the move punishable. If Daisy spotdodges, she can perform a down smash to launch opponents. Instead of 2 frame punishing the opponent with a down tilt, she can perform down smash at the ledge; the opponent may be launched at an unexpected angle. Down smash can finish the combo if the opponent is on the ground. While pressuring the opponent's shield, Daisy can perform down smash to shield poke.
Hitboxes[edit]
Timing[edit]
| Charges between | 2-3 |
|---|---|
| Hits 1-6 | 6-7, 10-11, 14-15, 18-19, 22-23, 26-27 |
| Hit 7 | 30-31 |
| Interruptible | 55 |
| Animation length | 69 |
Lag time |
Charge interval |
Hitbox |
Interruptible |
|
