SuperSqank (talk | contribs) (→Timing) |
m (→Timing) |
||
| (3 intermediate revisions by 2 users not shown) | |||
| Line 1: | Line 1: | ||
{{ArticleIcons|ssbb=y}} | {{ArticleIcons|ssbb=y}} | ||
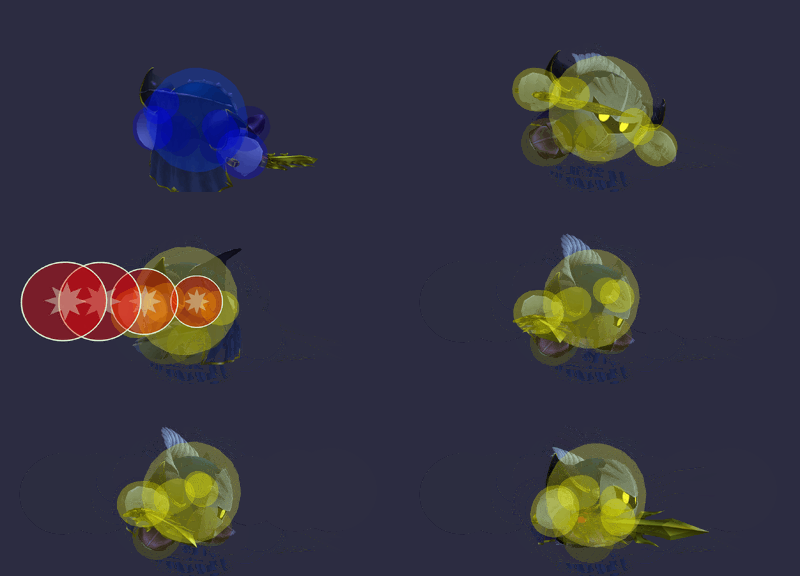
[[File:MetaKnightTripAttackSSBB.gif|thumb|400px|Hitbox visualization showing Meta Knight's trip attack.]] | |||
==Overview== | ==Overview== | ||
Meta Knight [[slash]]es on either side of himself. His trip attack comes out relatively quickly and can be used to escape tight [[tech-chasing]] situations, but it is rather [[punish]]able if the opponent [[shield]]s or avoids it. It is one of Meta Knight's few attacks that do not have [[transcendent priority]]. | Meta Knight [[slash]]es on either side of himself. His trip attack comes out relatively quickly and can be used to escape tight [[tech-chasing]] situations, but it is rather [[punish]]able if the opponent [[shield]]s or avoids it. It is one of Meta Knight's few attacks that do not have [[transcendent priority]]. | ||
==Hitboxes== | ==Hitboxes== | ||
{{ | {{BrawlHitboxTableHeader}} | ||
== | {{HitboxTableTitle|Hit 1|24}} | ||
{{BrawlHitboxTableRow | |||
|bn=3 | |||
|sd=1 | |||
|id=0 | |||
|damage=5% | |||
|angle=361 | |||
|bk=60 | |||
|ks=50 | |||
|fkv=0 | |||
|r=270000 | |||
|ypos=300000 | |||
|zpos=-900000 | |||
|rawflags=00111010100000110000011001000010 | |||
}} | |||
{{BrawlHitboxTableRow | |||
|bn=3 | |||
|sd=1 | |||
|id=1 | |||
|damage=5% | |||
|angle=361 | |||
|bk=60 | |||
|ks=50 | |||
|fkv=0 | |||
|r=270000 | |||
|ypos=300000 | |||
|zpos=-660000 | |||
|rawflags=00111010100000110000011001000010 | |||
}} | |||
{{BrawlHitboxTableRow | |||
|bn=3 | |||
|sd=1 | |||
|id=2 | |||
|damage=5% | |||
|angle=361 | |||
|bk=60 | |||
|ks=50 | |||
|fkv=0 | |||
|r=228000 | |||
|ypos=300000 | |||
|zpos=-360000 | |||
|rawflags=00111010100000110000011001000010 | |||
}} | |||
{{BrawlHitboxTableRow | |||
|bn=3 | |||
|sd=1 | |||
|id=3 | |||
|damage=5% | |||
|angle=361 | |||
|bk=60 | |||
|ks=50 | |||
|fkv=0 | |||
|r=180000 | |||
|ypos=300000 | |||
|rawflags=00111010100000110000011001000010 | |||
}} | |||
{{HitboxTableTitle|Hit 2|24}} | |||
{{BrawlHitboxTableRow | |||
|bn=3 | |||
|sd=1 | |||
|id=0 | |||
|damage=5% | |||
|angle=361 | |||
|bk=60 | |||
|ks=50 | |||
|fkv=0 | |||
|r=270000 | |||
|ypos=300000 | |||
|zpos=900000 | |||
|rawflags=00111010100000110000011001000010 | |||
}} | |||
{{BrawlHitboxTableRow | |||
|bn=3 | |||
|sd=1 | |||
|id=1 | |||
|damage=5% | |||
|angle=361 | |||
|bk=60 | |||
|ks=50 | |||
|fkv=0 | |||
|r=270000 | |||
|ypos=300000 | |||
|zpos=660000 | |||
|rawflags=00111010100000110000011001000010 | |||
}} | |||
{{BrawlHitboxTableRow | |||
|bn=3 | |||
|sd=1 | |||
|id=2 | |||
|damage=5% | |||
|angle=361 | |||
|bk=60 | |||
|ks=50 | |||
|fkv=0 | |||
|r=228000 | |||
|ypos=300000 | |||
|zpos=360000 | |||
|rawflags=00111010100000110000011001000010 | |||
}} | |||
{{BrawlHitboxTableRow | |||
|bn=3 | |||
|sd=1 | |||
|id=3 | |||
|damage=5% | |||
|angle=361 | |||
|bk=60 | |||
|ks=50 | |||
|fkv=0 | |||
|r=180000 | |||
|ypos=300000 | |||
|rawflags=00111010100000110000011001000010 | |||
}} | |||
|} | |||
==Timing== | ==Timing== | ||
{|class="wikitable" | {|class="wikitable" | ||
| Line 12: | Line 124: | ||
|1-8 | |1-8 | ||
|- | |- | ||
! | !Hit 1 | ||
|19-20 | |19-20 | ||
|- | |- | ||
! | !Hit 3 | ||
|25-26 | |25-26 | ||
|- | |- | ||
Latest revision as of 15:52, June 4, 2024
OverviewEdit
Meta Knight slashes on either side of himself. His trip attack comes out relatively quickly and can be used to escape tight tech-chasing situations, but it is rather punishable if the opponent shields or avoids it. It is one of Meta Knight's few attacks that do not have transcendent priority.
HitboxesEdit
TimingEdit
| Intangible | 1-8 |
|---|---|
| Hit 1 | 19-20 |
| Hit 3 | 25-26 |
| Animation length | 49 |
| Lag time |
Hitbox |
Vulnerable |
Intangible |
