Bowser Jr. (SSB4)/Down tilt: Difference between revisions
From SmashWiki, the Super Smash Bros. wiki
Jump to navigationJump to search
No edit summary |
No edit summary |
||
| (One intermediate revision by one other user not shown) | |||
| Line 3: | Line 3: | ||
==Overview== | ==Overview== | ||
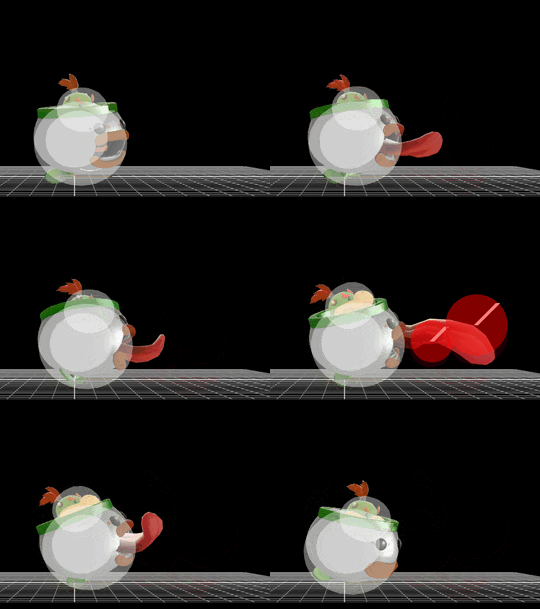
A large tongue comes out of the [[Junior Clown Car|Junior Clown Car's]] mouth, licking the opponent. The attack hits three times: 1.5% twice and another time for 5%, for a total of 8% if all hits connect. The attack has low knockback, launching the opponent forwards. | A large tongue comes out of the [[Junior Clown Car|Junior Clown Car's]] mouth, licking the opponent. The attack hits three times: 1.5% twice and another time for 5%, for a total of 8% if all hits connect. The attack has low [[knockback]], launching the opponent forwards. It has a fair amount of utility, as it is efficient at warding off rushdowns, can act as a set-up for a [[Bowser Jr. (SSB4)/Dash attack|dash attack]], or interfere with an opponent attempting to grab an edge due to its undulating [[hitbox]]. | ||
== | ==Hitbox Data== | ||
{| | {{SSB4HitboxTableHeader}} | ||
| | {{HitboxTableTitle|Hit 1|42}} | ||
{{SSB4HitboxTableRow | |||
| | |id=0 | ||
| 0 | |part=0 | ||
| | |damage=1.5% | ||
| | |angle=94 | ||
| | |bk=0 | ||
| | |ks=100 | ||
| | |fkv=30 | ||
|r=3.0 | |||
|bn=1040 | |||
|xpos=9.0 | |||
| | |ypos=0.0 | ||
|zpos=0.0 | |||
| | |type=Weapon | ||
| | |SDI=1.0 | ||
| | |trip=0 | ||
|sfx=Punch | |||
| | |slvl=S | ||
| 2 || | }} | ||
| | {{SSB4HitboxTableRow | ||
| | |id=1 | ||
| | |part=0 | ||
| | |damage=1.5% | ||
| | |angle=45 | ||
| | |bk=0 | ||
|ks=100 | |||
|fkv=30 | |||
|r=2.8 | |||
|bn=1040 | |||
|xpos=3.0 | |||
|ypos=1.0 | |||
|zpos=0.0 | |||
|type=Weapon | |||
|SDI=1.0 | |||
|trip=0 | |||
|sfx=Punch | |||
|slvl=S | |||
}} | |||
{{HitboxTableTitle|Hit 2|42}} | |||
{{SSB4HitboxTableRow | |||
|id=0 | |||
|part=0 | |||
|damage=1.5% | |||
|angle=94 | |||
|bk=0 | |||
|ks=100 | |||
|fkv=30 | |||
|r=3.0 | |||
|bn=1040 | |||
|xpos=9.0 | |||
|ypos=0.0 | |||
|zpos=0.0 | |||
|type=Weapon | |||
|SDI=1.0 | |||
|trip=0 | |||
|sfx=Punch | |||
|slvl=S | |||
}} | |||
{{SSB4HitboxTableRow | |||
|id=1 | |||
|part=0 | |||
|damage=1.5% | |||
|angle=55 | |||
|bk=0 | |||
|ks=100 | |||
|fkv=30 | |||
|r=2.8 | |||
|bn=1040 | |||
|xpos=3.0 | |||
|ypos=1.0 | |||
|zpos=0.0 | |||
|type=Weapon | |||
|SDI=1.0 | |||
|trip=0 | |||
|sfx=Punch | |||
|slvl=S | |||
}} | |||
{{HitboxTableTitle|Late hit|42}} | |||
{{SSB4HitboxTableRow | |||
|id=0 | |||
|part=0 | |||
|damage=1.5% | |||
|angle=45 | |||
|bk=20 | |||
|ks=150 | |||
|fkv=0 | |||
|r=4.0 | |||
|bn=1040 | |||
|xpos=9.5 | |||
|ypos=0.0 | |||
|zpos=0.0 | |||
|type=Weapon | |||
|SDI=1.0 | |||
|trip=0.4 | |||
|sfx=Punch | |||
|slvl=M | |||
}} | |||
{{SSB4HitboxTableRow | |||
|id=1 | |||
|part=0 | |||
|damage=1.5% | |||
|angle=45 | |||
|bk=20 | |||
|ks=150 | |||
|fkv=0 | |||
|r=2.8 | |||
|bn=1040 | |||
|xpos=3.0 | |||
|ypos=1.0 | |||
|zpos=0.0 | |||
|type=Weapon | |||
|SDI=1.0 | |||
|trip=0.4 | |||
|sfx=Punch | |||
|slvl=M | |||
}} | |||
|} | |} | ||
| Line 61: | Line 152: | ||
==References== | ==References== | ||
[http://opensa.dantarion.com/s4/mastercore2/index.php?char=koopajr&mode=view104 Master Core Alpha] | [http://opensa.dantarion.com/s4/mastercore2/index.php?char=koopajr&mode=view104 Master Core Alpha] | ||
{{MvSubNavBowserJr|g=SSB4}} | {{MvSubNavBowserJr|g=SSB4}} | ||
Latest revision as of 12:36, April 21, 2021
Overview[edit]
A large tongue comes out of the Junior Clown Car's mouth, licking the opponent. The attack hits three times: 1.5% twice and another time for 5%, for a total of 8% if all hits connect. The attack has low knockback, launching the opponent forwards. It has a fair amount of utility, as it is efficient at warding off rushdowns, can act as a set-up for a dash attack, or interfere with an opponent attempting to grab an edge due to its undulating hitbox.
Hitbox Data[edit]
Timing[edit]
| Hit 1 | 4-6 |
|---|---|
| Hit 2 | 12-14 |
| Hit 3 | 23-25 |
| Interruptible | 41 |
| Animation length | 44 |
Lag time |
Hitbox |
Interruptible |
References[edit]
|
