Super Smash Bros. Ultimate

Donkey Kong (SSBU)/Side special: Difference between revisions

From SmashWiki, the Super Smash Bros. wiki
Jump to navigationJump to search
(9.0.0)
 
(7 intermediate revisions by 6 users not shown)
Line 1: Line 1:
{{ArticleIcons|ssbu=y}}
{{disambig2|the hitbox visualization in ''Super Smash Bros. Ultimate''|the move itself|Headbutt}}
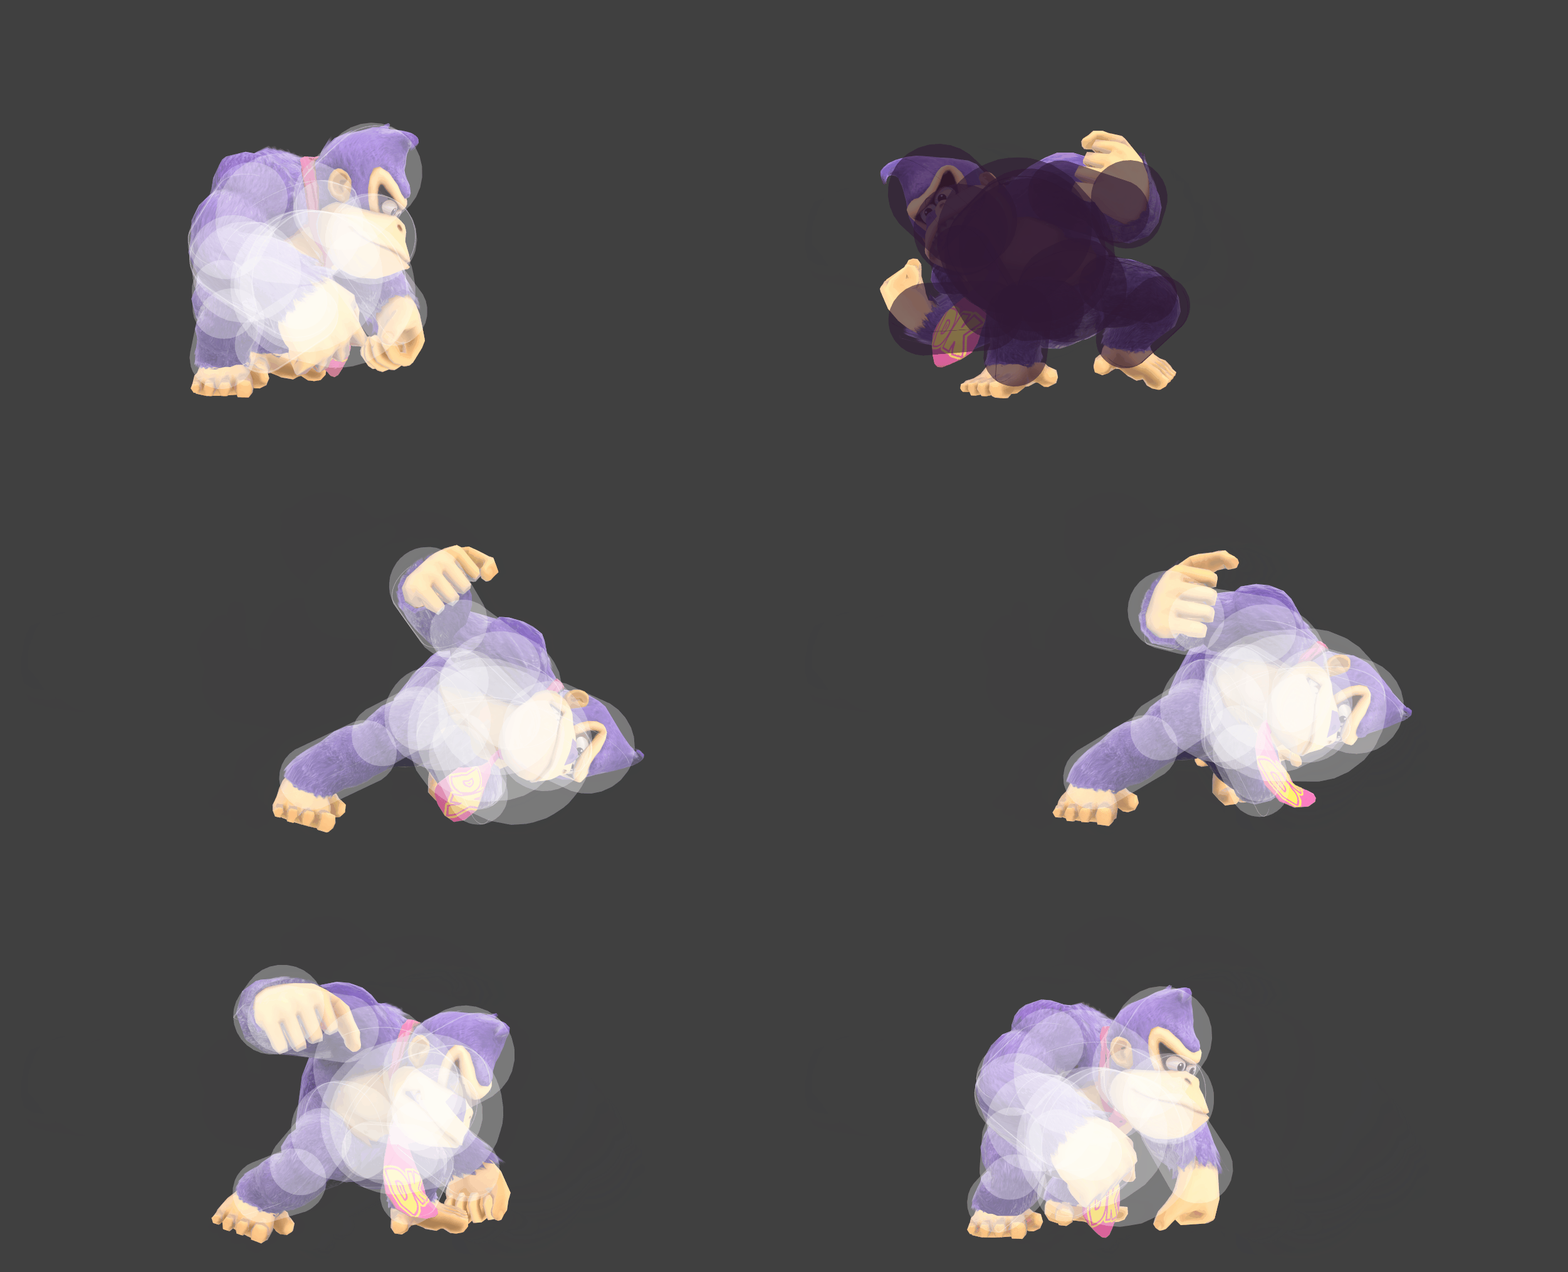
[[File:DonkeyKongHeadbuttGroundedSSBU.gif|350px|thumb|right|Hitbox visualization showing Donkey Kong's grounded side special, Headbutt.]]
[[File:DonkeyKongHeadbuttGroundedSSBU.gif|350px|thumb|Hitbox visualization showing Donkey Kong's grounded side special, Headbutt.]]
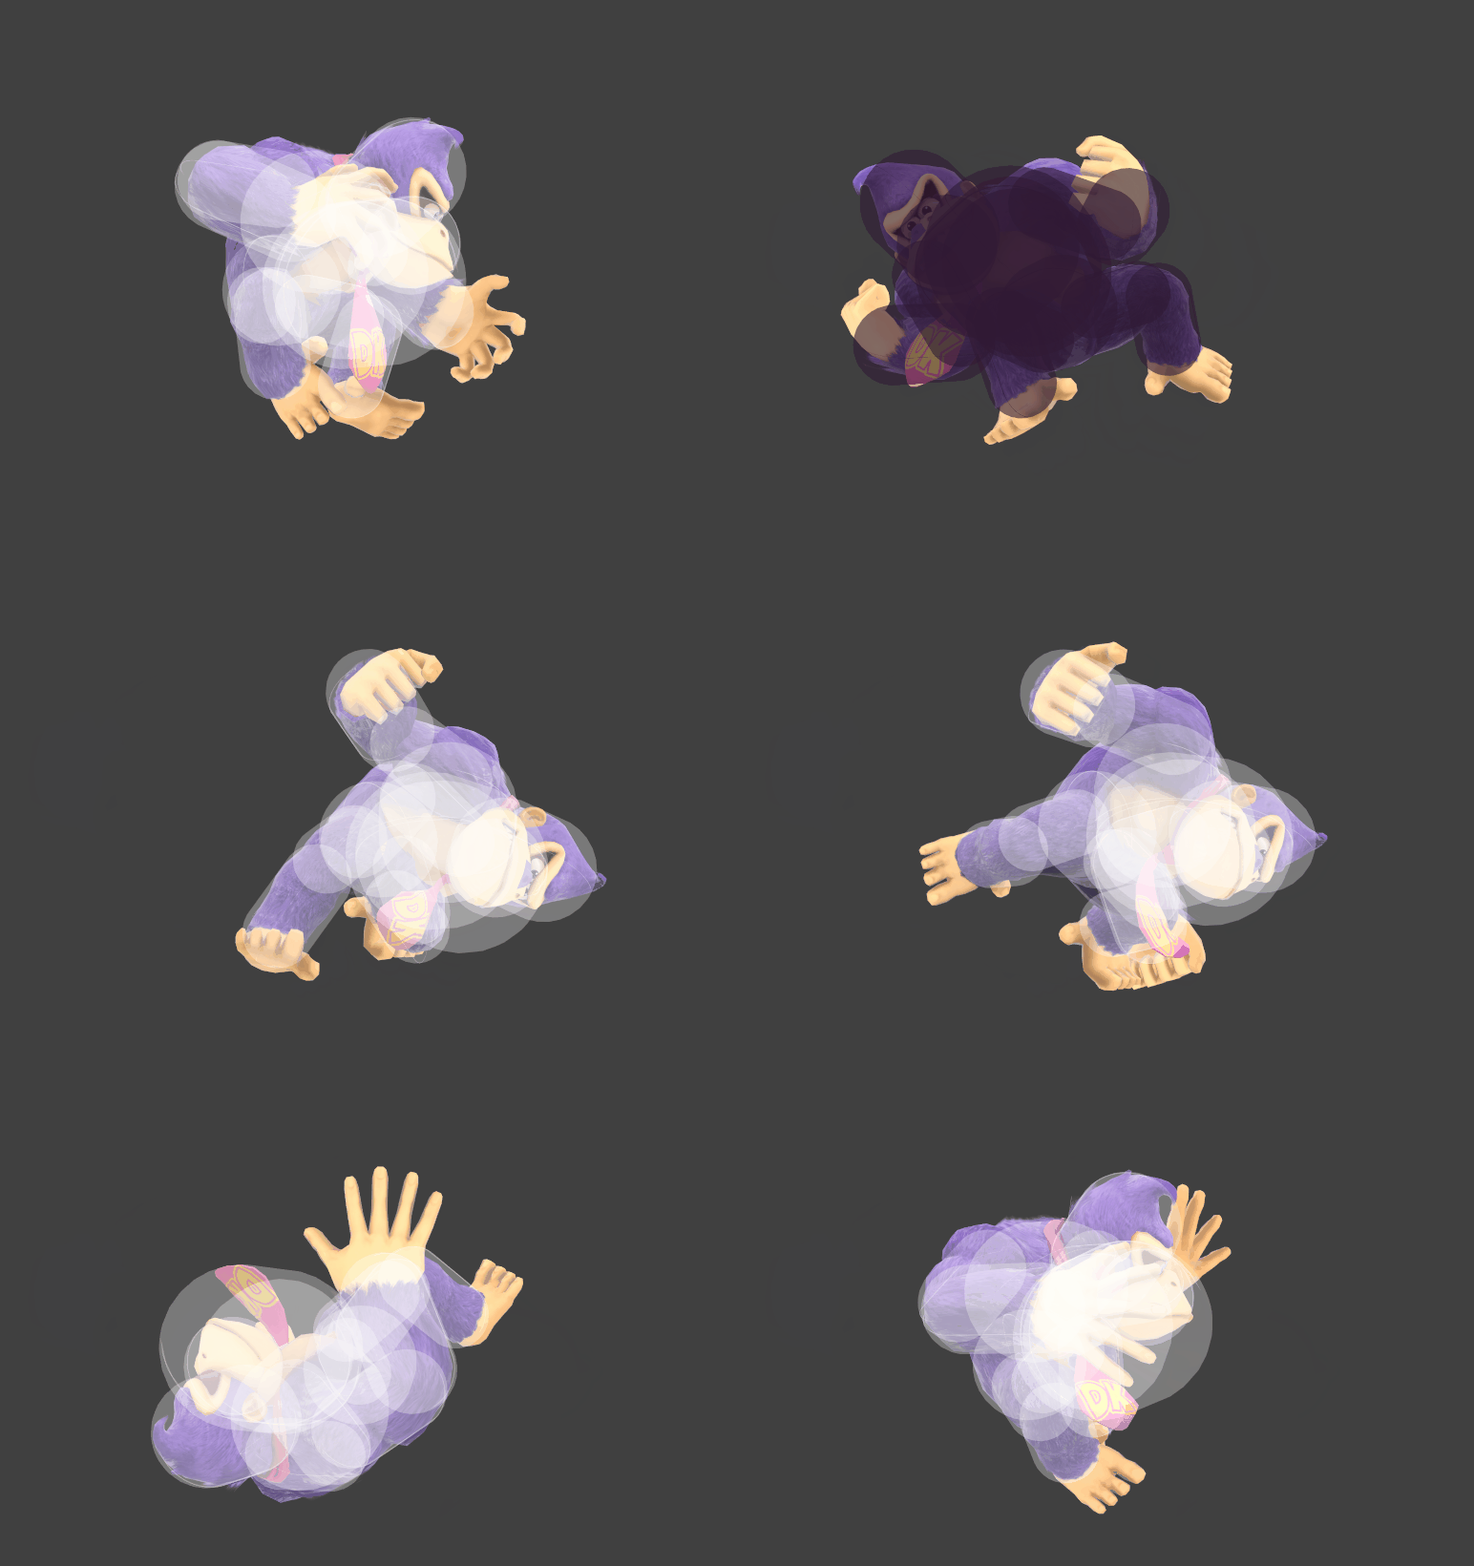
[[File:DonkeyKongHeadbuttAerialSSBU.gif|350px|thumb|right|Hitbox visualization showing Donkey Kong's aerial side special, Headbutt.]]
[[File:DonkeyKongHeadbuttAerialSSBU.gif|350px|thumb|Hitbox visualization showing Donkey Kong's aerial side special, Headbutt.]]
{{competitive expertise}}
==Overview==
Donkey Kong headbutts to the side of himself. Headbutt is a high-risk, high reward option that [[Bury|buries]] opponents who are hit, locking them in place for a smash attack or grounded [[Donkey Kong (SSBU)/Up special|Spinning Kong]]. Headbutt is ideally used at somewhat high percents, as the bury is susceptible to mashing. The move also has [[Armor]] right before Donkey Kong begins to headbutt, which can make the move usable as a landing option. Headbutt is also notable for its tremendous shield damage, with the move being able to break nearly any shield that has been damaged slightly.
 
However, despite these positives, the move is held back by its sluggish frame data, making the move very committal and leaving Donkey Kong wide open for attack if it misses. Additionally, the armor on the move only lasts for a very specific time in the middle of the animation and isn't very dangerous if it connects in the air, meaning that the move can still be challenged by multi-hit attacks, resulting in the move being used sparingly for landing. Additionally, while the move deals great damage to shields, it isn't a one-hit shield break, and is colossally unsafe at -32 if it doesn't break a shield.
 
In conclusion, Headbutt is a high-risk, high reward move that can potentially allow Donkey Kong to take a stock early if the bury or shield break connects, and is a niche landing option thanks to the armor. However, the move is used sparingly in competitive play due to its sluggish frame data and unsafety in whiffed.
 
==Update History==
==Update History==
'''{{GameIcon|ssbu}} {{SSBU|9.0.0}}'''
*{{buff|Grounded Headbutt has more vertical range on grounded opponents by adding an extra sweetspot hitbox.}}
*{{buff|Grounded [[Headbutt]] has an additional hitbox against grounded opponents that is placed higher (Y offset: 5u → 13u), increasing its vertical range.}}
==Hitboxes==
 
==Hitbox Data==
{{UltimateHitboxTableHeader}}
{{HitboxTableTitle|Grounded|42}}
Line 84: Line 93:
|ks=40
|ks=40
|fkv=0
|fkv=0
|r=5.0
|r=6.5
|bn=top
|bn=top
|xpos=0.0
|xpos=0.0
Line 139: Line 148:
{{FrameStripEnd}}
{{FrameStripEnd}}
{{FrameIconLegend|lag=y|hitbox=y|interruptible=y|vulnerable=y|armour=y}}
==Parameters==
{|class="wikitable"
!Horizontal speed multiplier on startup
|0.5 (grounded)<br>0.67 (aerial)
|-
!Vertical speed multiplier on startup
|0 (grounded)<br>0.5 (aerial)
|-
!Gravity multiplier
|0.5
|}


{{MvSubNavDonkeyKong|g=SSBU}}
[[Category:Donkey Kong (SSBU)]]
[[Category:Donkey Kong (SSBU)]]
[[Category:Side special moves (SSBU)]]
[[Category:Side special moves (SSBU)]]

Latest revision as of 11:46, September 15, 2024

This article is about the hitbox visualization in Super Smash Bros. Ultimate. For the move itself, see Headbutt.
Hitbox visualization showing Donkey Kong's grounded side special, Headbutt.
Hitbox visualization showing Donkey Kong's aerial side special, Headbutt.
Competitive.png This article or section may require competitive expertise.
You can discuss this issue on the talk page or edit this page to improve it.

Overview[edit]

Donkey Kong headbutts to the side of himself. Headbutt is a high-risk, high reward option that buries opponents who are hit, locking them in place for a smash attack or grounded Spinning Kong. Headbutt is ideally used at somewhat high percents, as the bury is susceptible to mashing. The move also has Armor right before Donkey Kong begins to headbutt, which can make the move usable as a landing option. Headbutt is also notable for its tremendous shield damage, with the move being able to break nearly any shield that has been damaged slightly.

However, despite these positives, the move is held back by its sluggish frame data, making the move very committal and leaving Donkey Kong wide open for attack if it misses. Additionally, the armor on the move only lasts for a very specific time in the middle of the animation and isn't very dangerous if it connects in the air, meaning that the move can still be challenged by multi-hit attacks, resulting in the move being used sparingly for landing. Additionally, while the move deals great damage to shields, it isn't a one-hit shield break, and is colossally unsafe at -32 if it doesn't break a shield.

In conclusion, Headbutt is a high-risk, high reward move that can potentially allow Donkey Kong to take a stock early if the bury or shield break connects, and is a niche landing option thanks to the armor. However, the move is used sparingly in competitive play due to its sluggish frame data and unsafety in whiffed.

Update History[edit]

Super Smash Bros. Ultimate 9.0.0

  • Buff Grounded Headbutt has an additional hitbox against grounded opponents that is placed higher (Y offset: 5u → 13u), increasing its vertical range.

Hitbox Data[edit]

ID Part Rehit rate Damage SD Angle Angle type BK KS FKV Set weight Radius Bone Offset SDI× T% Clang Rebound Effect Type G A Sound Direct Hit bits Hit part Blockable Reflectable Absorbable Flinchless No GFX Heedless
Grounded
0 0 0 10.0% 25.0 AngleIcon270.png Standard 40 40 0 HitboxTableIcon(False).png 5.0 top 0.0 5.0 19.0 to 7.0 1.0× 1.0× 0% HitboxTableIcon(Clang).png HitboxTableIcon(Rebound).png Bury (effect) Head (type) HitboxTableIcon(GroundedTrue).png HitboxTableIcon(AerialFalse).png L Kick SpecialsDirect.png All All HitboxTableIcon(Blockable).png HitboxTableIcon(Unreflectable).png HitboxTableIcon(Unabsorbable).png HitboxTableIcon(False).png HitboxTableIcon(False).png HitboxTableIcon(False).png
1 0 0 10.0% 25.0 AngleIcon270.png Standard 40 40 0 HitboxTableIcon(False).png 3.0 top 0.0 13.0 18.0 to 9.0 1.0× 1.0× 0% HitboxTableIcon(Clang).png HitboxTableIcon(Rebound).png Bury (effect) Head (type) HitboxTableIcon(GroundedTrue).png HitboxTableIcon(AerialFalse).png L Kick SpecialsDirect.png All All HitboxTableIcon(Blockable).png HitboxTableIcon(Unreflectable).png HitboxTableIcon(Unabsorbable).png HitboxTableIcon(False).png HitboxTableIcon(False).png HitboxTableIcon(False).png
2 0 0 8.0% 25.0 AngleIcon70.png Standard 15 40 0 HitboxTableIcon(False).png 10.0 top 0.0 11.0 14.0 1.0× 1.0× 0% HitboxTableIcon(Clang).png HitboxTableIcon(Rebound).png Normal (effect) Head (type) HitboxTableIcon(GroundedFalse).png HitboxTableIcon(AerialTrue).png M Kick SpecialsDirect.png All All HitboxTableIcon(Blockable).png HitboxTableIcon(Unreflectable).png HitboxTableIcon(Unabsorbable).png HitboxTableIcon(False).png HitboxTableIcon(False).png HitboxTableIcon(False).png
Aerial
0 0 0 10.0% 25.0 AngleIcon270.png Standard 30 40 0 HitboxTableIcon(False).png 6.5 top 0.0 5.0 8.8 to 1.4 1.0× 1.0× 0% HitboxTableIcon(Clang).png HitboxTableIcon(Rebound).png Bury (effect) Head (type) HitboxTableIcon(GroundedTrue).png HitboxTableIcon(AerialTrue).png L Kick SpecialsDirect.png All All HitboxTableIcon(Blockable).png HitboxTableIcon(Unreflectable).png HitboxTableIcon(Unabsorbable).png HitboxTableIcon(False).png HitboxTableIcon(False).png HitboxTableIcon(False).png
2 0 0 8.0% 25.0 AngleIcon70.png Standard 15 40 0 HitboxTableIcon(False).png 10.0 top 0.0 11.0 14.0 1.0× 1.0× 0% HitboxTableIcon(Clang).png HitboxTableIcon(Rebound).png Normal (effect) Head (type) HitboxTableIcon(GroundedFalse).png HitboxTableIcon(AerialTrue).png M Kick SpecialsDirect.png All All HitboxTableIcon(Blockable).png HitboxTableIcon(Unreflectable).png HitboxTableIcon(Unabsorbable).png HitboxTableIcon(False).png HitboxTableIcon(False).png HitboxTableIcon(False).png

Timing[edit]

Hitbox 20-21
Super Armor 5-14
Interruptible 63
Animation length 69
FrameIcon(Lag).png FrameIcon(Lag).png FrameIcon(Lag).png FrameIcon(Lag).png FrameIcon(Lag).png FrameIcon(Lag).png FrameIcon(Lag).png FrameIcon(Lag).png FrameIcon(Lag).png FrameIcon(Lag).png FrameIcon(Lag).png FrameIcon(Lag).png FrameIcon(Lag).png FrameIcon(Lag).png FrameIcon(Lag).png FrameIcon(Lag).png FrameIcon(Lag).png FrameIcon(Lag).png FrameIcon(Lag).png FrameIcon(Hitbox).png FrameIcon(Hitbox).png FrameIcon(Lag).png FrameIcon(Lag).png FrameIcon(Lag).png FrameIcon(Lag).png FrameIcon(Lag).png FrameIcon(Lag).png FrameIcon(Lag).png FrameIcon(Lag).png FrameIcon(Lag).png FrameIcon(Lag).png FrameIcon(Lag).png FrameIcon(Lag).png FrameIcon(Lag).png FrameIcon(Lag).png FrameIcon(Lag).png FrameIcon(Lag).png FrameIcon(Lag).png FrameIcon(Lag).png FrameIcon(Lag).png FrameIcon(Lag).png FrameIcon(Lag).png FrameIcon(Lag).png FrameIcon(Lag).png FrameIcon(Lag).png FrameIcon(Lag).png FrameIcon(Lag).png FrameIcon(Lag).png FrameIcon(Lag).png FrameIcon(Lag).png FrameIcon(Lag).png FrameIcon(Lag).png FrameIcon(Lag).png FrameIcon(Lag).png FrameIcon(Lag).png FrameIcon(Lag).png FrameIcon(Lag).png FrameIcon(Lag).png FrameIcon(Lag).png FrameIcon(Lag).png FrameIcon(Lag).png FrameIcon(Lag).png FrameIcon(Interruptible).png FrameIcon(Interruptible).png FrameIcon(Interruptible).png FrameIcon(Interruptible).png FrameIcon(Interruptible).png FrameIcon(Interruptible).png FrameIcon(Interruptible).png
FrameIcon(Vulnerable).png FrameIcon(Vulnerable).png FrameIcon(Vulnerable).png FrameIcon(Vulnerable).png FrameIcon(Armour).png FrameIcon(Armour).png FrameIcon(Armour).png FrameIcon(Armour).png FrameIcon(Armour).png FrameIcon(Armour).png FrameIcon(Armour).png FrameIcon(Armour).png FrameIcon(Armour).png FrameIcon(Armour).png FrameIcon(Vulnerable).png FrameIcon(Vulnerable).png FrameIcon(Vulnerable).png FrameIcon(Vulnerable).png FrameIcon(Vulnerable).png FrameIcon(Vulnerable).png FrameIcon(Vulnerable).png FrameIcon(Vulnerable).png FrameIcon(Vulnerable).png FrameIcon(Vulnerable).png FrameIcon(Vulnerable).png FrameIcon(Vulnerable).png FrameIcon(Vulnerable).png FrameIcon(Vulnerable).png FrameIcon(Vulnerable).png FrameIcon(Vulnerable).png FrameIcon(Vulnerable).png FrameIcon(Vulnerable).png FrameIcon(Vulnerable).png FrameIcon(Vulnerable).png FrameIcon(Vulnerable).png FrameIcon(Vulnerable).png FrameIcon(Vulnerable).png FrameIcon(Vulnerable).png FrameIcon(Vulnerable).png FrameIcon(Vulnerable).png FrameIcon(Vulnerable).png FrameIcon(Vulnerable).png FrameIcon(Vulnerable).png FrameIcon(Vulnerable).png FrameIcon(Vulnerable).png FrameIcon(Vulnerable).png FrameIcon(Vulnerable).png FrameIcon(Vulnerable).png FrameIcon(Vulnerable).png FrameIcon(Vulnerable).png FrameIcon(Vulnerable).png FrameIcon(Vulnerable).png FrameIcon(Vulnerable).png FrameIcon(Vulnerable).png FrameIcon(Vulnerable).png FrameIcon(Vulnerable).png FrameIcon(Vulnerable).png FrameIcon(Vulnerable).png FrameIcon(Vulnerable).png FrameIcon(Vulnerable).png FrameIcon(Vulnerable).png FrameIcon(Vulnerable).png FrameIcon(Vulnerable).png FrameIcon(Vulnerable).png FrameIcon(Vulnerable).png FrameIcon(Vulnerable).png FrameIcon(Vulnerable).png FrameIcon(Vulnerable).png FrameIcon(Vulnerable).png
Legend (1 square = 1 frame)
Lag
Lag time
Hitbox
Hitbox
FrameIcon(Vulnerable).png
Vulnerable
Armor
Armour
Interruptibility
Interruptible

Parameters[edit]

Horizontal speed multiplier on startup 0.5 (grounded)
0.67 (aerial)
Vertical speed multiplier on startup 0 (grounded)
0.5 (aerial)
Gravity multiplier 0.5