Super Smash Bros. Ultimate

Donkey Kong (SSBU)/Back aerial: Difference between revisions

From SmashWiki, the Super Smash Bros. wiki
Jump to navigationJump to search
 
Line 4: Line 4:
DK's back aerial is his best aerial and one of the best air-to-air attacks in the game. It has good speed, reach, power, low endlag, and a lingering hitbox. The main things holding it back are higher than usual landing lag and DK's high short hop which makes rising back air whiff on shorter characters.


In [[neutral]], back air is DK's main offensive aerial. It outspaces and/or trades favorably against most aerials. It is also DK's most reliable aerial to clang with projetiles. Defensively, back air is very effective at walling out characters with short range. The threat of back air establishes air superiority and can condition the opponent to stay on the ground, which further helps DK's stellar ground game. Rising back air can be used as a poke against taller characters, making it less predictable and harder to react to.
In [[neutral]], back air is DK's main offensive aerial. It outspaces and/or trades favorably against most aerials. It is also DK's most reliable aerial to clang with projectiles. Defensively, back air is very effective at walling out characters with short range. The threat of back air establishes air superiority and can condition the opponent to stay on the ground, which further helps DK's stellar ground game. Rising back air can be used as a poke against taller characters, making it less predictable and harder to react to.


The strong hit of back air on frames 7-8 will KO at around 140% from center stage with DI when it's fresh. At low percents a clean hit can combo into itself, grabs, tilts, or start a [[tech chase]]. The weak hit on frames 9-16 combos into those at mid percents instead.


Edgeguarding with back air is an effective way to rack up damage and score KOs. DK can go surprisingly deep offstage, throw out 3-4 Bairs in quick successtion, and still make it back. The lingering hitbox makes it easier to hit flexible recoveries and ledgegrab attempts. Weak hits can gimp them or combo into the clean hit of another Bair that does KO. Bair will always launch opponents in the opposite direction DK is facing. As long as you back air while DK is facing the ledge, the opponent won't be hit into the stage even if they are hugging the stage as they recover. Back air is also quick enough to true combo into after a successful [[ledge trump]].
Edgeguarding with back air is an effective way to rack up damage and score KOs. DK can go surprisingly deep offstage, throw out 3-4 Bairs in quick succession, and still make it back. The lingering hitbox makes it easier to hit flexible recoveries and ledgegrab attempts. Weak hits can gimp them or combo into the clean hit of another Bair that does KO. Bair will always launch opponents in the opposite direction DK is facing. As long as you back air while DK is facing the ledge, the opponent won't be hit into the stage even if they are hugging the stage as they recover. Back air is also quick enough to true combo into after a successful [[ledge trump]].


Back air is -6 on block at best, so it needs good spacing to be safe. The landing animation extends DK leg hurtbox and makes it easier to punish.

Latest revision as of 22:43, October 9, 2023

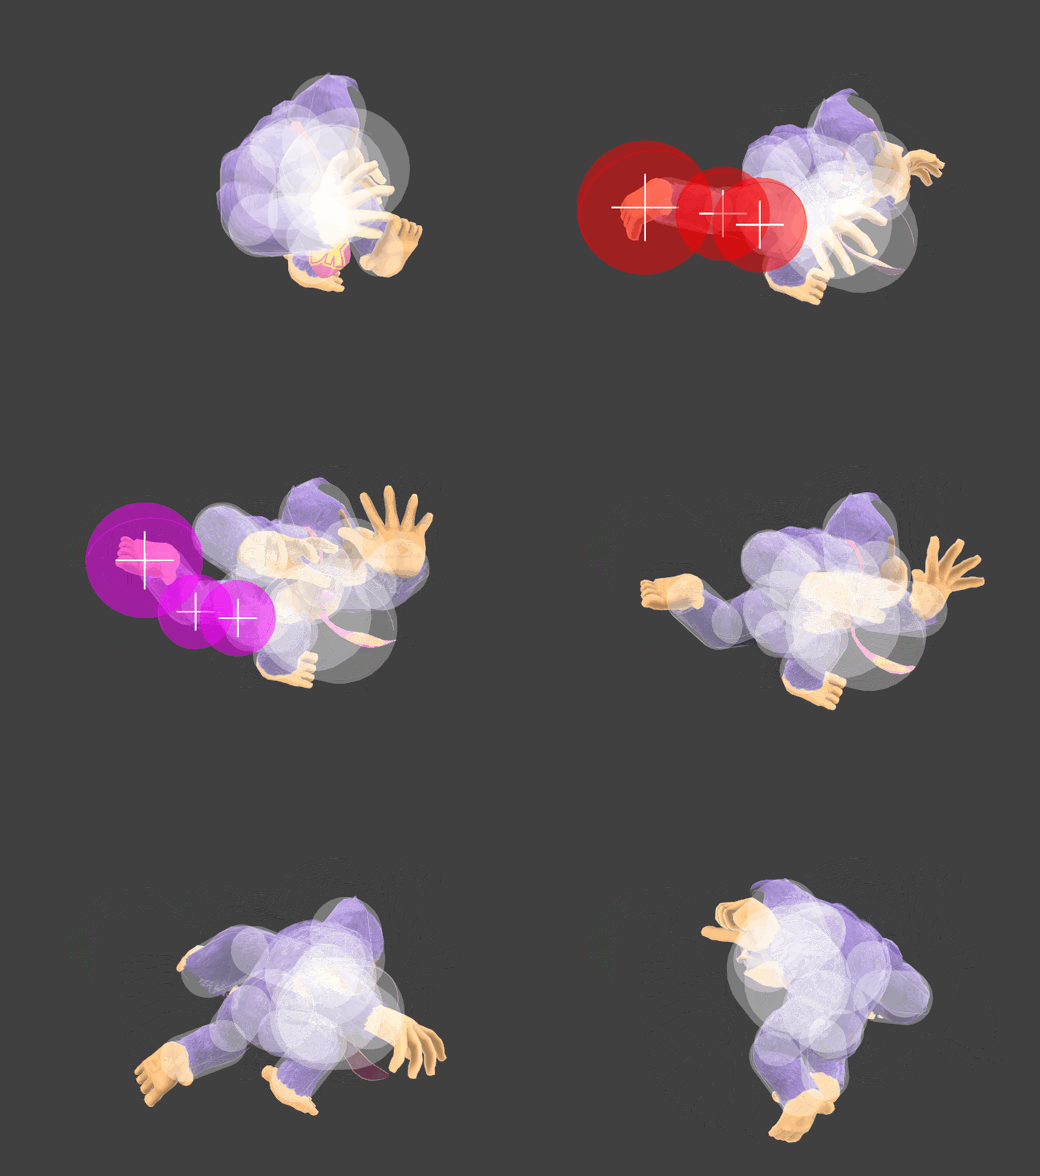
Hitbox visualization showing Donkey Kong's back aerial.

Overview[edit]

DK's back aerial is his best aerial and one of the best air-to-air attacks in the game. It has good speed, reach, power, low endlag, and a lingering hitbox. The main things holding it back are higher than usual landing lag and DK's high short hop which makes rising back air whiff on shorter characters.

In neutral, back air is DK's main offensive aerial. It outspaces and/or trades favorably against most aerials. It is also DK's most reliable aerial to clang with projectiles. Defensively, back air is very effective at walling out characters with short range. The threat of back air establishes air superiority and can condition the opponent to stay on the ground, which further helps DK's stellar ground game. Rising back air can be used as a poke against taller characters, making it less predictable and harder to react to.

The strong hit of back air on frames 7-8 will KO at around 140% from center stage with DI when it's fresh. At low percents a clean hit can combo into itself, grabs, tilts, or start a tech chase. The weak hit on frames 9-16 combos into those at mid percents instead.

Edgeguarding with back air is an effective way to rack up damage and score KOs. DK can go surprisingly deep offstage, throw out 3-4 Bairs in quick succession, and still make it back. The lingering hitbox makes it easier to hit flexible recoveries and ledgegrab attempts. Weak hits can gimp them or combo into the clean hit of another Bair that does KO. Bair will always launch opponents in the opposite direction DK is facing. As long as you back air while DK is facing the ledge, the opponent won't be hit into the stage even if they are hugging the stage as they recover. Back air is also quick enough to true combo into after a successful ledge trump.

Back air is -6 on block at best, so it needs good spacing to be safe. The landing animation extends DK leg hurtbox and makes it easier to punish.

Hitboxes[edit]

ID Part Rehit rate Damage SD Angle Angle type BK KS FKV Set weight Radius Bone Offset SDI× T% Clang Rebound Effect Type G A Sound Direct Hit bits Hit part Blockable Reflectable Absorbable Flinchless No GFX Heedless
Clean hit
0 0 0 13.0% 0 Sakurai angle Backward 20 97 0 HitboxTableIcon(False).png 7.0 footl 1.0 -2.0 0.0 1.0× 1.0× 0% HitboxTableIcon(Clang).png HitboxTableIcon(Rebound).png Normal (effect) Foot (type) HitboxTableIcon(GroundedTrue).png HitboxTableIcon(AerialTrue).png L Kick SpecialsDirect.png All All HitboxTableIcon(Blockable).png HitboxTableIcon(Unreflectable).png HitboxTableIcon(Unabsorbable).png HitboxTableIcon(False).png HitboxTableIcon(False).png HitboxTableIcon(False).png
1 0 0 13.0% 0 Sakurai angle Backward 20 97 0 HitboxTableIcon(False).png 5.0 kneel -1.0 0.0 0.0 1.0× 1.0× 0% HitboxTableIcon(Clang).png HitboxTableIcon(Rebound).png Normal (effect) Foot (type) HitboxTableIcon(GroundedTrue).png HitboxTableIcon(AerialTrue).png L Kick SpecialsDirect.png All All HitboxTableIcon(Blockable).png HitboxTableIcon(Unreflectable).png HitboxTableIcon(Unabsorbable).png HitboxTableIcon(False).png HitboxTableIcon(False).png HitboxTableIcon(False).png
2 0 0 13.0% 0 Sakurai angle Backward 20 97 0 HitboxTableIcon(False).png 5.0 hip -1.0 0.0 0.0 1.0× 1.0× 0% HitboxTableIcon(Clang).png HitboxTableIcon(Rebound).png Normal (effect) Foot (type) HitboxTableIcon(GroundedTrue).png HitboxTableIcon(AerialTrue).png L Kick SpecialsDirect.png All All HitboxTableIcon(Blockable).png HitboxTableIcon(Unreflectable).png HitboxTableIcon(Unabsorbable).png HitboxTableIcon(False).png HitboxTableIcon(False).png HitboxTableIcon(False).png
Late hit
0 0 0 8.0% 0 Sakurai angle Backward 10 100 0 HitboxTableIcon(False).png 6.0 footl 1.0 -2.0 0.0 1.0× 1.0× 0% HitboxTableIcon(Clang).png HitboxTableIcon(Rebound).png Normal (effect) Foot (type) HitboxTableIcon(GroundedTrue).png HitboxTableIcon(AerialTrue).png M Kick SpecialsDirect.png All All HitboxTableIcon(Blockable).png HitboxTableIcon(Unreflectable).png HitboxTableIcon(Unabsorbable).png HitboxTableIcon(False).png HitboxTableIcon(False).png HitboxTableIcon(False).png
1 0 0 8.0% 0 Sakurai angle Backward 10 100 0 HitboxTableIcon(False).png 4.0 kneel -1.0 0.0 0.0 1.0× 1.0× 0% HitboxTableIcon(Clang).png HitboxTableIcon(Rebound).png Normal (effect) Foot (type) HitboxTableIcon(GroundedTrue).png HitboxTableIcon(AerialTrue).png M Kick SpecialsDirect.png All All HitboxTableIcon(Blockable).png HitboxTableIcon(Unreflectable).png HitboxTableIcon(Unabsorbable).png HitboxTableIcon(False).png HitboxTableIcon(False).png HitboxTableIcon(False).png
2 0 0 8.0% 0 Sakurai angle Backward 10 100 0 HitboxTableIcon(False).png 4.0 hip -1.0 0.0 0.0 1.0× 1.0× 0% HitboxTableIcon(Clang).png HitboxTableIcon(Rebound).png Normal (effect) Foot (type) HitboxTableIcon(GroundedTrue).png HitboxTableIcon(AerialTrue).png M Kick SpecialsDirect.png All All HitboxTableIcon(Blockable).png HitboxTableIcon(Unreflectable).png HitboxTableIcon(Unabsorbable).png HitboxTableIcon(False).png HitboxTableIcon(False).png HitboxTableIcon(False).png

Timing[edit]

Attack[edit]

Initial autocancel 1-6
Clean hit 7-8
Late hit 9-16
Ending autocancel 31-
Interruptible 32
Animation length 49
FrameIcon(Lag).png FrameIcon(Lag).png FrameIcon(Lag).png FrameIcon(Lag).png FrameIcon(Lag).png FrameIcon(Lag).png FrameIcon(Hitbox).png FrameIcon(HitboxChangeS).png FrameIcon(HitboxChangeE).png FrameIcon(Hitbox).png FrameIcon(Hitbox).png FrameIcon(Hitbox).png FrameIcon(Hitbox).png FrameIcon(Hitbox).png FrameIcon(Hitbox).png FrameIcon(Hitbox).png FrameIcon(Lag).png FrameIcon(Lag).png FrameIcon(Lag).png FrameIcon(Lag).png FrameIcon(Lag).png FrameIcon(Lag).png FrameIcon(Lag).png FrameIcon(Lag).png FrameIcon(Lag).png FrameIcon(Lag).png FrameIcon(Lag).png FrameIcon(Lag).png FrameIcon(Lag).png FrameIcon(Lag).png FrameIcon(Lag).png FrameIcon(Interruptible).png FrameIcon(Interruptible).png FrameIcon(Interruptible).png FrameIcon(Interruptible).png FrameIcon(Interruptible).png FrameIcon(Interruptible).png FrameIcon(Interruptible).png FrameIcon(Interruptible).png FrameIcon(Interruptible).png FrameIcon(Interruptible).png FrameIcon(Interruptible).png FrameIcon(Interruptible).png FrameIcon(Interruptible).png FrameIcon(Interruptible).png FrameIcon(Interruptible).png FrameIcon(Interruptible).png FrameIcon(Interruptible).png FrameIcon(Interruptible).png
FrameIcon(Autocancel).png FrameIcon(Autocancel).png FrameIcon(Autocancel).png FrameIcon(Autocancel).png FrameIcon(Autocancel).png FrameIcon(Autocancel).png FrameIcon(Blank).png FrameIcon(Blank).png FrameIcon(Blank).png FrameIcon(Blank).png FrameIcon(Blank).png FrameIcon(Blank).png FrameIcon(Blank).png FrameIcon(Blank).png FrameIcon(Blank).png FrameIcon(Blank).png FrameIcon(Blank).png FrameIcon(Blank).png FrameIcon(Blank).png FrameIcon(Blank).png FrameIcon(Blank).png FrameIcon(Blank).png FrameIcon(Blank).png FrameIcon(Blank).png FrameIcon(Blank).png FrameIcon(Blank).png FrameIcon(Blank).png FrameIcon(Blank).png FrameIcon(Blank).png FrameIcon(Blank).png FrameIcon(Autocancel).png FrameIcon(Autocancel).png FrameIcon(Autocancel).png FrameIcon(Autocancel).png FrameIcon(Autocancel).png FrameIcon(Autocancel).png FrameIcon(Autocancel).png FrameIcon(Autocancel).png FrameIcon(Autocancel).png FrameIcon(Autocancel).png FrameIcon(Autocancel).png FrameIcon(Autocancel).png FrameIcon(Autocancel).png FrameIcon(Autocancel).png FrameIcon(Autocancel).png FrameIcon(Autocancel).png FrameIcon(Autocancel).png FrameIcon(Autocancel).png FrameIcon(Autocancel).png

Landing lag[edit]

Interruptible 12
Animation length 23
FrameIcon(Lag).png FrameIcon(Lag).png FrameIcon(Lag).png FrameIcon(Lag).png FrameIcon(Lag).png FrameIcon(Lag).png FrameIcon(Lag).png FrameIcon(Lag).png FrameIcon(Lag).png FrameIcon(Lag).png FrameIcon(Lag).png FrameIcon(Interruptible).png FrameIcon(Interruptible).png FrameIcon(Interruptible).png FrameIcon(Interruptible).png FrameIcon(Interruptible).png FrameIcon(Interruptible).png FrameIcon(Interruptible).png FrameIcon(Interruptible).png FrameIcon(Interruptible).png FrameIcon(Interruptible).png FrameIcon(Interruptible).png FrameIcon(Interruptible).png
Legend (1 square = 1 frame)
Lag
Lag time
Hitbox
Hitbox
FrameIcon(HitboxChangeS).pngFrameIcon(HitboxChangeE).png
Hitbox change
Auto-canceling
Autocancel
Interruptibility
Interruptible