Super Smash Bros. Ultimate

Mario (SSBU)/Up throw: Difference between revisions

From SmashWiki, the Super Smash Bros. wiki
Jump to navigationJump to search
(Merge it)
(Don't just copy-paste it. Smash 4 has no relevance here and should be removed. "Performance" is a poor title for what the section is (and should've been called something else in the source article). And don't put anything below categories)
Tags: Mobile edit Advanced mobile edit
Line 10: Line 10:
==Overview==
==Overview==
An upwards throw, generally used as a combo tool. Reminiscent of an upwards cap throw in Super Mario Odyssey.
===Ally combo===
The '''Ally combo''', named after the Canadian Mario player {{Sm|Ally}}, is a simple and effective combo after performing Mario's up throw.
It is performed by doing an up throw into a full-hop down aerial. The player can then follow up with any of Mario's other aerials, typically forward aerial for optimal damage or up aerial for coverage and extended advantage situations. Up aerial is predominantly used as a finisher in most cases due to forward aerial not being true with certain [[DI]]. Down aerial is a true combo and is good for dealing damage.


==Throw Data==
==Throw Data==
Line 67: Line 72:
[[Category:Mario (SSBU)]]
[[Category:Mario (SSBU)]]
[[Category:Up throws (SSBU)]]
[[Category:Up throws (SSBU)]]
==Performance==
The combo is performed by doing an up throw into a full-hop down aerial. The player can then follow up with any of Mario's other aerials, typically forward aerial for optimal damage or up aerial for coverage and extended advantage situations. Up aerial is predominantly used as a finisher in most cases due to forward aerial not being true with certain [[DI]].
In ''Super Smash Bros. 4'', it is not a [[true combo]]. The long delay before down aerial's final hitbox allows characters with an air dodge or attack that is active before frame 4 to escape from the move, thus ending the combo. Since the combo is performed close to the ground, an opponent that air dodges will end up in landing lag by the time Mario's down aerial ends, allowing Mario to punish them. This means only characters with fast attacks can reliably escape the combo. This combo generally works from around 0-30% on middleweights, though down aerial will send too far to follow up with other aerials around 15-20%.
The combo is more effective in ''Super Smash Bros. Ultimate''. The universal 3-frame jumpsquat change makes it easier to perform. Additionally, down aerial's final hit comes out two frames faster than in ''SSB4'', making it a true combo. Down aerial's increased damage also makes it a stronger combo overall.

Revision as of 14:49, August 31, 2023

Competitive.png This article or section may require competitive expertise.
You can discuss this issue on the talk page or edit this page to improve it.
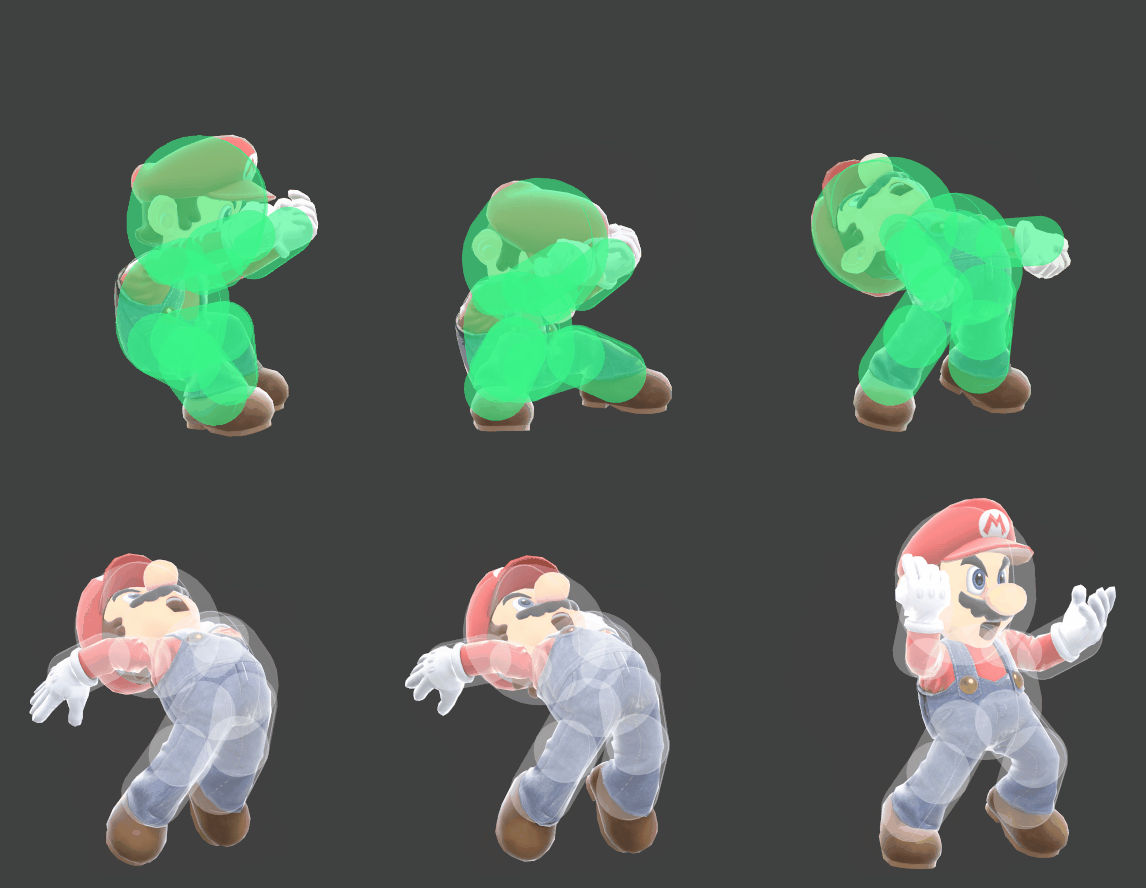
Mario up throw hurtbox visualization
MarioUThrowSSBU.gif

Overview

An upwards throw, generally used as a combo tool. Reminiscent of an upwards cap throw in Super Mario Odyssey.

Ally combo

The Ally combo, named after the Canadian Mario player Ally, is a simple and effective combo after performing Mario's up throw.

It is performed by doing an up throw into a full-hop down aerial. The player can then follow up with any of Mario's other aerials, typically forward aerial for optimal damage or up aerial for coverage and extended advantage situations. Up aerial is predominantly used as a finisher in most cases due to forward aerial not being true with certain DI. Down aerial is a true combo and is good for dealing damage.

Throw Data

Kind ID Damage Angle Angle type BK KS FKV Effect Type Sound
Throw 0 7.0% AngleIcon90.png Forward 70 72 0 0.0× Normal (effect) Throwing (type) S None
Break 0 3.0% Sakurai angle Forward 40 100 0 0.0× Normal (effect) Throwing (type) S None

Timing

Invincibility 1-18
Throw Release 18
Interruptible 40
Animation length 69
FrameIcon(Lag).png FrameIcon(Lag).png FrameIcon(Lag).png FrameIcon(Lag).png FrameIcon(Lag).png FrameIcon(Lag).png FrameIcon(Lag).png FrameIcon(Lag).png FrameIcon(Lag).png FrameIcon(Lag).png FrameIcon(Lag).png FrameIcon(Lag).png FrameIcon(Lag).png FrameIcon(Lag).png FrameIcon(Lag).png FrameIcon(Lag).png FrameIcon(LagThrowS).png FrameIcon(LagThrowE).png FrameIcon(Lag).png FrameIcon(Lag).png FrameIcon(Lag).png FrameIcon(Lag).png FrameIcon(Lag).png FrameIcon(Lag).png FrameIcon(Lag).png FrameIcon(Lag).png FrameIcon(Lag).png FrameIcon(Lag).png FrameIcon(Lag).png FrameIcon(Lag).png FrameIcon(Lag).png FrameIcon(Lag).png FrameIcon(Lag).png FrameIcon(Lag).png FrameIcon(Lag).png FrameIcon(Lag).png FrameIcon(Lag).png FrameIcon(Lag).png FrameIcon(Lag).png FrameIcon(Interruptible).png FrameIcon(Interruptible).png FrameIcon(Interruptible).png FrameIcon(Interruptible).png FrameIcon(Interruptible).png FrameIcon(Interruptible).png FrameIcon(Interruptible).png FrameIcon(Interruptible).png FrameIcon(Interruptible).png FrameIcon(Interruptible).png FrameIcon(Interruptible).png FrameIcon(Interruptible).png FrameIcon(Interruptible).png FrameIcon(Interruptible).png FrameIcon(Interruptible).png FrameIcon(Interruptible).png FrameIcon(Interruptible).png FrameIcon(Interruptible).png FrameIcon(Interruptible).png FrameIcon(Interruptible).png FrameIcon(Interruptible).png FrameIcon(Interruptible).png FrameIcon(Interruptible).png FrameIcon(Interruptible).png FrameIcon(Interruptible).png FrameIcon(Interruptible).png FrameIcon(Interruptible).png FrameIcon(Interruptible).png FrameIcon(Interruptible).png FrameIcon(Interruptible).png
FrameIcon(Invincible).png FrameIcon(Invincible).png FrameIcon(Invincible).png FrameIcon(Invincible).png FrameIcon(Invincible).png FrameIcon(Invincible).png FrameIcon(Invincible).png FrameIcon(Invincible).png FrameIcon(Invincible).png FrameIcon(Invincible).png FrameIcon(Invincible).png FrameIcon(Invincible).png FrameIcon(Invincible).png FrameIcon(Invincible).png FrameIcon(Invincible).png FrameIcon(Invincible).png FrameIcon(Invincible).png FrameIcon(Invincible).png FrameIcon(Vulnerable).png FrameIcon(Vulnerable).png FrameIcon(Vulnerable).png FrameIcon(Vulnerable).png FrameIcon(Vulnerable).png FrameIcon(Vulnerable).png FrameIcon(Vulnerable).png FrameIcon(Vulnerable).png FrameIcon(Vulnerable).png FrameIcon(Vulnerable).png FrameIcon(Vulnerable).png FrameIcon(Vulnerable).png FrameIcon(Vulnerable).png FrameIcon(Vulnerable).png FrameIcon(Vulnerable).png FrameIcon(Vulnerable).png FrameIcon(Vulnerable).png FrameIcon(Vulnerable).png FrameIcon(Vulnerable).png FrameIcon(Vulnerable).png FrameIcon(Vulnerable).png FrameIcon(Vulnerable).png FrameIcon(Vulnerable).png FrameIcon(Vulnerable).png FrameIcon(Vulnerable).png FrameIcon(Vulnerable).png FrameIcon(Vulnerable).png FrameIcon(Vulnerable).png FrameIcon(Vulnerable).png FrameIcon(Vulnerable).png FrameIcon(Vulnerable).png FrameIcon(Vulnerable).png FrameIcon(Vulnerable).png FrameIcon(Vulnerable).png FrameIcon(Vulnerable).png FrameIcon(Vulnerable).png FrameIcon(Vulnerable).png FrameIcon(Vulnerable).png FrameIcon(Vulnerable).png FrameIcon(Vulnerable).png FrameIcon(Vulnerable).png FrameIcon(Vulnerable).png FrameIcon(Vulnerable).png FrameIcon(Vulnerable).png FrameIcon(Vulnerable).png FrameIcon(Vulnerable).png FrameIcon(Vulnerable).png FrameIcon(Vulnerable).png FrameIcon(Vulnerable).png FrameIcon(Vulnerable).png FrameIcon(Vulnerable).png
Legend (1 square = 1 frame)
Lag
Lag time
FrameIcon(Vulnerable).png
Vulnerable
Invincibility
Invincible
ThrowThrow
Throw point
Interruptibility
Interruptible