Donkey Kong (SSBU)/Forward throw: Difference between revisions
m (Text replacement - " " to " ") |
|||
| (8 intermediate revisions by 5 users not shown) | |||
| Line 1: | Line 1: | ||
{{ArticleIcons|ssbu=y}} | {{ArticleIcons|ssbu=y}} | ||
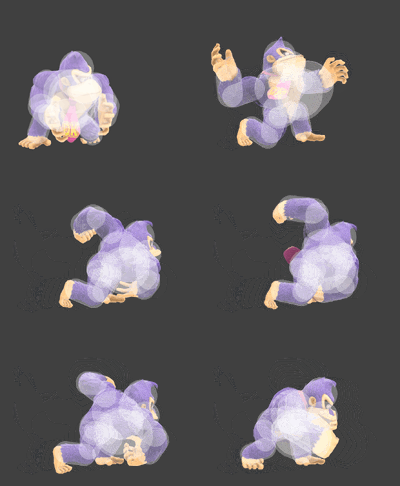
[[File:DonkeyKongFThrowForwardSSBU.gif|thumb| | [[File:DonkeyKongFThrowForwardSSBU.gif|thumb|200px|Hitbox visualization showing Donkey Kong's cargo forward throw.]] | ||
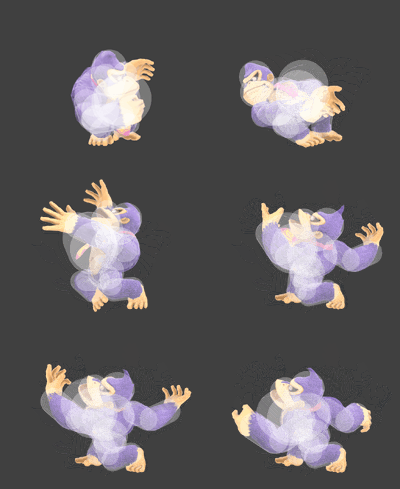
[[File:DonkeyKongFThrowBackSSBU.gif|thumb| | [[File:DonkeyKongFThrowBackSSBU.gif|thumb|200px|Hitbox visualization showing Donkey Kong's cargo back throw.]] | ||
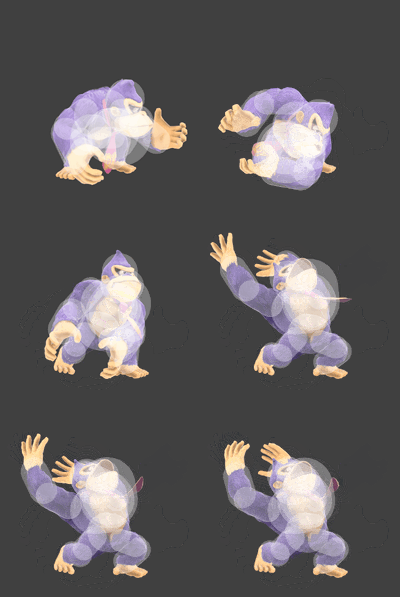
[[File:DonkeyKongFThrowUpSSBU.gif|thumb| | [[File:DonkeyKongFThrowUpSSBU.gif|thumb|200px|Hitbox visualization showing Donkey Kong's cargo up throw.]] | ||
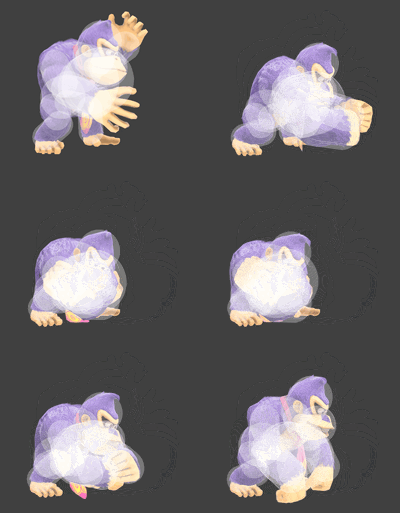
[[File:DonkeyKongFThrowDownSSBU.gif|thumb| | [[File:DonkeyKongFThrowDownSSBU.gif|thumb|200px|Hitbox visualization showing Donkey Kong's cargo down throw.]] | ||
== | {{competitive expertise}} | ||
==Overview== | |||
Donkey Kong's forward throw, also known as Kong Karry, allows him to maneuver around the stage while holding an opponent. During the move, Donkey Kong has access to four additional throws that he can use by holding a direction and pressing the attack button. All of them are potent kill throws, most notably back throw, especially on a stage with platforms. Up throw is a viable combo starter, being able to combo into up air at low percents. All four throws have the potential to stage spike opponents if Donkey Kong is positioned correctly, with down throw being the safest option, as it gives Donkey Kong a slight boost upwards. | |||
==Throw Data== | |||
===Carry release=== | |||
{{UltimateThrowTableHeader}} | |||
{{UltimateThrowTableRow | |||
|kind=1 | |||
|id=0 | |||
|damage=4.0% | |||
|angle=361 | |||
|bk=0 | |||
|ks=100 | |||
|fkv=30 | |||
|ff=0.0 | |||
|effect=Normal | |||
|type=Throwing | |||
|sfx=None | |||
|slvl=S | |||
}} | |||
|} | |||
===Forward=== | ===Forward=== | ||
{{UltimateThrowTableHeader}} | {{UltimateThrowTableHeader}} | ||
| Line 17: | Line 38: | ||
|ff=0.0 | |ff=0.0 | ||
|type=Throwing | |type=Throwing | ||
|sfx=None | |||
|slvl=S | |||
}} | |||
{{UltimateThrowTableRow | |||
|kind=1 | |||
|id=0 | |||
|type=Throwing | |||
|damage=3.0% | |||
|angle=361 | |||
|bk=40 | |||
|ks=100 | |||
|fkv=0 | |||
|effect=Normal | |||
|sfx=None | |sfx=None | ||
|slvl=S | |slvl=S | ||
| Line 32: | Line 66: | ||
|ff=0.0 | |ff=0.0 | ||
|type=Throwing | |type=Throwing | ||
|sfx=None | |||
|slvl=S | |||
}} | |||
{{UltimateThrowTableRow | |||
|kind=1 | |||
|id=0 | |||
|type=Throwing | |||
|damage=3.0% | |||
|angle=361 | |||
|bk=40 | |||
|ks=100 | |||
|fkv=0 | |||
|effect=Normal | |||
|sfx=None | |sfx=None | ||
|slvl=S | |slvl=S | ||
| Line 47: | Line 94: | ||
|ff=0.0 | |ff=0.0 | ||
|type=Throwing | |type=Throwing | ||
|sfx=None | |||
|slvl=S | |||
}} | |||
{{UltimateThrowTableRow | |||
|kind=1 | |||
|id=0 | |||
|type=Throwing | |||
|damage=3.0% | |||
|angle=361 | |||
|bk=40 | |||
|ks=100 | |||
|fkv=0 | |||
|effect=Normal | |||
|sfx=None | |sfx=None | ||
|slvl=S | |slvl=S | ||
| Line 62: | Line 122: | ||
|ff=0.0 | |ff=0.0 | ||
|type=Throwing | |type=Throwing | ||
|sfx=None | |||
|slvl=S | |||
}} | |||
{{UltimateThrowTableRow | |||
|kind=1 | |||
|id=0 | |||
|type=Throwing | |||
|damage=3.0% | |||
|angle=361 | |||
|bk=40 | |||
|ks=100 | |||
|fkv=0 | |||
|effect=Normal | |||
|sfx=None | |sfx=None | ||
|slvl=S | |slvl=S | ||
}} | }} | ||
|} | |} | ||
==Timing== | ==Timing== | ||
===Carry=== | |||
{|class="wikitable" | |||
!Invincibility | |||
|1-15 | |||
|- | |||
!Animation length | |||
|15 | |||
|} | |||
{{FrameStripStart}} | |||
{{FrameStrip|t=Lag|c=15}} | |||
|- | |||
{{FrameStrip|t=Invincible|c=15}} | |||
{{FrameStripEnd}} | |||
===Forward=== | ===Forward=== | ||
{|class="wikitable" | {|class="wikitable" | ||
| Line 82: | Line 170: | ||
{{FrameStrip|t=Lag|c=14|e=LagThrowS}}{{FrameStrip|t=Lag|c=31|s=LagThrowE}}{{FrameStrip|t=Interruptible|c=19}} | {{FrameStrip|t=Lag|c=14|e=LagThrowS}}{{FrameStrip|t=Lag|c=31|s=LagThrowE}}{{FrameStrip|t=Interruptible|c=19}} | ||
{{FrameStripEnd}} | {{FrameStripEnd}} | ||
===Back=== | ===Back=== | ||
Donkey Kong changes direction on frame 16. | |||
{|class="wikitable" | {|class="wikitable" | ||
!Throw | !Throw | ||
| Line 97: | Line 188: | ||
{{FrameStrip|t=Lag|c=15|e=LagThrowS}}{{FrameStrip|t=Lag|c=27|s=LagThrowE}}{{FrameStrip|t=Interruptible|c=17}} | {{FrameStrip|t=Lag|c=15|e=LagThrowS}}{{FrameStrip|t=Lag|c=27|s=LagThrowE}}{{FrameStrip|t=Interruptible|c=17}} | ||
{{FrameStripEnd}} | {{FrameStripEnd}} | ||
===Up=== | ===Up=== | ||
{|class="wikitable" | {|class="wikitable" | ||
| Line 112: | Line 204: | ||
{{FrameStrip|t=Lag|c=14|e=LagThrowS}}{{FrameStrip|t=Lag|c=15|s=LagThrowE}}{{FrameStrip|t=Interruptible|c=20}} | {{FrameStrip|t=Lag|c=14|e=LagThrowS}}{{FrameStrip|t=Lag|c=15|s=LagThrowE}}{{FrameStrip|t=Interruptible|c=20}} | ||
{{FrameStripEnd}} | {{FrameStripEnd}} | ||
===Down=== | ===Down=== | ||
On frame 17, the move stops Donkey Kong's horizontal momentum, and sets his vertical momentum to 1.5. | |||
{|class="wikitable" | {|class="wikitable" | ||
!Throw | !Throw | ||
| Line 129: | Line 224: | ||
{{FrameIconLegend|lag=y|throw=y|interruptible=y|invincible=y|vulnerable=y}} | {{FrameIconLegend|lag=y|throw=y|interruptible=y|invincible=y|vulnerable=y}} | ||
==Carry parameters== | |||
The carry's duration is equal to <code>((90 + 1.7p) * 11 / 6) - g</code>, where '''p''' is the opponent's percent at the time of the carry's initiation, and '''g''' is the [[Grab#Grab time|grab time]] passed prior to it. As a result, it lasts longer the earlier it is initiated after grabbing an opponent; for example, against an opponent with 0% damage, it lasts 165 frames if initiated immediately out of a grab, and 105 frames if initiated after 60 grab frames. As with standard grabs, [[button mashing]] reduces this amount by 8 frames per stick input, and 14.4 frames per button input (though they cannot be registered as quickly). | |||
Additionally, while carrying an opponent or heavy item, Donkey Kong's [[walk]] speed and acceleration are increased by 1.1×. | |||
{{MvSubNavDonkeyKong|g=SSBU}} | {{MvSubNavDonkeyKong|g=SSBU}} | ||
[[Category:Donkey Kong (SSBU)]] | [[Category:Donkey Kong (SSBU)]] | ||
[[Category:Forward throws (SSBU)]] | [[Category:Forward throws (SSBU)]] | ||
Latest revision as of 19:20, July 19, 2022
Overview[edit]
Donkey Kong's forward throw, also known as Kong Karry, allows him to maneuver around the stage while holding an opponent. During the move, Donkey Kong has access to four additional throws that he can use by holding a direction and pressing the attack button. All of them are potent kill throws, most notably back throw, especially on a stage with platforms. Up throw is a viable combo starter, being able to combo into up air at low percents. All four throws have the potential to stage spike opponents if Donkey Kong is positioned correctly, with down throw being the safest option, as it gives Donkey Kong a slight boost upwards.
Throw Data[edit]
Carry release[edit]
| Kind | ID | Damage | Angle | Angle type | BK | KS | FKV | H× | Effect | Type | Sound |
|---|---|---|---|---|---|---|---|---|---|---|---|
| Break | 0 | 4.0% | Forward | 0 | 100 | 30 | 0.0× |
Forward[edit]
| Kind | ID | Damage | Angle | Angle type | BK | KS | FKV | H× | Effect | Type | Sound |
|---|---|---|---|---|---|---|---|---|---|---|---|
| Throw | 0 | 12.0% | Forward | 90 | 46 | 0 | 0.0× | ||||
| Break | 0 | 3.0% | Forward | 40 | 100 | 0 | 0.0× |
Back[edit]
| Kind | ID | Damage | Angle | Angle type | BK | KS | FKV | H× | Effect | Type | Sound |
|---|---|---|---|---|---|---|---|---|---|---|---|
| Throw | 0 | 13.0% | Forward | 85 | 52 | 0 | 0.0× | ||||
| Break | 0 | 3.0% | Forward | 40 | 100 | 0 | 0.0× |
Up[edit]
| Kind | ID | Damage | Angle | Angle type | BK | KS | FKV | H× | Effect | Type | Sound |
|---|---|---|---|---|---|---|---|---|---|---|---|
| Throw | 0 | 12.0% | Forward | 65 | 53 | 0 | 0.0× | ||||
| Break | 0 | 3.0% | Forward | 40 | 100 | 0 | 0.0× |
Down[edit]
| Kind | ID | Damage | Angle | Angle type | BK | KS | FKV | H× | Effect | Type | Sound |
|---|---|---|---|---|---|---|---|---|---|---|---|
| Throw | 0 | 11.0% | Forward | 70 | 45 | 0 | 0.0× | ||||
| Break | 0 | 3.0% | Forward | 40 | 100 | 0 | 0.0× |
Timing[edit]
Carry[edit]
| Invincibility | 1-15 |
|---|---|
| Animation length | 15 |
Forward[edit]
| Throw | 15 |
|---|---|
| Interruptible | 46 |
| Animation length | 64 |
Back[edit]
Donkey Kong changes direction on frame 16.
| Throw | 16 |
|---|---|
| Interruptible | 43 |
| Animation length | 59 |
Up[edit]
| Throw | 15 |
|---|---|
| Interruptible | 30 |
| Animation length | 49 |
Down[edit]
On frame 17, the move stops Donkey Kong's horizontal momentum, and sets his vertical momentum to 1.5.
| Throw | 17 |
|---|---|
| Interruptible | 45 |
| Animation length | 59 |
Lag time |
Vulnerable |
Invincible |
Throw point |
Interruptible |
Carry parameters[edit]
The carry's duration is equal to ((90 + 1.7p) * 11 / 6) - g, where p is the opponent's percent at the time of the carry's initiation, and g is the grab time passed prior to it. As a result, it lasts longer the earlier it is initiated after grabbing an opponent; for example, against an opponent with 0% damage, it lasts 165 frames if initiated immediately out of a grab, and 105 frames if initiated after 60 grab frames. As with standard grabs, button mashing reduces this amount by 8 frames per stick input, and 14.4 frames per button input (though they cannot be registered as quickly).
Additionally, while carrying an opponent or heavy item, Donkey Kong's walk speed and acceleration are increased by 1.1×.
|


