Pac-Man (SSB4)/Back aerial: Difference between revisions
From SmashWiki, the Super Smash Bros. wiki
Jump to navigationJump to search
Baefeather (talk | contribs) m (→Timing) |
m (Text replacement - "== ([^=])" to "== $1") |
||
| (7 intermediate revisions by 5 users not shown) | |||
| Line 1: | Line 1: | ||
{{ArticleIcons|ssb4=y}} | {{ArticleIcons|ssb4=y}} | ||
[[File:Pac-ManBAir.gif|thumb|270px|Hitbox visualization showing Pac-Man's back aerial.]] | |||
{{competitive expertise}} | |||
==Overview== | ==Overview== | ||
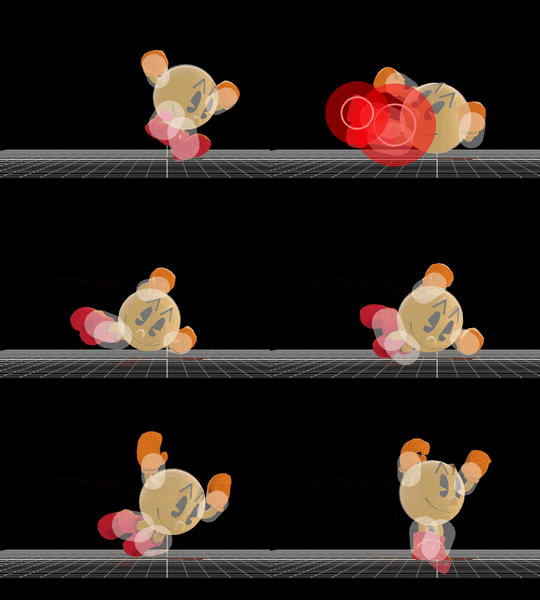
Pac-Man performs a {{s|Wikipedia|dropkick}}, hitting opponents behind him. The hit deals 11.8% damage and has moderate knockback, making it a kill option at higher percents. It is able to [[Autocancel|autocancel]] off of a short hop, making it an effective spacing tool. If not autocancelled, however, the move has 22 frames of landing lag, leaving Pac-Man open to [[Punishment|punishes]]. | Pac-Man performs a {{s|Wikipedia|dropkick}}, hitting opponents behind him. The hit deals 11.8% damage and has moderate knockback, making it a kill option at higher percents. It is able to [[Autocancel|autocancel]] off of a short hop, making it an effective spacing tool. If not autocancelled, however, the move has 22 frames of landing lag, leaving Pac-Man open to [[Punishment|punishes]]. | ||
==Update history== | |||
Pac-Man's back aerial has received only one change in version [[1.1.5]], where the clean hit's knockback was slightly increased. | |||
'''{{GameIcon|ssb4}} [[1.1.5]]''' | |||
*{{buff|Back aerial clean hit knockback scaling (98 → 100)}} | |||
==Hitboxes== | ==Hitboxes== | ||
{{ | {{SSB4HitboxTableHeader}} | ||
{| | {{HitboxTableTitle|Clean hit|42}} | ||
{{SSB4HitboxTableRow | |||
| | |id=0 | ||
| | |part=0 | ||
|damage=11.8% | |||
|angle=361 | |||
|bk=10 | |||
|ks=100 | |||
|fkv=0 | |||
|r=4.5 | |||
|bn=9 | |||
|xpos=4.8 | |||
|ypos=0.0 | |||
|zpos=0.0 | |||
|type=Foot | |||
|sdi=1.0 | |||
|trip=0 | |||
|sfx=Kick | |||
|slvl=L | |||
}} | |||
{{SSB4HitboxTableRow | |||
|id=1 | |||
|part=0 | |||
|damage=11.8% | |||
|angle=361 | |||
|bk=10 | |||
|ks=100 | |||
|fkv=0 | |||
|r=5.9 | |||
|bn=8 | |||
|xpos=1.6 | |||
|ypos=0.0 | |||
|zpos=0.0 | |||
|type=Foot | |||
|sdi=1.0 | |||
|trip=0 | |||
|sfx=Kick | |||
|slvl=L | |||
}} | |||
{{HitboxTableTitle|Late hit|42}} | |||
{{SSB4HitboxTableRow | |||
|id=0 | |||
|part=0 | |||
|damage=7% | |||
|angle=361 | |||
|bk=7 | |||
|ks=90 | |||
|fkv=0 | |||
|r=4.5 | |||
|bn=9 | |||
|xpos=4.8 | |||
|ypos=0.0 | |||
|zpos=0.0 | |||
|type=Foot | |||
|sdi=1.0 | |||
|trip=0 | |||
|sfx=Kick | |||
|slvl=M | |||
}} | |||
{{SSB4HitboxTableRow | |||
|id=1 | |||
|part=0 | |||
|damage=7% | |||
|angle=361 | |||
|bk=7 | |||
|ks=90 | |||
|fkv=0 | |||
|r=5.3 | |||
|bn=8 | |||
|xpos=1.6 | |||
|ypos=0.0 | |||
|zpos=0.0 | |||
|type=Foot | |||
|sdi=1.0 | |||
|trip=0 | |||
|sfx=Kick | |||
|slvl=M | |||
}} | |||
|} | |} | ||
| Line 15: | Line 97: | ||
===Attack=== | ===Attack=== | ||
{|class="wikitable" | {|class="wikitable" | ||
!Initial autocancel | |||
|1-8 | |||
|- | |- | ||
! | !Clean hit | ||
|9-11 | |9-11 | ||
|- | |- | ||
!Late | !Late hit | ||
|12-16 | |12-16 | ||
|- | |- | ||
! | !Ending autocancel | ||
| | |36- | ||
|- | |||
!Interruptible | |||
|41 | |||
|- | |- | ||
!Animation length | !Animation length | ||
| | |44 | ||
|} | |} | ||
{{FrameStripStart}} | {{FrameStripStart}} | ||
{{FrameStrip|t=Lag|c=8}}{{FrameStrip|t=Hitbox|c= | {{FrameStrip|t=Lag|c=8}}{{FrameStrip|t=Hitbox|c=3|e=HitboxChangeS}}{{FrameStrip|t=Hitbox|c=5|s=HitboxChangeE}}{{FrameStrip|t=Lag|c=24}}{{FrameStrip|t=Interruptible|c=4}} | ||
|- | |- | ||
{{FrameStrip|t=Autocancel|c=8}}{{FrameStrip|t=Blank|c=27}}{{FrameStrip|t=Autocancel|c= | {{FrameStrip|t=Autocancel|c=8}}{{FrameStrip|t=Blank|c=27}}{{FrameStrip|t=Autocancel|c=9}} | ||
{{FrameStripEnd}} | {{FrameStripEnd}} | ||
===Landing lag=== | ===Landing lag=== | ||
{|class="wikitable" | {|class="wikitable" | ||
!Animation length | !Animation length | ||
|22 | |22 | ||
| Line 46: | Line 132: | ||
{{FrameStripEnd}} | {{FrameStripEnd}} | ||
{{FrameIconLegend|lag=y|hitbox=y|autocancel=y}} | {{FrameIconLegend|lag=y|hitbox=y|autocancel=y|hitboxchange=y|interruptible=y}} | ||
{{MvSubNavPac-Man|g=SSB4}} | {{MvSubNavPac-Man|g=SSB4}} | ||
[[Category:Pac-Man (SSB4)]] | [[Category:Pac-Man (SSB4)]] | ||
[[Category:Back aerials (SSB4)]] | [[Category:Back aerials (SSB4)]] | ||
Latest revision as of 22:10, April 12, 2022
Overview[edit]
Pac-Man performs a dropkick, hitting opponents behind him. The hit deals 11.8% damage and has moderate knockback, making it a kill option at higher percents. It is able to autocancel off of a short hop, making it an effective spacing tool. If not autocancelled, however, the move has 22 frames of landing lag, leaving Pac-Man open to punishes.
Update history[edit]
Pac-Man's back aerial has received only one change in version 1.1.5, where the clean hit's knockback was slightly increased.
 Back aerial clean hit knockback scaling (98 → 100)
Hitboxes[edit]
Timing[edit]
Attack[edit]
| Initial autocancel | 1-8 |
|---|---|
| Clean hit | 9-11 |
| Late hit | 12-16 |
| Ending autocancel | 36- |
| Interruptible | 41 |
| Animation length | 44 |
Landing lag[edit]
| Animation length | 22 |
|---|
Lag time |
Hitbox |
Hitbox change |
Autocancel |
Interruptible |
|

