Pac-Man (SSB4)/Down throw: Difference between revisions
From SmashWiki, the Super Smash Bros. wiki
Jump to navigationJump to search
m (Text replacement - " " to " ") |
m (Text replacement - "== ([^=])" to "== $1") |
||
| (4 intermediate revisions by one other user not shown) | |||
| Line 1: | Line 1: | ||
{{ArticleIcons|ssb4=y}} | {{ArticleIcons|ssb4=y}} | ||
[[File:Pac-ManThrowDown.gif|thumb|270px|Hitbox visualization showing Pac-Man's down throw.]] | [[File:Pac-ManThrowDown.gif|thumb|270px|Hitbox visualization showing Pac-Man's down throw.]] | ||
==Overview== | ==Overview== | ||
{{competitive expertise}} | |||
Pac-Man places the opponent underneath and transforms into his wedge form, chomping the opponent three times before launching them. While it has some follow-up potential, there are no true combos out of it unless Pac-Man is pushed by the [[Fire Hydrant]]'s water. | Pac-Man places the opponent underneath and transforms into his wedge form, chomping the opponent three times before launching them. While it has some follow-up potential, there are no true combos out of it unless Pac-Man is pushed by the [[Fire Hydrant]]'s water. | ||
==Throw and Hitbox data== | |||
===Hitboxes=== | |||
{{SSB4HitboxTableHeader|special=y}} | |||
{{SSB4SpecialHitboxTableRow | |||
=== | |||
{{SSB4HitboxTableHeader}} | |||
{{ | |||
|id=0 | |id=0 | ||
|part=0 | |part=0 | ||
|damage=1.5% | |damage=1.5% | ||
|angle=361 | |angle=361 | ||
|af=3 | |||
|bk=0 | |bk=0 | ||
|ks=100 | |ks=100 | ||
| Line 46: | Line 35: | ||
|} | |} | ||
{{MvSubNavPac-Man}} | ===Throw=== | ||
{{SSB4ThrowTableHeader}} | |||
{{SSB4ThrowTableRow | |||
|id=0 | |||
|damage=6% | |||
|af=3 | |||
|angle=45 | |||
|bk=60 | |||
|ks=55 | |||
|fkv=0 | |||
|bn=0 | |||
|noff=true | |||
|trip=0 | |||
|type=Throwing | |||
|effect=Normal | |||
|slvl=S | |||
|sfx=None | |||
}} | |||
{{SSB4ThrowTableRow | |||
|id=1 | |||
|damage=3% | |||
|af=3 | |||
|angle=361 | |||
|bk=40 | |||
|ks=100 | |||
|fkv=0 | |||
|bn=0 | |||
|noff=true | |||
|trip=0 | |||
|type=Throwing | |||
|effect=Normal | |||
|slvl=S | |||
|sfx=None | |||
}} | |||
|} | |||
==Timing== | |||
{|class="wikitable" | |||
!Invincibility | |||
|1-18 | |||
|- | |||
!Hitboxes | |||
|17-18, 27-28, 37-38 | |||
|- | |||
!Throw Release | |||
|39 | |||
|- | |||
!Interruptible | |||
|65 | |||
|- | |||
!Animation length | |||
|76 | |||
|} | |||
{{FrameStripStart}} | |||
{{FrameStrip|t=Lag|c=16}}{{FrameStrip|t=Hitbox|c=2}}{{FrameStrip|t=Lag|c=8}}{{FrameStrip|t=Hitbox|c=2}}{{FrameStrip|t=Lag|c=8}}{{FrameStrip|t=Hitbox|c=2|e=HitboxThrowS}}{{FrameStrip|t=Lag|c=26|s=LagThrowE}}{{FrameStrip|t=Interruptible|c=12}} | |||
|- | |||
{{FrameStrip|t=Invincible|c=18}}{{FrameStrip|t=Vulnerable|c=58}} | |||
{{FrameStripEnd}} | |||
{{FrameIconLegend|lag=y|hitbox=y|throw=y|interruptible=y|vulnerable=y|invincible=y}} | |||
{{MvSubNavPac-Man|g=SSB4}} | |||
[[Category:Pac-Man (SSB4)]] | [[Category:Pac-Man (SSB4)]] | ||
[[Category:Down throws (SSB4)]] | [[Category:Down throws (SSB4)]] | ||
Latest revision as of 21:44, April 12, 2022
Overview[edit]
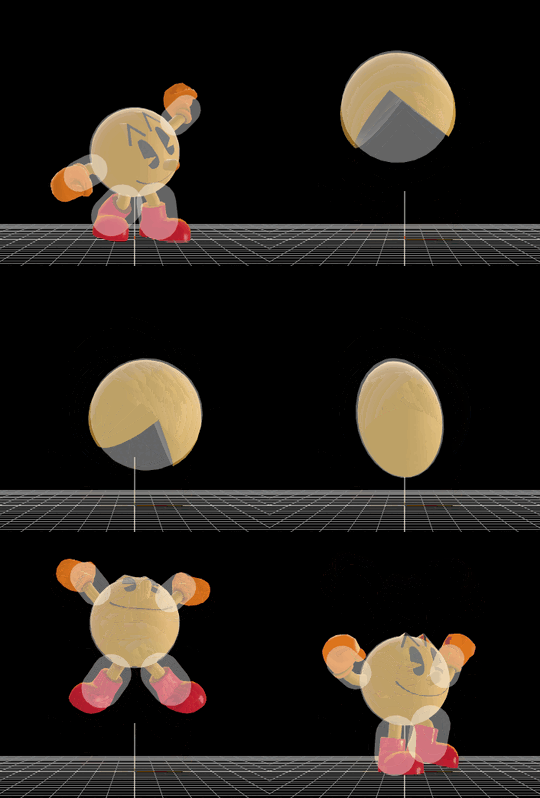
Pac-Man places the opponent underneath and transforms into his wedge form, chomping the opponent three times before launching them. While it has some follow-up potential, there are no true combos out of it unless Pac-Man is pushed by the Fire Hydrant's water.
Throw and Hitbox data[edit]
Hitboxes[edit]
Throw[edit]
| ID | Damage | Angle | BK | KS | FKV | Bone | FFx | Type | Effect | Sound | |
|---|---|---|---|---|---|---|---|---|---|---|---|
| 0 | 6% | Forwards | 60 | 55 | 0 | 0 | None | ||||
| 1 | 3% | Forwards | 40 | 100 | 0 | 0 | None | ||||
Timing[edit]
| Invincibility | 1-18 |
|---|---|
| Hitboxes | 17-18, 27-28, 37-38 |
| Throw Release | 39 |
| Interruptible | 65 |
| Animation length | 76 |
Lag time |
Hitbox |
Vulnerable |
Invincible |
Throw point |
Interruptible |
|

