Molten Fortress: Difference between revisions
mNo edit summary Tag: Mobile edit |
m (Spirit Name Standardization) |
||
| Line 1: | Line 1: | ||
{{articleIcons|ssbu=y}} | {{articleIcons|ssbu=y}} | ||
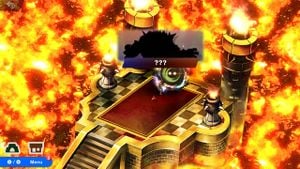
[[File:SmashGigaB.jpg|thumb|300px| | [[File:SmashGigaB.jpg|thumb|300px|{{SSBU|Link}} before the [[Giga Bowser|boss]] at the end of the Molten Fortress.]] | ||
The '''Molten Fortress''' ({{ja|溶岩城|Yōgan-jō}}, ''Lava Castle'') is a sub-world found in [[The Light Realm]] within [[Adventure Mode: World of Light|Adventure Mode]] in ''[[Super Smash Bros. Ultimate]]''. It is located in the north-central region above the Cliffside Rapids, and unlike other sub-worlds in the Light Realm, it does not require a certain type of Spirit to reach it. It is themed after the castle stages within the [[Mario (universe)|''Super Mario'' series]], and as such, P-Switches and Pipes are required for use in order to progress to the boss, [[Giga Bowser]]. The area's background music is ''{{SSBUMusicLink|Super Mario Bros.|Castle / Boss Fortress - Super Mario World / SMB 3}}''. | The '''Molten Fortress''' ({{ja|溶岩城|Yōgan-jō}}, ''Lava Castle'') is a sub-world found in [[The Light Realm]] within [[Adventure Mode: World of Light|Adventure Mode]] in ''[[Super Smash Bros. Ultimate]]''. It is located in the north-central region above the Cliffside Rapids, and unlike other sub-worlds in the Light Realm, it does not require a certain type of Spirit to reach it. It is themed after the castle stages within the [[Mario (universe)|''Super Mario'' series]], and as such, P-Switches and Pipes are required for use in order to progress to the boss, [[Giga Bowser]]. The area's background music is ''{{SSBUMusicLink|Super Mario Bros.|Castle / Boss Fortress - Super Mario World / SMB 3}}''. | ||
{{clear}} | {{clear}} | ||
| Line 25: | Line 25: | ||
|- | |- | ||
|62 | |62 | ||
|{{SpiritTableName|Mechakoopa|link=y|size=64}} | |||
|{{ | |||
|{{uv|Mario}} | |{{uv|Mario}} | ||
|•Tiny {{SSBU|Bowser}} {{Head|Bowser|g=SSBU|s=20px|cl=Yellow}} (×4) | |•Tiny {{SSBU|Bowser}} {{Head|Bowser|g=SSBU|s=20px|cl=Yellow}} (×4) | ||
| Line 37: | Line 36: | ||
|- | |- | ||
|1,059 | |1,059 | ||
| | |{{SpiritTableName|Juste Belmont|size=64}} | ||
|{{uv|Castlevania}} | |{{uv|Castlevania}} | ||
|•{{SSBU|Richter}} {{Head|Richter|g=SSBU|s=20px|cl=Red}} | |•{{SSBU|Richter}} {{Head|Richter|g=SSBU|s=20px|cl=Red}} | ||
| Line 49: | Line 47: | ||
|- | |- | ||
|642 | |642 | ||
| | |{{SpiritTableName|Leif (Fire Emblem)|customname={{s|fireemblem|Leif}} (Fire Emblem)|size=64}} | ||
|{{s|fireemblem|Leif}} (Fire Emblem) | |||
|{{uv|Fire Emblem}} | |{{uv|Fire Emblem}} | ||
|•{{SSBU|Roy}} {{Head|Roy|g=SSBU|s=20px|cl=Pink}} | |•{{SSBU|Roy}} {{Head|Roy|g=SSBU|s=20px|cl=Pink}} | ||
| Line 61: | Line 58: | ||
|- | |- | ||
|893 | |893 | ||
|{{ | |{{SpiritTableName|Shadow Man|size=64}} | ||
|{{uv|Mega Man}} | |{{uv|Mega Man}} | ||
|•{{SSBU|Greninja}} {{Head|Greninja|g=SSBU|s=20px|cl=Purple}} (×3) | |•{{SSBU|Greninja}} {{Head|Greninja|g=SSBU|s=20px|cl=Purple}} (×3) | ||
| Line 73: | Line 69: | ||
|- | |- | ||
|485 | |485 | ||
| | |{{SpiritTableName|Ho-Oh|link=y|size=64}} | ||
|{{uv|Pokémon}} | |{{uv|Pokémon}} | ||
|•Curry {{SSBU|Charizard}} {{Head|Charizard|g=SSBU|s=20px|cl=Red}} | |•Curry {{SSBU|Charizard}} {{Head|Charizard|g=SSBU|s=20px|cl=Red}} | ||
| Line 85: | Line 80: | ||
|- | |- | ||
|712 | |712 | ||
|{{ | |{{SpiritTableName|Twinbellows|size=64}} | ||
|{{uv|Kid Icarus}} | |{{uv|Kid Icarus}} | ||
|•Giant {{SSBU|Duck Hunt}} {{Head|Duck Hunt|g=SSBU|s=20px|cl=Tan}} | |•Giant {{SSBU|Duck Hunt}} {{Head|Duck Hunt|g=SSBU|s=20px|cl=Tan}} | ||
| Line 97: | Line 91: | ||
|- | |- | ||
|61 | |61 | ||
|{{SpiritTableName|Kamek|link=y|size=64}} | |||
|{{ | |||
|{{uv|Mario}} | |{{uv|Mario}} | ||
|•{{SSBU|Inkling}} {{Head|Inkling|g=SSBU|s=20px|cl=Cyan}} (×4) | |•{{SSBU|Inkling}} {{Head|Inkling|g=SSBU|s=20px|cl=Cyan}} (×4) | ||
| Line 109: | Line 102: | ||
|- | |- | ||
|498 | |498 | ||
|{{SpiritTableName|Groudon|link=y|size=64}} | |||
|{{ | |||
|{{uv|Pokémon}} | |{{uv|Pokémon}} | ||
|•Giant {{SSBU|Bowser}} {{Head|Bowser|g=SSBU|s=20px|cl=Red}} | |•Giant {{SSBU|Bowser}} {{Head|Bowser|g=SSBU|s=20px|cl=Red}} | ||
| Line 121: | Line 113: | ||
|- | |- | ||
|1,227 | |1,227 | ||
|{{ | |{{SpiritTableName|Aisya}} | ||
|{{uvm|ASH: Archaic Sealed Heat}} | |{{uvm|ASH: Archaic Sealed Heat}} | ||
|•{{SSBU|Lucina}} {{Head|Lucina|g=SSBU|s=20px|cl=Yellow}} | |•{{SSBU|Lucina}} {{Head|Lucina|g=SSBU|s=20px|cl=Yellow}} | ||
| Line 133: | Line 124: | ||
|- | |- | ||
|656 | |656 | ||
| | |{{SpiritTableName|Lyon|link=y|iw=fireemblem|size=64}} | ||
| | |||
|{{uv|Fire Emblem}} | |{{uv|Fire Emblem}} | ||
|•{{SSBU|Robin}} {{Head|Robin|g=SSBU|s=20px|cl=White}}<br>•Giant {{SSBU|Ridley}} {{Head|Ridley|g=SSBU|s=20px|cl=Purple}} | |•{{SSBU|Robin}} {{Head|Robin|g=SSBU|s=20px|cl=White}}<br>•Giant {{SSBU|Ridley}} {{Head|Ridley|g=SSBU|s=20px|cl=Purple}} | ||
|{{SpiritType|Grab}} | |{{SpiritType|Grab}} | ||
|3,700 | |3,700 | ||
|[[Unova Pokémon League]] | |[[Unova Pokémon League]] | ||
|N/A | |N/A | ||
|•Reinforcements will appear after an enemy is KO'd<br>•The enemy is giant (referring only to Ridley) | |•Reinforcements will appear after an enemy is KO'd<br>•The enemy is giant (referring only to Ridley) | ||
| Line 146: | Line 136: | ||
|} | |} | ||
===Boss Spirit=== | ===Boss Spirit=== | ||
{| class="wikitable | {|class="wikitable" | ||
! No. !! Image !! Name !! Type !! Class !! Slots | |||
! Base [[File:Equipment Icon Power Badge.png|20px|Power]] | |||
! Max [[File:Equipment Icon Power Badge.png|20px|Power]] | |||
! Base [[File:Equipment Icon Brawn Badge.png|20px|Attack]] | |||
! Max [[File:Equipment Icon Brawn Badge.png|20px|Attack]] | |||
! Base [[File:Equipment Icon Protection Badge.png|20px|Defense]] | |||
! Max [[File:Equipment Icon Protection Badge.png|20px|Defense]] | |||
! Ability !! Series | |||
|- | |- | ||
| 1,097 || {{SpiritTableName|Giga Bowser|size=64}} || {{SpiritType|Neutral}} || ★★ || 3 || 1655 || 6700 || 813 || 3289 || 692 || 2802 || Fire Attack ↑ || ''Super Smash Bros.'' Series | |||
| 1,097 || | |||
|} | |} | ||
| Line 164: | Line 160: | ||
! Music | ! Music | ||
|- | |- | ||
|[[File: | |[[File:Giga Bowser SSBU.png|center|108x108px]] | ||
|[[Giga Bowser]] | |[[Giga Bowser]] | ||
|{{SpiritType|Neutral}} <center>{{color|#796581|Neutral}}</center> | |{{SpiritType|Neutral}} <center>{{color|#796581|Neutral}}</center> | ||
Revision as of 12:05, December 2, 2020
The Molten Fortress (溶岩城, Lava Castle) is a sub-world found in The Light Realm within Adventure Mode in Super Smash Bros. Ultimate. It is located in the north-central region above the Cliffside Rapids, and unlike other sub-worlds in the Light Realm, it does not require a certain type of Spirit to reach it. It is themed after the castle stages within the Super Mario series, and as such, P-Switches and Pipes are required for use in order to progress to the boss, Giga Bowser. The area's background music is Castle / Boss Fortress - Super Mario World / SMB 3.
Spirits
The spirits found here are generally characters found in castles or ones associated with fire and lava. Spirits are ordered by when they are encountered on the map, up until the boss.
| Spirit | Battle parameters | |||||||||
|---|---|---|---|---|---|---|---|---|---|---|
| No. | Image | Name | Universe | Enemy Fighter(s) | Type | Power | Stage | Rules | Conditions | Music |
| 62 | Mechakoopa | Mario | •Tiny Bowser |
3,800 | Mushroom Kingdom U (Slide Lift Tower) | N/A | •The enemy starts the battle with a Bob-omb | King Bowser - Super Mario Bros. 3 | ||
| 1,059 | Juste Belmont | Castlevania | •Richter |
4,200 | The Great Cave Offensive (Battlefield form) | •Hazard: Lava Floor | •The floor is lava •The enemy has increased move speed |
Awake | ||
| 642 | Leif (Fire Emblem) | Fire Emblem | •Roy |
9,300 | Castle Siege | N/A | •The enemy can unleash powerful critical hits at random •The enemy heals over time |
Fire Emblem Theme | ||
| 893 | Shadow Man | Mega Man | •Greninja |
3,500 | Norfair (Battlefield form) | N/A | •The enemy's neutral special has increased power •Stamina battle •The enemy favors neutral specials |
Shadow Man Stage | ||
| 485 | Ho-Oh | Pokémon | •Curry Charizard |
13,900 | Kalos Pokémon League | N/A | •Fire and explosion attacks aren't as effective against the enemy •The enemy breathes fire |
Pokémon Gold / Pokémon Silver Medley | ||
| 712 | Twinbellows | Kid Icarus | •Giant Duck Hunt |
4,100 | Find Mii (Ω form) | •Curry-Filled | •The enemy breathes fire •The enemy is giant |
Boss Fight 1 - Kid Icarus: Uprising | ||
| 61 | Kamek | Mario | •Inkling |
3,300 | Mushroom Kingdom U (Slide Lift Tower) | •Easy to Launch •Item: Star Rod |
•All fighters are easy to launch after a little while •Reinforcements will appear after an enemy is KO'd •The enemy starts the battle with a Star Rod |
Fortress Boss - Super Mario World | ||
| 498 | Groudon | Pokémon | •Giant Bowser |
4,700 | Norfair (Battlefield form) | •Hazard: Lava Floor | •The floor is lava •The enemy is giant |
Victory Road - Pokémon Ruby / Pokémon Sapphire | ||
| 1,227 | Aisya | ASH: Archaic Sealed Heat | •Lucina |
2,500 | Bridge of Eldin | •Assist Trophy Enemies (Shovel Knight) •Bob-omb Festival |
•Bob-ombs will rain from the sky after a little while •Hostile assist trophies will appear |
Attack - Soma Bringer | ||
| 656 | Lyon | Fire Emblem | •Robin •Giant Ridley |
3,700 | Unova Pokémon League | N/A | •Reinforcements will appear after an enemy is KO'd •The enemy is giant (referring only to Ridley) |
Preparing to Advance | ||
Boss Spirit
| No. | Image | Name | Type | Class | Slots | Base |
Max |
Base |
Max |
Base |
Max |
Ability | Series |
|---|---|---|---|---|---|---|---|---|---|---|---|---|---|
| 1,097 | Giga Bowser | ★★ | 3 | 1655 | 6700 | 813 | 3289 | 692 | 2802 | Fire Attack ↑ | Super Smash Bros. Series |
Boss
The boss of this sub-world is Giga Bowser. Defeating him grants players the Giga Bowser spirit, the partial destruction of Galeem's shield depending on the other sub-worlds defeated, and Bowser as a playable character.
| Image | Name | Type | Power | Stage | Music |
|---|---|---|---|---|---|
| Giga Bowser | ??? | Final Destination | Giga Bowser |
Captured Fighters
There are two fighters that can be freed within this sub-world. Both are from the Mario universe, and Bowser is required to free, as he is locked behind Giga Bowser. Peach is optional.
| No. | Image | Name | Type | Power | Stage | Music | |
|---|---|---|---|---|---|---|---|
| 13 | Peach | 7,500 | Mushroom Kingdom U | Fortress Boss - Super Mario World | |||
| 14 | Bowser | There is no fighter battle for Bowser. This fighter is obtained after defeating Giga Bowser. | |||||
Chests
Two chests can be found in this sub-world.
| Type | Item Name | Location |
|---|---|---|
| Music Track | Melty Monster | On the most-right path to Peach's location |
| Snack | Snacks (L) ×2 | Next to Lyon's spirit location |


