Super Smash Bros. Ultimate

Fox (SSBU)/Neutral attack/Hit 2: Difference between revisions

From SmashWiki, the Super Smash Bros. wiki
Jump to navigationJump to search
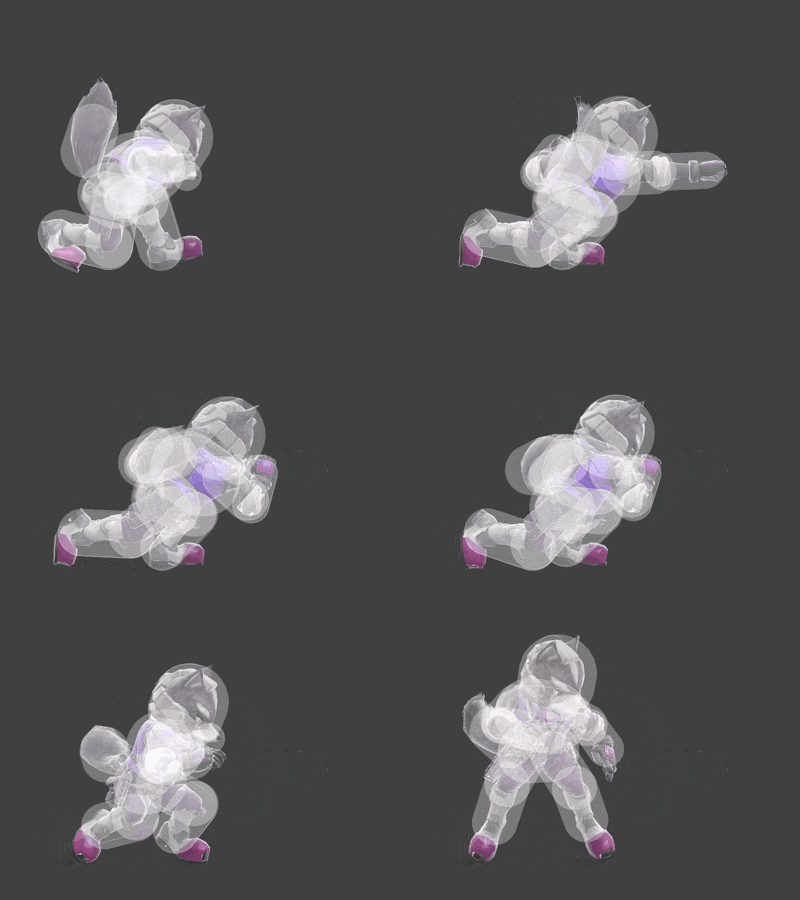
(New Page: {{ArticleIcons|ssbu=y}} thumb|400px|Hitbox visualization showing Fox's second jab. {{competitive expertise}} ==Overview== ==Hitboxes== {{UltimateHitboxTableHead...)
 
m (Yep, the farthest hitbox is 180º. Also added update history)
Line 3: Line 3:
{{competitive expertise}}
==Overview==
==Overview==
==Update History==
'''{{GameIcon|ssbu}} {{SSBU|3.1.0}}'''
*{{buff|Neutral attack 2 connects into neutral infinite more reliably.}}
==Hitboxes==
==Hitboxes==
{{UltimateHitboxTableHeader}}
Line 44: Line 47:
|id=2
|id=2
|damage=1.0%
|damage=1.0%
|angle=361
|angle=180
|bk=20
|bk=20
|ks=20
|ks=20

Revision as of 16:11, July 11, 2020

Hitbox visualization showing Fox's second jab.
Competitive.png This article or section may require competitive expertise.
You can discuss this issue on the talk page or edit this page to improve it.

Overview

Update History

Super Smash Bros. Ultimate 3.1.0

  • Buff Neutral attack 2 connects into neutral infinite more reliably.

Hitboxes

ID Part Rehit rate Damage SD Angle Angle type BK KS FKV Set weight Radius Bone Offset SDI× T% Clang Rebound Effect Type G A Sound Direct Hit bits Hit part Blockable Reflectable Absorbable Flinchless No GFX Heedless
0 0 0 1.0% 0 Sakurai angle Standard 20 35 0 HitboxTableIcon(False).png 2.5 top 0.0 7.0 6.0 1.2× 1.0× 0% HitboxTableIcon(Clang).png HitboxTableIcon(Rebound).png Normal (effect) Hand (type) HitboxTableIcon(GroundedTrue).png HitboxTableIcon(AerialTrue).png M Punch SpecialsDirect.png All All HitboxTableIcon(Blockable).png HitboxTableIcon(Unreflectable).png HitboxTableIcon(Unabsorbable).png HitboxTableIcon(False).png HitboxTableIcon(False).png HitboxTableIcon(False).png
1 0 0 1.0% 0 Sakurai angle Standard 20 33 0 HitboxTableIcon(False).png 3.2 top 0.0 7.0 9.5 1.2× 1.0× 0% HitboxTableIcon(Clang).png HitboxTableIcon(Rebound).png Normal (effect) Hand (type) HitboxTableIcon(GroundedTrue).png HitboxTableIcon(AerialTrue).png M Punch SpecialsDirect.png All All HitboxTableIcon(Blockable).png HitboxTableIcon(Unreflectable).png HitboxTableIcon(Unabsorbable).png HitboxTableIcon(False).png HitboxTableIcon(False).png HitboxTableIcon(False).png
2 0 0 1.0% 0 AngleIcon180.png Standard 20 20 0 HitboxTableIcon(False).png 4.0 top 0.0 7.0 13.0 1.2× 1.0× 0% HitboxTableIcon(Clang).png HitboxTableIcon(Rebound).png Normal (effect) Hand (type) HitboxTableIcon(GroundedTrue).png HitboxTableIcon(AerialTrue).png M Punch SpecialsDirect.png All All HitboxTableIcon(Blockable).png HitboxTableIcon(Unreflectable).png HitboxTableIcon(Unabsorbable).png HitboxTableIcon(False).png HitboxTableIcon(False).png HitboxTableIcon(False).png

Timing

Hitboxes 2
Earliest continuable 6
Interruptible 21
Animation length 30
FrameIcon(Lag).png FrameIcon(Hitbox).png FrameIcon(Lag).png FrameIcon(Lag).png FrameIcon(LagContinuableS).png FrameIcon(LagContinuableE).png FrameIcon(Lag).png FrameIcon(Lag).png FrameIcon(Lag).png FrameIcon(Lag).png FrameIcon(Lag).png FrameIcon(Lag).png FrameIcon(Lag).png FrameIcon(Lag).png FrameIcon(Lag).png FrameIcon(Lag).png FrameIcon(Lag).png FrameIcon(Lag).png FrameIcon(Lag).png FrameIcon(Lag).png FrameIcon(Interruptible).png FrameIcon(Interruptible).png FrameIcon(Interruptible).png FrameIcon(Interruptible).png FrameIcon(Interruptible).png FrameIcon(Interruptible).png FrameIcon(Interruptible).png FrameIcon(Interruptible).png FrameIcon(Interruptible).png FrameIcon(Interruptible).png
Legend (1 square = 1 frame)
Lag
Lag time
Hitbox
Hitbox
FrameIcon(BlankContinuableS).pngFrameIcon(BlankContinuableE).png
Earliest continuable point
Interruptibility
Interruptible