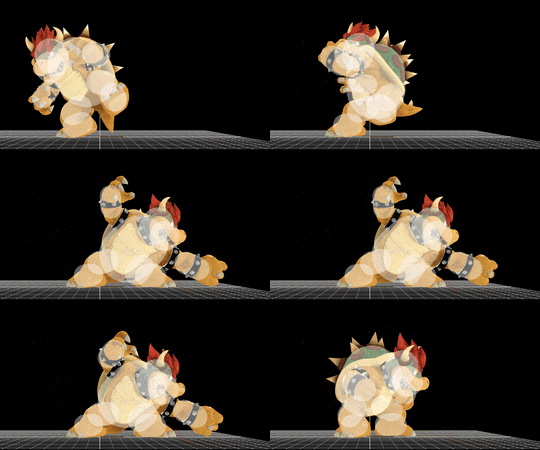
Bowser (SSB4)/Forward tilt: Difference between revisions
(New Page: {{competitive expertise}} ==Hitboxes== This move can be angled up, forward, or down, but all three have the same properties. {{SSB4HitboxTableHeader}} {{SSB4HitboxTableRow |id=0 |par...) |
(fixed some wording and added more detail. also removed the need of competitive expertise.) |
||
| (9 intermediate revisions by 7 users not shown) | |||
| Line 1: | Line 1: | ||
{{ | {{ArticleIcons|ssb4=y}} | ||
{|class="wikitable" style="float:right; margin:4pt;" | |||
!colspan=2|Bowser forward tilt hitbox visualization | |||
|- | |||
!↗ | |||
|[[File:BowserFTiltUp.gif|270px]] | |||
|- | |||
!→ | |||
|[[File:BowserFTilt.gif|270px]] | |||
|- | |||
!↘ | |||
|[[File:BowserFTiltDown.gif|270px]] | |||
|} | |||
==Overview== | |||
Bowser swings his fist forward. The move is slow, but can stuff out an opponent's approach and can KO at higher percents. However, due to it's slow startup and being unsafe on [[shield]] because of its [[end lag]], the move is overshadowed by other moves such as his [[down tilt]] and [[jab]], which are all more safe on shield and have greater versatility to kill and rack up damage or lead into his other followups like his deadly [[grab]] respectively. | |||
The move can be linked from a single hit jab as a mixup, or from as a combo extension from Bowser's other moves, such as his forward aerial. It can also be used to soft punish tech options or to [[two frame]] a ledge grab. | |||
==Hitboxes== | ==Hitboxes== | ||
This move can be angled up, forward, or down, but all three angles have the same properties. | |||
This move can be angled up, forward, or down, but all three have the same properties. | |||
{{SSB4HitboxTableHeader}} | {{SSB4HitboxTableHeader}} | ||
{{SSB4HitboxTableRow | {{SSB4HitboxTableRow | ||
|id=0 | |id=0 | ||
|damage=12% | |damage=12% | ||
|angle=361 | |angle=361 | ||
| Line 17: | Line 31: | ||
|bn=16 | |bn=16 | ||
|xpos=5.1 | |xpos=5.1 | ||
|type=Hand | |type=Hand | ||
|sfx=Kick | |sfx=Kick | ||
|slvl=L | |slvl=L | ||
| Line 27: | Line 37: | ||
{{SSB4HitboxTableRow | {{SSB4HitboxTableRow | ||
|id=1 | |id=1 | ||
|damage=12% | |damage=12% | ||
|angle=361 | |angle=361 | ||
| Line 35: | Line 44: | ||
|r=4.0 | |r=4.0 | ||
|bn=16 | |bn=16 | ||
|type=Hand | |type=Hand | ||
|sfx=Kick | |sfx=Kick | ||
|slvl=L | |slvl=L | ||
| Line 46: | Line 50: | ||
{{SSB4HitboxTableRow | {{SSB4HitboxTableRow | ||
|id=2 | |id=2 | ||
|damage=12% | |damage=12% | ||
|angle=361 | |angle=361 | ||
| Line 54: | Line 57: | ||
|r=4.0 | |r=4.0 | ||
|bn=16 | |bn=16 | ||
|type=Hand | |type=Hand | ||
|sfx=Kick | |sfx=Kick | ||
|slvl=L | |slvl=L | ||
| Line 65: | Line 63: | ||
|} | |} | ||
==Timing== | |||
{|class="wikitable" | |||
!Hitboxes | |||
|10-14 | |||
|- | |||
!Arm intangible | |||
|10-14 | |||
|- | |||
!Interruptible | |||
|38 | |||
|- | |||
!Animation length | |||
|49 | |||
|} | |||
{{FrameStripStart}} | |||
|Hitboxes {{FrameStrip|t=Lag|c=9}}{{FrameStrip|t=Hitbox|c=5}}{{FrameStrip|t=Lag|c=23}}{{FrameStrip|t=Interruptible|c=12}} | |||
|- | |||
|Arm {{FrameStrip|t=Vulnerable|c=9}}{{FrameStrip|t=Intangible|c=5}}{{FrameStrip|t=Vulnerable|c=35}} | |||
{{FrameStripEnd}} | |||
{{FrameIconLegend|lag=y|hitbox=y|vulnerable=y|intangible=y|interruptible=y}} | |||
{{MvSubNavBowser|g=SSB4}} | {{MvSubNavBowser|g=SSB4}} | ||
[[Category:Bowser (SSB4)]] | |||
[[Category:Forward tilts (SSB4)]] | |||
Latest revision as of 15:41, September 20, 2019
| Bowser forward tilt hitbox visualization | |
|---|---|
| ↗ | 
|
| → | 
|
| ↘ | 
|
Overview[edit]
Bowser swings his fist forward. The move is slow, but can stuff out an opponent's approach and can KO at higher percents. However, due to it's slow startup and being unsafe on shield because of its end lag, the move is overshadowed by other moves such as his down tilt and jab, which are all more safe on shield and have greater versatility to kill and rack up damage or lead into his other followups like his deadly grab respectively. The move can be linked from a single hit jab as a mixup, or from as a combo extension from Bowser's other moves, such as his forward aerial. It can also be used to soft punish tech options or to two frame a ledge grab.
Hitboxes[edit]
This move can be angled up, forward, or down, but all three angles have the same properties.
Timing[edit]
| Hitboxes | 10-14 |
|---|---|
| Arm intangible | 10-14 |
| Interruptible | 38 |
| Animation length | 49 |
| Hitboxes | |||||||||||||||||||||||||||||||||||||||||||||||||
| Arm |
Lag time |
Hitbox |
Vulnerable |
Intangible |
Interruptible |
|