| Welcome to SmashWiki! Log in or create an account and join the community, and don't forget to read this first! |
| Notices |
|---|
| The Skill parameter has been removed from Smasher infoboxes, and in its place are the new "Best historical ranking" and "Best tournament result" parameters. SmashWiki needs help adding these new parameters to Smasher infoboxes, refer to the guidelines here for what should be included in these new parameters. |
| When adding results to Smasher pages, include each tournament's entrant number in addition to the player's placement, and use the {{Trn}} template with the matching game specified. Please also fix old results on Smasher pages that do not abide to this standard. Refer to our Smasher article guidelines to see how results tables should be formatted. |
| Check out our project page for ongoing projects that SmashWiki needs help with. |
Adventure Mode (SSBM)
Adventure Mode is one of three single player modes in Super Smash Bros. Melee. In this mode, the player must traverse a longer sequence of stages found in Classic Mode, but almost all of the stages require more effort; some lack fighting altogether. Like in Classic mode, the player can choose their character, the number of stocks, and difficulty. While the mode generally follows a fixed route, there are possible divergences depending on what actions the player performs.
Overview
The Adventure Mode acts as a method to showcase almost all of the game's starter universes, as well as a slightly more in-depth single player experience than the more arcade-styled Classic Mode.
For the former point, all of the starting universes are represented by one stage; the only exception is Yoshi's, which is incorporated into the Mario stage. Adding to this, some unlockable characters such as Jigglypuff and Luigi can appear in the mode if they are unlocked, while some who do not appear at all, such as Marth.
For the latter, while the Adventure Mode does feature typical one-on-one fights common in the Classic mode, some fights are considerably less straightforward, or follow a theme; for instance, Stage 7: Pokémon Stadium pits the player against a team of 12 Pikachus, as well as the potential for Pichus and Jigglypuffs, but only with Pokéballs as available weapons, mirroring the Pokémon series' gameplay. Some stages also incorporate platforming elements prior to fighting, such as Stage 3: Underground Maze, and others, such as the Escape From Brinstar segment in Stage 4: Brinstar, lack fighting altogether. Another point of interest in the mode is the inclusion of various enemies in the stages that are not fighters, but rather, serve as obstacles to the player; among these include Goombas and ReDeads. Adding to this depth of making the Adventure Mode more involved, the stages follow a loose narrative, involving the player's character traveling to different planets (as seen between Stages 4 and 5), and finally ending up at Stage 12: Final Destination.
Stage 1: Mushroom Kingdom
Part 1: Reach the Flagpole
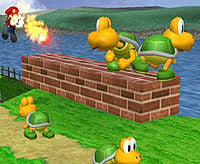
The stage is known as Mushroom Kingdom Adventure, and the goal is simple: reaching the finishing point in 7 minutes. On the player's way through the stage, they will encounter Goombas, Koopa Troopas, and Koopa Paratroopas. They can attack or use items to fight them off, optionally using defeated Koopas' shells against others. Halfway through the stage, the player will encounter some platforms that rise up to the next part.
The player will come to a platform with a Super Mushroom symbol on it. They will have to fight a team made up of 10 Yoshis in a locked battle. In order to progress, the player must defeat all of the Yoshis. The Yoshis are lighter than usual on most difficulties, so the player should be able to fight the Yoshis off quickly, depending on what difficulty they are using. After the player beats the Yoshis, they will encounter a few more Goombas and Koopas. Finally, the player will see the finishing point flagpole with Toad running back and forth. Simply passing the flag completes the stage. Trophies are collectible in this stage.
Part 2: Team Mario and Peach Battle
This is the second part of the stage. The player must battle Mario and Peach on Princess Peach's Castle. The battle is like any regular battle, but at higher difficulties they will abuse the central tower to combo the player. Peach and Mario have a habit to run to the opposite side of the castle when Banzai Bill approaches the castle. They will not attack the player until Banzai Bill explodes, unless the player comes near. Defeating both of them will allow the player to move on to the next match.
Alternate part 2: Team Luigi and Peach Battle
Beating Adventure mode with a "2" in the seconds place (ex. 3:32:00) will initiate a cutscene where Luigi footstools over Mario onto the castle's roof, resulting in the fight being against Luigi and Peach instead of Mario and Peach. Luigi fights similarly, though his misuse of the Green Missile can be used to the player's advantage, as it limits his vertical recovery. Defeating the pair in under a minute and completing the rest of Adventure Mode without continuing will result in getting the chance to unlock Luigi.
Stage 2: Kongo Jungle
Part 1: Tiny Donkey Kong Team Battle
The player must defeat two tiny Donkey Kongs in Kongo Jungle. Tiny characters are light and are easier to KO on low percentages, but their small size means they can be hard to hit. At normal or higher difficulties, these tiny Donkey Kongs are harder to KO. The best way to KO them is to throw them upwards on lower difficulties. On higher difficulties, the best way to KO them is to use an attack that can meteor smash or spike. Also, the two tiny Donkey Kongs can easily self destruct on higher difficulties by having the player use a forward smash near the ledge when the tiny Donkey Kongs are in the air, trying to jump back from the rock to the raft. The tiny Donkey Kongs will then air dodge and fall helpless until they are KO'd by the bottom blast line.
Part 2: Giant Donkey Kong Battle
Part two pits the player against Giant Donkey Kong on Jungle Japes. Giant characters weigh more and are harder to KO, but they are bigger targets. Giant Donkey Kong is not the brightest computer player either, and may trap himself beneath the stage for an easy self-destruct. Sometimes, DK gets KO'd when he hangs where the Klaptraps jump at. Beating this match will let the player proceed to the next stage.
Stage 3: Underground Maze
Part 1: Find the Triforce
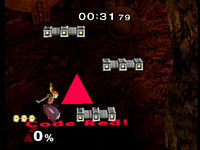
This part is similar to Part 1 of the Mushroom Kingdom stage in that the player must reach a finishing point within 7 minutes. The difference is that the Underground Maze is a non-linear stage, and the target - the Triforce - can be in any one of six rooms, chosen at random. The other five rooms contain a Master Sword, and landing in a room with one will initiate a locked battle with Link. The player, however, can jump over the swords to avoid dueling Link; defeating all five Links, however, gives the player a sizable 30000 points as part of the "Link Master" bonus.
The Underground Maze is infested with ReDeads, Octoroks, and Like Likes. These enemies can cause heavy damage, especially the ReDeads, which a Link in the next room can then exploit for a KO. The Underground Maze is large and easy to become lost in, with one area that has lava, which has a similar effect to touching the acid on the Brinstar stage. The player can collect trophies on the way.
Part 2: Zelda/Sheik Battle
In part two the player battles against Zelda or Sheik in the Temple stage. Winning allows the player to progress to the next stage.
Stage 4: Brinstar
Part 1: Samus Battle
The player battles Samus on the Planet Zebes: Brinstar stage. This is a basic fight with no gimmicks.
Part 2: Escape Zebes
The goal of part 2 is to reach the finish point in 40 seconds. The player must jump up a series of platforms to get to the top of the Brinstar Escape Shaft. The stage is complete when the player reaches the top or runs out of time. Failing to reach the top in time will cost the player one stock but still progress them to stage 5 should they have stock remaining.
Stage 5: Green Greens
Part 1: Single Kirby Battle
When the player first arrives at this level they will be pitted against a single Kirby in a standard one-on-one match, taking place on Green Greens.
Part 2: Team Kirby Battle
The player battles against various Kirbies who each possess different character abilities. The battle once again takes place on Green Greens and the player has 4 minutes to complete it. The Kirbies' different abilities are chosen at random, but no two will possess the same ability in the same match, and only the abilities of currently-unlocked characters are chosen. On easier difficulties, the Kirbies are lighter and are extremely easy to knock out. On harder difficulties, the Kirbies are heavier and more aggressive, and harder to knock out.
Part 3 (optional): Giant Kirby Battle
If the player defeated the first Kirby and the Kirby team in less than 31 seconds each (the timer can go as much as 0.99 seconds past 30 seconds), they will be given the chance to fight a giant Kirby. Defeating the Giant Kirby will award the Giant Kirby KO bonus.
Stage 6: Corneria
Part 1: Fox Battle
The player will have 4 minutes to defeat Fox on Corneria. Fox acts very defensively in this fight; the higher the difficulty, the more likely he is to simply run to the other end of the stage and only attack if approached. Defeating Fox will allow the player to progress to the second part of the stage.
Part 2: Fox Reborn Battle
The player will battle Fox once again. This time, Fox is far more aggressive, attacking the player rather than running away. A significant number of Arwings will be flying around the stage and firing their lasers, which can damage both the player and Fox. Beating Fox will be the same as last time, although he is slightly lighter. Defeating Fox for the second time completes the stage.
Alternate part 2: Falco Battle
If the player has unlocked Falco, they will sometimes fight him instead (chosen at random). Falco's tactics are very similar to Fox's.
Stage 7: Pokémon Stadium
Part 1: Pokémon Battle
The player will battle a team of twelve Pokémon. Most of the opponents will be Pikachu, though if Jigglypuff and Pichu have been unlocked, a minority of them will also appear. The only items that appear on the stage are Poké Balls, with more appearing on lower difficulties.
Stage 8: F-Zero Grand Prix
Part 1: Reach the Finish Line
The goal for part 1 is to reach the finish line in 4 minutes. While the player progresses towards the finish line, F-Zero race cars will speed through the track that the player is running on. A giant "!" on the screen indicates that race cars are approaching. If a car hits the player, then they will take 35% damage. The character will likely survive being hit once, but any subsequent impacts will usually lead to a KO. The player can jump on pink platforms that are situated throughout the stage to avoid being hit by the cars, and certain locations are safe for some characters to crouch. The player must reach the finish line in time to progress to part 2 of this stage. There are also trophies scattered throughout that may be collected. Yoshi's Egg Roll, along with Jigglypuff's Rollout, can be used to cover long distances in this level.
Part 2: Captain Falcon Battle
The player will have 4 minutes to defeat Captain Falcon on Mute City. This battle is no different from the individual character battles that the player fought earlier. Defeating Captain Falcon will allow the player to progress to stage 9.
Stage 9: Onett
Part 1: Team Ness Battle
The player's goal is to defeat three Nesses in 4 minutes. The only item that will appear on the stage is Mr. Saturn, and in copious amounts. The Nesses will grab the Mr. Saturns and lug them at the player. The Nesses rarely attack the player's character on lower difficulties. Instead, they travel around the stage to collect Mr. Saturns and throw them at the player. They will still attack the player comes near. On higher difficulties, the Nesses will attack the players until Mr. Saturn appears. Defeating all three Nesses will allow the player to progress to the next stage.
Stage 10: Icicle Mountain
Part 1: Survive the Scrolling Mountain + Team Ice Climber Battle
On the stage Icicle Mountain, the player must survive 51 seconds of constant upwards scrolling. Unlike the playable version of the stage, the scrolling speed is not random; it starts out very slowly and accelerates up to maximum speed when the time is almost up. While the player is traveling upwards, they will encounter Topis and Polar Bears. Topis are usually found pushing Freezies, which are very common on the stage, while Polar Bears can jump to "bump" the stage upwards a bit. After 51 seconds have elapsed, the stage will slow to a medium pace and the player must battle two pairs of Ice Climbers with a remaining time limit of 3:09. Defeating the Ice Climbers will allow the player to progress to the next stage.
Oddly, the player can also force the stage upwards a bit by landing on high platforms; skilled players can use this to maniputate the stage's layout in order to get a good setup for the Ice Climbers battle, or simply force the Ice Climbers off the screen.
Stage 11: Battlefield
Part 1: Fighting Wire Frames Battle
In the first part of this stage, the player must defeat fifteen Fighting Wire Frames in reduced gravity. Other than the lower gravity, the fight is rather basic.
Part 2: Metal Mario Battle/Metal Bros. Battle
In the second part, the player must battle Metal Mario. If Luigi is unlocked, then Metal Luigi will appear alongside Metal Mario. Defeating both causes the player to win the Metal Bros. KO bonus.
Stage 12: Final Destination
Part 1: Giant Bowser Battle
In the first part of this stage, the player must battle Giant Bowser.
Part 2 (bonus): Giga Bowser Battle
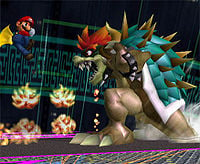
In the second part of this stage, the player must defeat Giga Bowser as the final battle. The player can only fight him if they meet the following conditions:
- The player is playing on Normal difficulty or higher.
- The player makes it to this stage in less than 18 minutes.
- The player has not used a continue. (Continuing against Giant Bowser does not count.)
Once the player meets these conditions, the player is placed into the fray against Giga Bowser. Giga Bowser is a monstrous adversary; his weight is tremendous, requiring at least 200% damage to even get him within gimping range and near 300% for a legitimate KO opportunity, and substantial damage is required for him to even flinch from some attacks. Defeating him with give the player the "Giga Bowser KO" bonus, adding 100,000 points to their score; defeating him without using a continue also gives the player the Giga Bowser trophy.
Rewards
- Clearing Adventure Mode on Hard or Very Hard without using any continues gives the player the Crazy Hand trophy.
- Clearing Adventure Mode with all characters gives the player the F-Zero Racers trophy.
Trivia
- There are no stages based on the Yoshi, Fire Emblem, or Game & Watch universes. The reason for the latter two not having any stages is likely to avoid revealing the existance of these universes in Melee before any characters from those universes have been unlocked, while the reason for the former not having a stage is likely that Yoshi was simply merged with the Mario stage by having the player fight ten Yoshis within the Mario stage.


