Super Smash Bros. Ultimate

Piranha Plant (SSBU)/Neutral aerial

From SmashWiki, the Super Smash Bros. wiki
< Piranha Plant (SSBU)
Revision as of 11:22, August 9, 2022 by DrakRoar (talk | contribs) (→‎Timing)
(diff) ← Older revision | Latest revision (diff) | Newer revision → (diff)
Jump to navigationJump to search
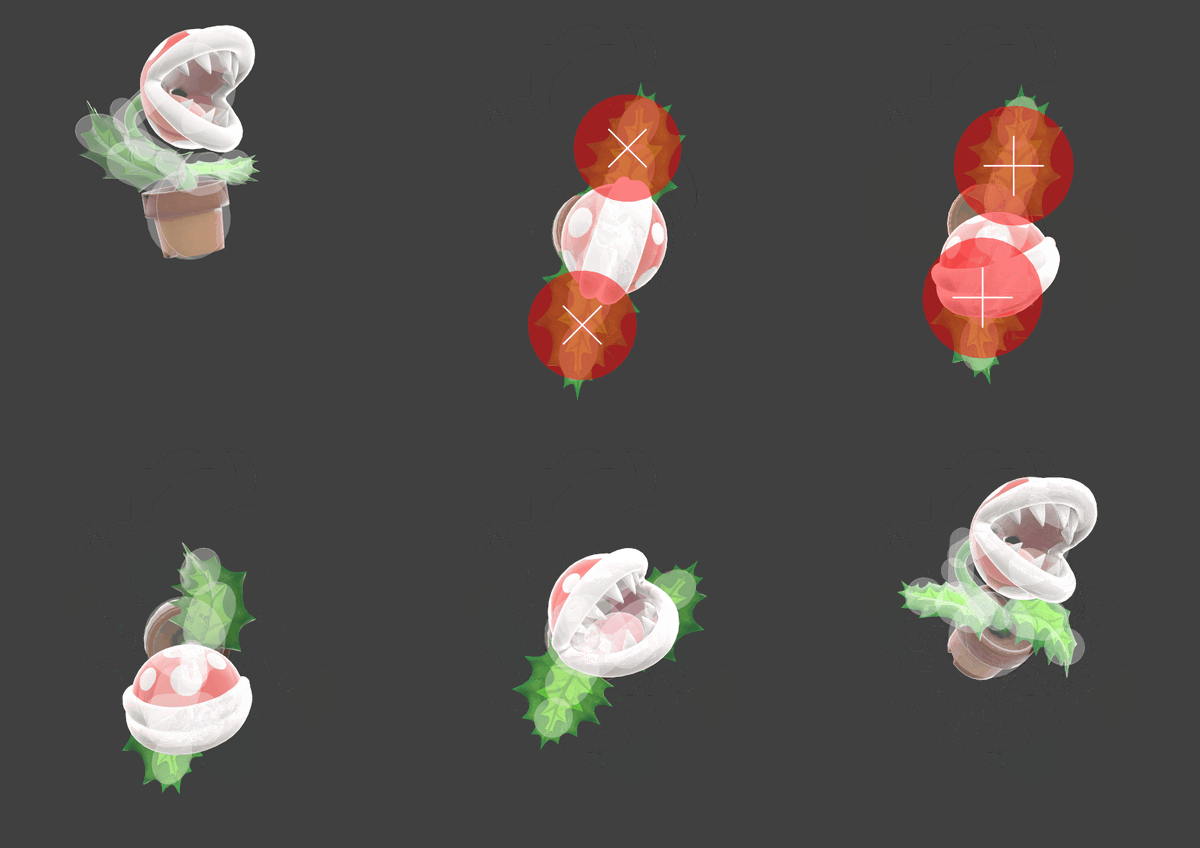
Hitbox visualization showing Piranha Plant's neutral aerial.

Overview[edit]

Piranha Plant faces towards the screen, then spins around using its leaves to attack. It is one of Piranha Plant's most versatile normal moves. A notable aspect of neutral aerial is that the final hit always sends opponents in the direction Piranha Plant is facing, making it exceptionally consistent in comboing and edgeguarding. Its main use is as a combo tool, in which the final hit can lead to grabs or jabs at percents where the opponent isn't sent into tumble, then forward aerials, dash attacks or even jablocks once at tumble percent. The multihits of the move can also be used to drag opponents down to the ground with Piranha Plant, and at high enough percents, lead to jabs or grabs, which the latter can end up being a kill confirm due to up throw's power. At much higher percents, when the opponent is grounded, a single hit of neutral aerial can send the opponent slightly up, and lead to the sweetspot of up tilt, and also be able to kill. At early percents however, the multihits are unsafe on hit upon landing, so it is best to relegate the move as a short hop aerial until it gains enough hit advantage for at least jab (which is frame 2).

It also is highly important for Piranha Plant's edgeguarding. Since it always launches the direction it is facing, it can be used to never force opponents to tech, until Piranha Plant decides to reverse it and send the opponent into the stage. Its knockback is also strong enough to get KOs outright offstage, and due to the multihits autolink angle, it can be possible to pseudo-spike opponents upon the multihits failing or Piranha Plant trading with another move. Neutral aerial's 12 active frames also help it edgeguard more effectively, giving room for error should the Piranha Plant mistime the neutral aerial. If done too low to the blastzone however, it can end up causing an SD due to its lengthy endlag.

Neutral aerial is also useful in other situations, such as being used as an out-of-shield option or when landing. While it is slow for an OOS aerial at frame 11 counting jumpsquat, the area it covers and the longevity of the hitbox help to make the move usable against most laggy moves on Piranha Plant's shield, however it can struggle against low profiling opponents as the hitboxes do not reach down immediately, leading to the move being inconsistent on shorter characters. It is also a useful landing option, especially when combined with Piranha Plant's fallspeed, however its lacking disjoint and high landing lag of 15 frames makes it especially vulnerable to being anti-aired or outright punished on landing. Due to the move coming out on frame 8, it also does not work very well as a string breaker.

In neutral, it also functions well as an air-to-air against jump-ins with delayed or slow, non-disjointed aerials. It can also be a way to get combos with the final hit or using dragdowns, as well as being used as a quick combo finisher that sends to the side out of moves like Ptooie or up tilt. Using the multihits of the move, it can also play a minor mindgame on an opponent's shield, where if the opponent suspects the Piranha Plant to go with all hits of neutral aerial, they may instead use less, and cause the opponent to do a slower OOS punish, in which the Piranha Plant can then use more hits if the opponent wants to try punishing it faster, causing them to get hit. It can also crossup on shields, and low profile certain moves, as Piranha Plant lays down on the ground in its landing animation. Overall, this move is extremely important to Piranha Plant, as it has many great aspects and even enables one of Piranha Plant's only kill confirms in neutral aerial to up throw, is one of its best edgeguard tools, helps with landing and OOS, and its usefulness as an air-to-air.

Hitboxes[edit]

ID Part Rehit rate Damage SD Angle Angle type BK KS FKV Set weight Radius Bone Offset SDI× T% Clang Rebound Effect Type G A Sound Direct Hit bits Hit part Blockable Reflectable Absorbable Flinchless No GFX Heedless
Multihits
0 0 3 2.0% 0 Autolink angle (367) Standard 10 100 0 HitboxTableIcon(False).png 4.5 arml 1.8 0.0 0.0 0.5× 1.0× 0% HitboxTableIcon(Clang).png HitboxTableIcon(Rebound).png Slash (effect) Hand (type) HitboxTableIcon(GroundedTrue).png HitboxTableIcon(AerialTrue).png S Slash SpecialsDirect.png All All HitboxTableIcon(Blockable).png HitboxTableIcon(Unreflectable).png HitboxTableIcon(Unabsorbable).png HitboxTableIcon(False).png HitboxTableIcon(False).png HitboxTableIcon(False).png
1 0 3 2.0% 0 Autolink angle (367) Standard 10 100 0 HitboxTableIcon(False).png 4.5 armr 1.8 0.0 0.0 0.5× 1.0× 0% HitboxTableIcon(Clang).png HitboxTableIcon(Rebound).png Slash (effect) Hand (type) HitboxTableIcon(GroundedTrue).png HitboxTableIcon(AerialTrue).png S Slash SpecialsDirect.png All All HitboxTableIcon(Blockable).png HitboxTableIcon(Unreflectable).png HitboxTableIcon(Unabsorbable).png HitboxTableIcon(False).png HitboxTableIcon(False).png HitboxTableIcon(False).png
Final hit
0 0 0 3.0% 0 Sakurai angle Forward 45 140 0 HitboxTableIcon(False).png 5.0 arml 0.0 0.0 0.0 1.8× 1.0× 0% HitboxTableIcon(Clang).png HitboxTableIcon(Rebound).png Slash (effect) Hand (type) HitboxTableIcon(GroundedTrue).png HitboxTableIcon(AerialTrue).png M Slash SpecialsDirect.png All All HitboxTableIcon(Blockable).png HitboxTableIcon(Unreflectable).png HitboxTableIcon(Unabsorbable).png HitboxTableIcon(False).png HitboxTableIcon(False).png HitboxTableIcon(False).png
1 0 0 3.0% 0 Sakurai angle Forward 45 140 0 HitboxTableIcon(False).png 5.0 arml 0.0 0.0 0.0 1.8× 1.0× 0% HitboxTableIcon(Clang).png HitboxTableIcon(Rebound).png Slash (effect) Hand (type) HitboxTableIcon(GroundedTrue).png HitboxTableIcon(AerialTrue).png M Slash SpecialsDirect.png All All HitboxTableIcon(Blockable).png HitboxTableIcon(Unreflectable).png HitboxTableIcon(Unabsorbable).png HitboxTableIcon(False).png HitboxTableIcon(False).png HitboxTableIcon(False).png

Timing[edit]

Attack[edit]

Initial autocancel 1-4
Multihits 8-17 (rehit rate: 3)
Final hit 18-19
Ending autocancel 40-
Interruptible 48
Animation length 59
FrameIcon(Lag).png FrameIcon(Lag).png FrameIcon(Lag).png FrameIcon(Lag).png FrameIcon(Lag).png FrameIcon(Lag).png FrameIcon(Lag).png FrameIcon(Hitbox).png FrameIcon(Hitbox).png FrameIcon(Hitbox).png FrameIcon(Hitbox).png FrameIcon(Hitbox).png FrameIcon(Hitbox).png FrameIcon(Hitbox).png FrameIcon(Hitbox).png FrameIcon(Hitbox).png FrameIcon(HitboxChangeS).png FrameIcon(HitboxChangeE).png FrameIcon(Hitbox).png FrameIcon(Lag).png FrameIcon(Lag).png FrameIcon(Lag).png FrameIcon(Lag).png FrameIcon(Lag).png FrameIcon(Lag).png FrameIcon(Lag).png FrameIcon(Lag).png FrameIcon(Lag).png FrameIcon(Lag).png FrameIcon(Lag).png FrameIcon(Lag).png FrameIcon(Lag).png FrameIcon(Lag).png FrameIcon(Lag).png FrameIcon(Lag).png FrameIcon(Lag).png FrameIcon(Lag).png FrameIcon(Lag).png FrameIcon(Lag).png FrameIcon(Lag).png FrameIcon(Lag).png FrameIcon(Lag).png FrameIcon(Lag).png FrameIcon(Lag).png FrameIcon(Lag).png FrameIcon(Lag).png FrameIcon(Lag).png FrameIcon(Interruptible).png FrameIcon(Interruptible).png FrameIcon(Interruptible).png FrameIcon(Interruptible).png FrameIcon(Interruptible).png FrameIcon(Interruptible).png FrameIcon(Interruptible).png FrameIcon(Interruptible).png FrameIcon(Interruptible).png FrameIcon(Interruptible).png FrameIcon(Interruptible).png FrameIcon(Interruptible).png
FrameIcon(Autocancel).png FrameIcon(Autocancel).png FrameIcon(Autocancel).png FrameIcon(Autocancel).png FrameIcon(Blank).png FrameIcon(Blank).png FrameIcon(Blank).png FrameIcon(Blank).png FrameIcon(Blank).png FrameIcon(Blank).png FrameIcon(Blank).png FrameIcon(Blank).png FrameIcon(Blank).png FrameIcon(Blank).png FrameIcon(Blank).png FrameIcon(Blank).png FrameIcon(Blank).png FrameIcon(Blank).png FrameIcon(Blank).png FrameIcon(Blank).png FrameIcon(Blank).png FrameIcon(Blank).png FrameIcon(Blank).png FrameIcon(Blank).png FrameIcon(Blank).png FrameIcon(Blank).png FrameIcon(Blank).png FrameIcon(Blank).png FrameIcon(Blank).png FrameIcon(Blank).png FrameIcon(Blank).png FrameIcon(Blank).png FrameIcon(Blank).png FrameIcon(Blank).png FrameIcon(Blank).png FrameIcon(Blank).png FrameIcon(Blank).png FrameIcon(Blank).png FrameIcon(Blank).png FrameIcon(Autocancel).png FrameIcon(Autocancel).png FrameIcon(Autocancel).png FrameIcon(Autocancel).png FrameIcon(Autocancel).png FrameIcon(Autocancel).png FrameIcon(Autocancel).png FrameIcon(Autocancel).png FrameIcon(Autocancel).png FrameIcon(Autocancel).png FrameIcon(Autocancel).png FrameIcon(Autocancel).png FrameIcon(Autocancel).png FrameIcon(Autocancel).png FrameIcon(Autocancel).png FrameIcon(Autocancel).png FrameIcon(Autocancel).png FrameIcon(Autocancel).png FrameIcon(Autocancel).png FrameIcon(Autocancel).png

Landing lag[edit]

Interruptible 16
Animation length 42
FrameIcon(Lag).png FrameIcon(Lag).png FrameIcon(Lag).png FrameIcon(Lag).png FrameIcon(Lag).png FrameIcon(Lag).png FrameIcon(Lag).png FrameIcon(Lag).png FrameIcon(Lag).png FrameIcon(Lag).png FrameIcon(Lag).png FrameIcon(Lag).png FrameIcon(Lag).png FrameIcon(Lag).png FrameIcon(Lag).png FrameIcon(Interruptible).png FrameIcon(Interruptible).png FrameIcon(Interruptible).png FrameIcon(Interruptible).png FrameIcon(Interruptible).png FrameIcon(Interruptible).png FrameIcon(Interruptible).png FrameIcon(Interruptible).png FrameIcon(Interruptible).png FrameIcon(Interruptible).png FrameIcon(Interruptible).png FrameIcon(Interruptible).png FrameIcon(Interruptible).png FrameIcon(Interruptible).png FrameIcon(Interruptible).png FrameIcon(Interruptible).png FrameIcon(Interruptible).png FrameIcon(Interruptible).png FrameIcon(Interruptible).png FrameIcon(Interruptible).png FrameIcon(Interruptible).png FrameIcon(Interruptible).png FrameIcon(Interruptible).png FrameIcon(Interruptible).png FrameIcon(Interruptible).png FrameIcon(Interruptible).png FrameIcon(Interruptible).png
Legend (1 square = 1 frame)
Lag
Lag time
Hitbox
Hitbox
FrameIcon(HitboxChangeS).pngFrameIcon(HitboxChangeE).png
Hitbox change
Auto-canceling
Autocancel
Interruptibility
Interruptible