Welcome to SmashWiki! Log in or create an account and join the community, and don't forget to read this first!
Notices
The Skill parameter has been removed from Smasher infoboxes, and in its place are the new "Best historical ranking" and "Best tournament result" parameters. SmashWiki needs help adding these new parameters to Smasher infoboxes, refer to the guidelines here for what should be included in these new parameters.
When adding results to Smasher pages, include each tournament's entrant number in addition to the player's placement, and use the {{Trn}} template with the matching game specified. Please also fix old results on Smasher pages that do not abide to this standard. Refer to our Smasher article guidelines to see how results tables should be formatted.
Check out our project page for ongoing projects that SmashWiki needs help with.
Super Smash Bros. Ultimate

King K. Rool (SSBU)/Down aerial

From SmashWiki, the Super Smash Bros. wiki
< King K. Rool (SSBU)
Revision as of 13:19, August 8, 2022 by DrakRoar (talk | contribs)
(diff) ← Older revision | Latest revision (diff) | Newer revision → (diff)
Jump to navigationJump to search
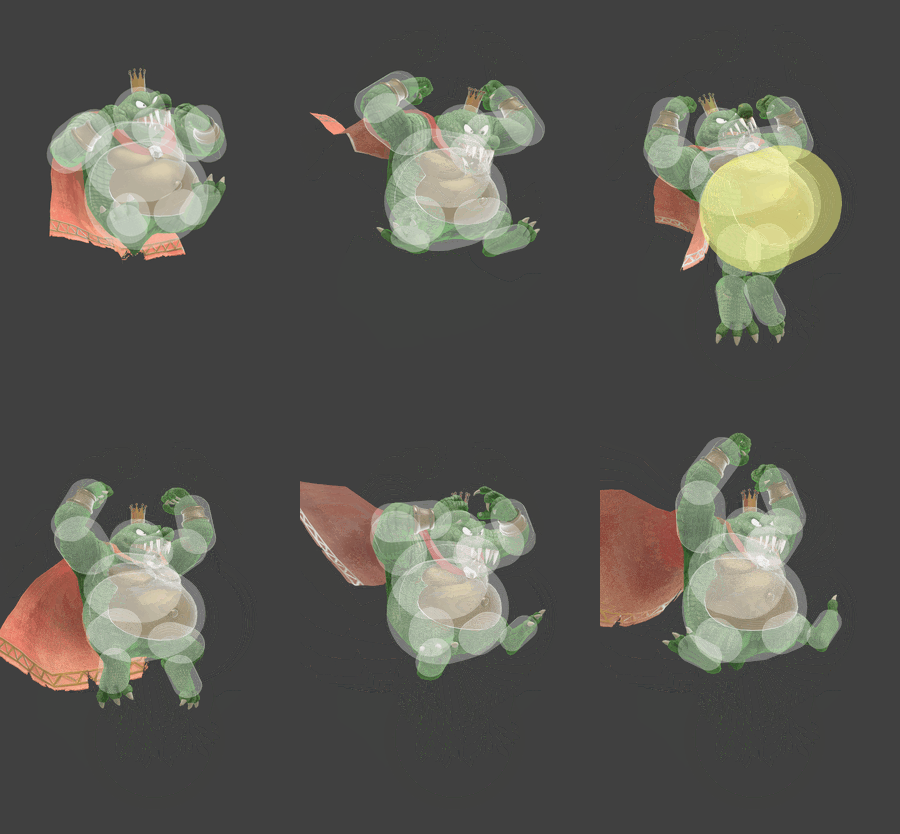
King K. Rool down aerial hitbox visualization
KingKRoolDAirSSBU.gif

Overview[edit]

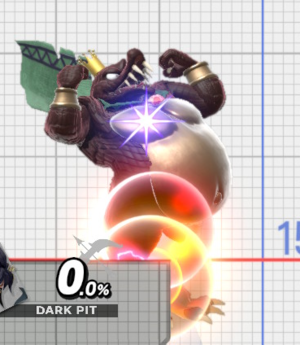
A hitbox visual of King K. Rool's down aerial against the ledge. This allows K. Rool to get easy 2-frames, possibly even KOing characters with a meteor smash.

K. Rool does a flip before stomping downwards. Down aerial has a particularly weak meteor smash, but a lingering hitbox lending it some use as a sex kick of sorts. However the hitbox is quite thin and the move as a whole is a bit slow, often making it difficult for K. Rool players to use. However, the payoff for landing it is immense.

Down aerial is K. Rool's best grab confirm once forward aerial has started to send into tumble (which makes grab almost impossible), up until down aerial's early hit sends too high off the ground, usually post-tumble[1]. Tumble occurs at 50%. This allows for absurd damage in a short space of time, with down aerial dealing 15% alone and K. Rool's grab game allowing for many different routes to deal damage. Usually, a single hit of down aerial can lead to at least 45% in damage.

Down aerial is capable of locking opponents until it sends into tumble as well, which as mentioned before is around 50%. The sourspot will also lock until around 15%. These allow for K. Rool to get very high damage output from his lock combos, usually ending with dash attack, or if the player isn't confident, forward tilt. However, hitting opponents as they get up with another down aerial can be used for further combo extension. These are often set up by neutral attack or forward aerial, or very rarely low percentage Crownerang. While forward tilt can set these up, the hit advantage is almost never enough to justify attempting to do so.

Down aerial's most powerful utility comes as a hard punish for players not mashing fast enough out of down throw or down tilt. This is because it is possible to store its meteor smashes in buried states for around 40-50%, allowing K. Rool to get incredible combos. Down tilt virtually guarantees down aerial confirms from around 70%, allowing for forward smash. It's also very helpful as an out of shield option through SHFF, which is one of the few options King K. Rool has that can be seen as reliable.

Down aerial's hitbox is very large vertically, extending past the feet, thus making it disjointed. This makes it extremely good for 2-framing, as the hitbox reaches well below the ledge. In fact, due to this, it is possible to nail opponents before it is even possible to 2-frame them, due to how far the hitbox goes below the stage. The high amount of active frames makes this even easier, and if it fails there is usually enough time to get a neutral aerial ledgetrap off. In a similar vein, down aerial hits below platforms, allowing it to be used to stave off platform pressure and even combo from around 80%.

Naturally this large hitbox also makes it easy to end stocks with meteor smashes offstage. However, the FAF is very high, meaning a fast fall down aerial offstage will lead to an SD. The meteor smash is also weak, meaning it isn't safe on hit until it actually sends into tumble, although it is recommended to wait until around 80% to start doing it properly. The sourspot is also very good for edgeguarding, sending at an awkward angle (usually around ~38 going by sakurai angle calculations), and the sweetspot on the hip has 20 more base knockback than the feet, scoring a KO reasonably early.

However, down aerial has significant drawbacks. The hitbox is extremely thin, making it difficult to use in neutral or even advantage. It is also very unsafe on whiff despite the Belly Super Armor backing it up, with it essentially being a free grab for the opponent once the hitbox has terminated. The move is also quite laggy on startup (frame 14) and endlag (with 14 frames of landing lag and a very large FAF), and doesn't autocancel out of short hop, further worsening this issue. As a result, down aerial is usually used for whiff punishing or bury combo extension.

Hitboxes[edit]

ID Part Rehit rate Damage SD Angle Angle type BK KS FKV Set weight Radius Bone Offset SDI× T% Clang Rebound Effect Type G A Sound Direct Hit bits Hit part Blockable Reflectable Absorbable Flinchless No GFX Heedless
Clean hit
0 0 0 12.0% 0 AngleIcon270.png Standard 10 90 0 HitboxTableIcon(False).png 7.0 top 0.0 -1.5 0.5 1.0× 1.0× 0% HitboxTableIcon(Clang).png HitboxTableIcon(Rebound).png Normal (effect) Foot (type) HitboxTableIcon(GroundedTrue).png HitboxTableIcon(AerialTrue).png L Kick SpecialsDirect.png All All HitboxTableIcon(Blockable).png HitboxTableIcon(Unreflectable).png HitboxTableIcon(Unabsorbable).png HitboxTableIcon(False).png HitboxTableIcon(False).png HitboxTableIcon(False).png
1 0 0 12.0% 0 AngleIcon270.png Standard 10 90 0 HitboxTableIcon(False).png 8.5 top 0.0 -6.5 0.0 1.0× 1.0× 0% HitboxTableIcon(Clang).png HitboxTableIcon(Rebound).png Normal (effect) Foot (type) HitboxTableIcon(GroundedTrue).png HitboxTableIcon(AerialTrue).png L Kick SpecialsDirect.png All All HitboxTableIcon(Blockable).png HitboxTableIcon(Unreflectable).png HitboxTableIcon(Unabsorbable).png HitboxTableIcon(False).png HitboxTableIcon(False).png HitboxTableIcon(False).png
Late hit
0 0 0 9.0% 0 Sakurai angle Standard 40 100 0 HitboxTableIcon(False).png 6.5 top 0.0 -1.5 0.5 1.0× 1.0× 0% HitboxTableIcon(Clang).png HitboxTableIcon(Rebound).png Normal (effect) Foot (type) HitboxTableIcon(GroundedTrue).png HitboxTableIcon(AerialTrue).png M Kick SpecialsDirect.png All All HitboxTableIcon(Blockable).png HitboxTableIcon(Unreflectable).png HitboxTableIcon(Unabsorbable).png HitboxTableIcon(False).png HitboxTableIcon(False).png HitboxTableIcon(False).png
1 0 0 9.0% 0 Sakurai angle Standard 20 100 0 HitboxTableIcon(False).png 7.0 top 0.0 -6.5 0.5 1.0× 1.0× 0% HitboxTableIcon(Clang).png HitboxTableIcon(Rebound).png Normal (effect) Foot (type) HitboxTableIcon(GroundedTrue).png HitboxTableIcon(AerialTrue).png M Kick SpecialsDirect.png All All HitboxTableIcon(Blockable).png HitboxTableIcon(Unreflectable).png HitboxTableIcon(Unabsorbable).png HitboxTableIcon(False).png HitboxTableIcon(False).png HitboxTableIcon(False).png

Timing[edit]

Attack[edit]

Initial autocancel 1-3
Belly Super Armor 14-25
Clean hit 14-15
Late hit 16-21
Ending autocancel 40-
Interruptible 62
Animation length 70
FrameIcon(Lag).png FrameIcon(Lag).png FrameIcon(Lag).png FrameIcon(Lag).png FrameIcon(Lag).png FrameIcon(Lag).png FrameIcon(Lag).png FrameIcon(Lag).png FrameIcon(Lag).png FrameIcon(Lag).png FrameIcon(Lag).png FrameIcon(Lag).png FrameIcon(Lag).png FrameIcon(Hitbox).png FrameIcon(HitboxChangeS).png FrameIcon(HitboxChangeE).png FrameIcon(Hitbox).png FrameIcon(Hitbox).png FrameIcon(Hitbox).png FrameIcon(Hitbox).png FrameIcon(Hitbox).png FrameIcon(Lag).png FrameIcon(Lag).png FrameIcon(Lag).png FrameIcon(Lag).png FrameIcon(Lag).png FrameIcon(Lag).png FrameIcon(Lag).png FrameIcon(Lag).png FrameIcon(Lag).png FrameIcon(Lag).png FrameIcon(Lag).png FrameIcon(Lag).png FrameIcon(Lag).png FrameIcon(Lag).png FrameIcon(Lag).png FrameIcon(Lag).png FrameIcon(Lag).png FrameIcon(Lag).png FrameIcon(Lag).png FrameIcon(Lag).png FrameIcon(Lag).png FrameIcon(Lag).png FrameIcon(Lag).png FrameIcon(Lag).png FrameIcon(Lag).png FrameIcon(Lag).png FrameIcon(Lag).png FrameIcon(Lag).png FrameIcon(Lag).png FrameIcon(Lag).png FrameIcon(Lag).png FrameIcon(Lag).png FrameIcon(Lag).png FrameIcon(Lag).png FrameIcon(Lag).png FrameIcon(Lag).png FrameIcon(Lag).png FrameIcon(Lag).png FrameIcon(Lag).png FrameIcon(Lag).png FrameIcon(Interruptible).png FrameIcon(Interruptible).png FrameIcon(Interruptible).png FrameIcon(Interruptible).png FrameIcon(Interruptible).png FrameIcon(Interruptible).png FrameIcon(Interruptible).png FrameIcon(Interruptible).png FrameIcon(Interruptible).png
FrameIcon(Vulnerable).png FrameIcon(Vulnerable).png FrameIcon(Vulnerable).png FrameIcon(Vulnerable).png FrameIcon(Vulnerable).png FrameIcon(Vulnerable).png FrameIcon(Vulnerable).png FrameIcon(Vulnerable).png FrameIcon(Vulnerable).png FrameIcon(Vulnerable).png FrameIcon(Vulnerable).png FrameIcon(Vulnerable).png FrameIcon(Vulnerable).png FrameIcon(Armour).png FrameIcon(Armour).png FrameIcon(Armour).png FrameIcon(Armour).png FrameIcon(Armour).png FrameIcon(Armour).png FrameIcon(Armour).png FrameIcon(Armour).png FrameIcon(Armour).png FrameIcon(Armour).png FrameIcon(Armour).png FrameIcon(Armour).png FrameIcon(Vulnerable).png FrameIcon(Vulnerable).png FrameIcon(Vulnerable).png FrameIcon(Vulnerable).png FrameIcon(Vulnerable).png FrameIcon(Vulnerable).png FrameIcon(Vulnerable).png FrameIcon(Vulnerable).png FrameIcon(Vulnerable).png FrameIcon(Vulnerable).png FrameIcon(Vulnerable).png FrameIcon(Vulnerable).png FrameIcon(Vulnerable).png FrameIcon(Vulnerable).png FrameIcon(Vulnerable).png FrameIcon(Vulnerable).png FrameIcon(Vulnerable).png FrameIcon(Vulnerable).png FrameIcon(Vulnerable).png FrameIcon(Vulnerable).png FrameIcon(Vulnerable).png FrameIcon(Vulnerable).png FrameIcon(Vulnerable).png FrameIcon(Vulnerable).png FrameIcon(Vulnerable).png FrameIcon(Vulnerable).png FrameIcon(Vulnerable).png FrameIcon(Vulnerable).png FrameIcon(Vulnerable).png FrameIcon(Vulnerable).png FrameIcon(Vulnerable).png FrameIcon(Vulnerable).png FrameIcon(Vulnerable).png FrameIcon(Vulnerable).png FrameIcon(Vulnerable).png FrameIcon(Vulnerable).png FrameIcon(Vulnerable).png FrameIcon(Vulnerable).png FrameIcon(Vulnerable).png FrameIcon(Vulnerable).png FrameIcon(Vulnerable).png FrameIcon(Vulnerable).png FrameIcon(Vulnerable).png FrameIcon(Vulnerable).png FrameIcon(Vulnerable).png
FrameIcon(Autocancel).png FrameIcon(Autocancel).png FrameIcon(Autocancel).png FrameIcon(Blank).png FrameIcon(Blank).png FrameIcon(Blank).png FrameIcon(Blank).png FrameIcon(Blank).png FrameIcon(Blank).png FrameIcon(Blank).png FrameIcon(Blank).png FrameIcon(Blank).png FrameIcon(Blank).png FrameIcon(Blank).png FrameIcon(Blank).png FrameIcon(Blank).png FrameIcon(Blank).png FrameIcon(Blank).png FrameIcon(Blank).png FrameIcon(Blank).png FrameIcon(Blank).png FrameIcon(Blank).png FrameIcon(Blank).png FrameIcon(Blank).png FrameIcon(Blank).png FrameIcon(Blank).png FrameIcon(Blank).png FrameIcon(Blank).png FrameIcon(Blank).png FrameIcon(Blank).png FrameIcon(Blank).png FrameIcon(Blank).png FrameIcon(Blank).png FrameIcon(Blank).png FrameIcon(Blank).png FrameIcon(Blank).png FrameIcon(Blank).png FrameIcon(Blank).png FrameIcon(Blank).png FrameIcon(Autocancel).png FrameIcon(Autocancel).png FrameIcon(Autocancel).png FrameIcon(Autocancel).png FrameIcon(Autocancel).png FrameIcon(Autocancel).png FrameIcon(Autocancel).png FrameIcon(Autocancel).png FrameIcon(Autocancel).png FrameIcon(Autocancel).png FrameIcon(Autocancel).png FrameIcon(Autocancel).png FrameIcon(Autocancel).png FrameIcon(Autocancel).png FrameIcon(Autocancel).png FrameIcon(Autocancel).png FrameIcon(Autocancel).png FrameIcon(Autocancel).png FrameIcon(Autocancel).png FrameIcon(Autocancel).png FrameIcon(Autocancel).png FrameIcon(Autocancel).png FrameIcon(Autocancel).png FrameIcon(Autocancel).png FrameIcon(Autocancel).png FrameIcon(Autocancel).png FrameIcon(Autocancel).png FrameIcon(Autocancel).png FrameIcon(Autocancel).png FrameIcon(Autocancel).png FrameIcon(Autocancel).png

Landing lag[edit]

Interruptible 15
Animation length 23
FrameIcon(Lag).png FrameIcon(Lag).png FrameIcon(Lag).png FrameIcon(Lag).png FrameIcon(Lag).png FrameIcon(Lag).png FrameIcon(Lag).png FrameIcon(Lag).png FrameIcon(Lag).png FrameIcon(Lag).png FrameIcon(Lag).png FrameIcon(Lag).png FrameIcon(Lag).png FrameIcon(Lag).png FrameIcon(Interruptible).png FrameIcon(Interruptible).png FrameIcon(Interruptible).png FrameIcon(Interruptible).png FrameIcon(Interruptible).png FrameIcon(Interruptible).png FrameIcon(Interruptible).png FrameIcon(Interruptible).png FrameIcon(Interruptible).png
Legend (1 square = 1 frame)
Lag
Lag time
Hitbox
Hitbox
FrameIcon(HitboxChangeS).pngFrameIcon(HitboxChangeE).png
Hitbox change
FrameIcon(Vulnerable).png
Vulnerable
Auto-canceling
Autocancel
Armor
Armour
Interruptibility
Interruptible

Trivia[edit]

  • Similarly to King K. Rool's back aerial, the move's scripts have a line for terminating intangibility on frame 18, but without any line for starting it. This implies it was intended to grant intangibility of some sort (such as on King K. Rool's legs to create disjoint) at some point in development, but ended up being scrapped.