Super Smash Bros. Ultimate

King K. Rool (SSBU)/Down smash

From SmashWiki, the Super Smash Bros. wiki
Jump to navigationJump to search
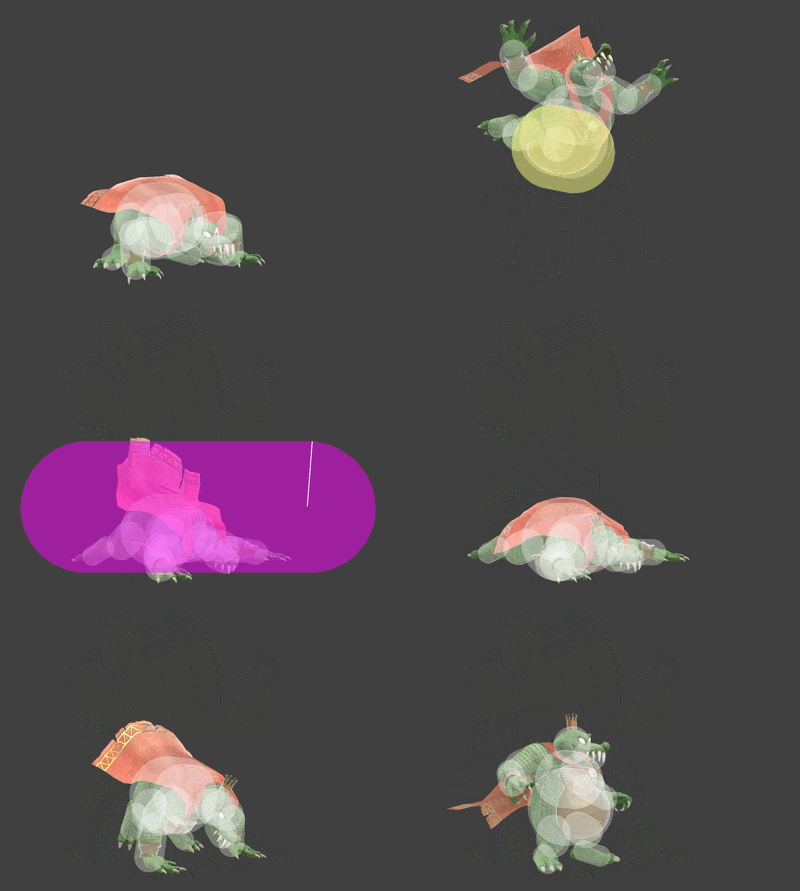
Hitbox visualization showing King K. Rool's down smash.

Overview

A belly flop, emphasising K. Rool's huge weight and armor. King K. Rool's down smash is among his most notorious attacks, thanks to its Belly Super Armor and hurtbox shift specifically making grabs miss. This is because K. Rool's hurtbox moves above conventional grab hitboxes as soon as frame 4. While it deals less knockback than his forward smash, it remains a monumentally powerful attack, ending stocks as early as 90%. Because of this blend of defense and power, K. Rool's down smash is largely considered to be one of the best down smashes in the game.

It is one of the most difficult moves to challenge on startup in the game, due to the aforementioned hurtbox shift and Belly Super Armor. Low attacks and regular grabs simply miss, and regular or high-reaching attacks tend to hit the armor. The only feasible way to challenge the move is to attack from above, where K. Rool completely lacks any armor. This protection, combined with kill power, makes this move a very strong hard punish tool in disadvantage, catching many players overextending with their burst options. It is not uncommon for K. Rool players to watch for greedy dash grabs and use the information to punish poor approaches later, simply because the reward for doing so will be substantially higher compared to other characters.

It is also notable to mention that down smash deals significant shield damage, to the extent that use after a neutral aerial on a shield is a guaranteed shield break. This notably avoids grabs because of the additional safety of neutral aerial, making a perfect shield or a roll backwards the only way to avoid it, which in high-pressure situations may not be thought about. However, with repeated use, it becomes better to prepare for these options instead, due to the punishable nature of the move against an experienced player.

Unlike many of K. Rool's attacks being designed to be difficult to challenge but easy to punish, his down smash is reasonably well-defended even after the initial slam is over. It has a surprisingly large "quake" hitbox just outside of the body slam's range, much like his down tilt's. This quake gives a sizable frame advantage on hit, but generally not enough for solid followups outside of his forward tilt. However, if shielded, this quake hitbox has little shieldstun, leaving K. Rool dangerously open regardless; the quake is -34 on shield, enough for even charged smash attacks to be valid punishes.

The move is typically not used outside of reads and hard punishes, largely because it is quite slow, with Belly Super Armor not switching on until frame 11, and the hitbox coming out frame 22. It has an enormous FAF of 64, though this is the middle ground in terms of K. Rool's smash attack FAFs. On top of this, in situations where the move can be done for free early stocks — such as shield breaks or if highly punishable moves are used — K. Rool's forward smash angled upwards KOs much earlier, making it strictly suboptimal. Furthermore, if Belly Super Armor is damaged, K. Rool becomes very vulnerable to it breaking: it has 14 active armor frames in total, which is enough for at least some heavy-hitting attacks to hit it, especially considering how the move is used. As a result, many armor breaks occur from down smash misuse. All things considered, in higher level play, K. Rool's down smash tends to be used far less on average.

Contrary to popular belief, while K. Rool leaves the ground as soon as frame 4, he maintains a foot hurtbox extension until frame 7, which makes it deceptively easy to grab him from behind. It is even possible—in fact easier—to grab K. Rool out of his down smash when he has actually began the belly flop. This is commonly seen with tether grabs such as Samus's, or large pivot grabs such as Greninja's. Naturally, and also humorously, command grabs such as K. Rool's Blunderbuss Vacuum can also force him out of it.

Hitboxes

ID Part Rehit rate Damage SD Angle Angle type BK KS FKV Set weight Radius Bone Offset SDI× T% Clang Rebound Effect Type G A Sound Direct Hit bits Hit part Blockable Reflectable Absorbable Flinchless No GFX Heedless
Early
0 0 0 18.0% 10.0 Sakurai angle Standard 65 80 0 HitboxTableIcon(False).png 6.0 top 0.0 7.5 10.5 to -4.5 1.0× 1.0× 0% HitboxTableIcon(Clang).png HitboxTableIcon(Rebound).png Normal (effect) Body (type) HitboxTableIcon(GroundedTrue).png HitboxTableIcon(AerialTrue).png L Kick SpecialsDirect.png All All HitboxTableIcon(Blockable).png HitboxTableIcon(Unreflectable).png HitboxTableIcon(Unabsorbable).png HitboxTableIcon(False).png HitboxTableIcon(False).png HitboxTableIcon(False).png
Late
0 0 0 18.0% 10.0 Sakurai angle Standard 65 80 0 HitboxTableIcon(False).png 6.0 top 0.0 5.0 10.5 to -4.5 1.0× 1.0× 0% HitboxTableIcon(Clang).png HitboxTableIcon(Rebound).png Normal (effect) Body (type) HitboxTableIcon(GroundedTrue).png HitboxTableIcon(AerialTrue).png L Kick SpecialsDirect.png All All HitboxTableIcon(Blockable).png HitboxTableIcon(Unreflectable).png HitboxTableIcon(Unabsorbable).png HitboxTableIcon(False).png HitboxTableIcon(False).png HitboxTableIcon(False).png
Quake
0 0 0 4.0% 0 AngleIcon85.png Standard 80 30 0 HitboxTableIcon(False).png 11.0 top 0.0 9.0 23.5 to -13.5 1.0× 1.0× 0% HitboxTableIcon(Clang).png HitboxTableIcon(Rebound).png Normal (effect) Body (type) HitboxTableIcon(GroundedTrue).png HitboxTableIcon(AerialFalse).png M Kick SpecialsDirect.png All All HitboxTableIcon(Blockable).png HitboxTableIcon(Unreflectable).png HitboxTableIcon(Unabsorbable).png HitboxTableIcon(False).png HitboxTableIcon(False).png HitboxTableIcon(False).png

Timing

Charges between 1-2
Belly Super Armor 8-21
Early hit 22
Late hit 23
Quake 24-25
Interruptible 64
Animation length 76
Hitboxes  FrameIcon(LagChargeS).png FrameIcon(LagChargeE).png FrameIcon(Lag).png FrameIcon(Lag).png FrameIcon(Lag).png FrameIcon(Lag).png FrameIcon(Lag).png FrameIcon(Lag).png FrameIcon(Lag).png FrameIcon(Lag).png FrameIcon(Lag).png FrameIcon(Lag).png FrameIcon(Lag).png FrameIcon(Lag).png FrameIcon(Lag).png FrameIcon(Lag).png FrameIcon(Lag).png FrameIcon(Lag).png FrameIcon(Lag).png FrameIcon(Lag).png FrameIcon(Lag).png FrameIcon(HitboxChangeS).png FrameIcon(HitboxChangeM).png FrameIcon(HitboxChangeE).png FrameIcon(Hitbox).png FrameIcon(Lag).png FrameIcon(Lag).png FrameIcon(Lag).png FrameIcon(Lag).png FrameIcon(Lag).png FrameIcon(Lag).png FrameIcon(Lag).png FrameIcon(Lag).png FrameIcon(Lag).png FrameIcon(Lag).png FrameIcon(Lag).png FrameIcon(Lag).png FrameIcon(Lag).png FrameIcon(Lag).png FrameIcon(Lag).png FrameIcon(Lag).png FrameIcon(Lag).png FrameIcon(Lag).png FrameIcon(Lag).png FrameIcon(Lag).png FrameIcon(Lag).png FrameIcon(Lag).png FrameIcon(Lag).png FrameIcon(Lag).png FrameIcon(Lag).png FrameIcon(Lag).png FrameIcon(Lag).png FrameIcon(Lag).png FrameIcon(Lag).png FrameIcon(Lag).png FrameIcon(Lag).png FrameIcon(Lag).png FrameIcon(Lag).png FrameIcon(Lag).png FrameIcon(Lag).png FrameIcon(Lag).png FrameIcon(Lag).png FrameIcon(Lag).png FrameIcon(Interruptible).png FrameIcon(Interruptible).png FrameIcon(Interruptible).png FrameIcon(Interruptible).png FrameIcon(Interruptible).png FrameIcon(Interruptible).png FrameIcon(Interruptible).png FrameIcon(Interruptible).png FrameIcon(Interruptible).png FrameIcon(Interruptible).png FrameIcon(Interruptible).png FrameIcon(Interruptible).png FrameIcon(Interruptible).png
Belly Super Armor  FrameIcon(Vulnerable).png FrameIcon(Vulnerable).png FrameIcon(Vulnerable).png FrameIcon(Vulnerable).png FrameIcon(Vulnerable).png FrameIcon(Vulnerable).png FrameIcon(Vulnerable).png FrameIcon(Armour).png FrameIcon(Armour).png FrameIcon(Armour).png FrameIcon(Armour).png FrameIcon(Armour).png FrameIcon(Armour).png FrameIcon(Armour).png FrameIcon(Armour).png FrameIcon(Armour).png FrameIcon(Armour).png FrameIcon(Armour).png FrameIcon(Armour).png FrameIcon(Armour).png FrameIcon(Armour).png FrameIcon(Vulnerable).png FrameIcon(Vulnerable).png FrameIcon(Vulnerable).png FrameIcon(Vulnerable).png FrameIcon(Vulnerable).png FrameIcon(Vulnerable).png FrameIcon(Vulnerable).png FrameIcon(Vulnerable).png FrameIcon(Vulnerable).png FrameIcon(Vulnerable).png FrameIcon(Vulnerable).png FrameIcon(Vulnerable).png FrameIcon(Vulnerable).png FrameIcon(Vulnerable).png FrameIcon(Vulnerable).png FrameIcon(Vulnerable).png FrameIcon(Vulnerable).png FrameIcon(Vulnerable).png FrameIcon(Vulnerable).png FrameIcon(Vulnerable).png FrameIcon(Vulnerable).png FrameIcon(Vulnerable).png FrameIcon(Vulnerable).png FrameIcon(Vulnerable).png FrameIcon(Vulnerable).png FrameIcon(Vulnerable).png FrameIcon(Vulnerable).png FrameIcon(Vulnerable).png FrameIcon(Vulnerable).png FrameIcon(Vulnerable).png FrameIcon(Vulnerable).png FrameIcon(Vulnerable).png FrameIcon(Vulnerable).png FrameIcon(Vulnerable).png FrameIcon(Vulnerable).png FrameIcon(Vulnerable).png FrameIcon(Vulnerable).png FrameIcon(Vulnerable).png FrameIcon(Vulnerable).png FrameIcon(Vulnerable).png FrameIcon(Vulnerable).png FrameIcon(Vulnerable).png FrameIcon(Vulnerable).png FrameIcon(Vulnerable).png FrameIcon(Vulnerable).png FrameIcon(Vulnerable).png FrameIcon(Vulnerable).png FrameIcon(Vulnerable).png FrameIcon(Vulnerable).png FrameIcon(Vulnerable).png FrameIcon(Vulnerable).png FrameIcon(Vulnerable).png FrameIcon(Vulnerable).png FrameIcon(Vulnerable).png FrameIcon(Vulnerable).png
Legend (1 square = 1 frame)
Lag
Lag time
ChargeCharge
Charge interval
Hitbox
Hitbox
FrameIcon(Vulnerable).png
Vulnerable
Armor
Armour
Interruptibility
Interruptible