Welcome to SmashWiki! Log in or create an account and join the community, and don't forget to read this first!
Notices
The Skill parameter has been removed from Smasher infoboxes, and in its place are the new "Best historical ranking" and "Best tournament result" parameters. SmashWiki needs help adding these new parameters to Smasher infoboxes, refer to the guidelines here for what should be included in these new parameters.
When adding results to Smasher pages, include each tournament's entrant number in addition to the player's placement, and use the {{Trn}} template with the matching game specified. Please also fix old results on Smasher pages that do not abide to this standard. Refer to our Smasher article guidelines to see how results tables should be formatted.
Check out our project page for ongoing projects that SmashWiki needs help with.
Super Smash Bros.

Ness (SSB)/Up aerial

From SmashWiki, the Super Smash Bros. wiki
< Ness (SSB)
Revision as of 16:19, December 23, 2019 by SuperSqank (talk | contribs)
Jump to navigationJump to search

Overview

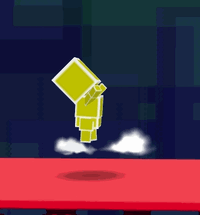
Hitbox of Ness's up aerial.
Hitbox of Ness's up aerial while double jump cancelled.

Ness quickly headbutts above himself in the air, dealing 15% damage and high knockback. Ness' head is intangible during the move's first four active frames and the hitbox on his head is quite large, making the attack difficult to interrupt. The move also always auto-cancels, which means that it is not always neccessary to Z-cancel the move. The move also has rather high KO power for an up aerial being able to KO Mario on Dream Land at 123% (assuming he's on the ground). It is good for juggling and, against most characters, it can be used in conjunction with an up tilt. However, this move is even more feared when double jump cancelled, which is very important to Ness's metagame and vital in most of his matchups. With it, Ness is capable of doing even shorter short hops, allowing him to use the move a very short distance from the ground, meaning up aerial chains can be performed until ~60%. Ness can also potentially perform zero-to-death combos on opponents, as he can rack up huge damage with his up aerial in conjunction with his other aerials, such as his down aerial. However, the move, along with Ness's other moves used for this technique, has short range, so the technique has since lost recognition and known effectiveness.

The move is much stronger in the Japanese version dealing 17% damage and higher knockback. It can KO Mario on Dream Land at 95% on Dream Land if he is on the ground making it the strongest up aerial in the Japanese version and the second strongest in the series behind Bowser's up aerial in Melee. Its higher power does make the move a worse combo tool in the Japanese version however, it also has even greater shield pressuring potential.


Data.png This article or section may require additional technical data.
The editor who added this tag elaborates: Double check Japanese hitbox table. Also check if there are any frame data differences between versions.
You can discuss this issue on the talk page or edit this page to improve it.

Hitboxes

NTSC-J

ID Part Damage SD Angle BK KS FKV Radius Bone Offset Clang Effect G A Sound
0 0 17% 0 AngleIcon85.png 10 120 0 175 12 0 100 0 HitboxTableIcon(Clang).png Normal (effect) HitboxTableIcon(GroundedTrue).png HitboxTableIcon(AerialTrue).png L Punch

NTSC-U/PAL

ID Part Damage SD Angle BK KS FKV Radius Bone Offset Clang Effect G A Sound
0 0 15% 0 AngleIcon85.png 10 110 0 175 12 0 100 0 HitboxTableIcon(Clang).png Normal (effect) HitboxTableIcon(GroundedTrue).png HitboxTableIcon(AerialTrue).png L Punch

Summary

  • Nerf Damage (17% → 15%).
  • Nerf Knockback scaling (120 → 110).
    • Buff These changes improve its combo potential.

Timing

Attack

Auto-cancel 1-41
Hitboxes 8-16
Head intangible 8-11
Animation length 41
Hitboxes  FrameIcon(Lag).png FrameIcon(Lag).png FrameIcon(Lag).png FrameIcon(Lag).png FrameIcon(Lag).png FrameIcon(Lag).png FrameIcon(Lag).png FrameIcon(Hitbox).png FrameIcon(Hitbox).png FrameIcon(Hitbox).png FrameIcon(Hitbox).png FrameIcon(Hitbox).png FrameIcon(Hitbox).png FrameIcon(Hitbox).png FrameIcon(Hitbox).png FrameIcon(Hitbox).png FrameIcon(Lag).png FrameIcon(Lag).png FrameIcon(Lag).png FrameIcon(Lag).png FrameIcon(Lag).png FrameIcon(Lag).png FrameIcon(Lag).png FrameIcon(Lag).png FrameIcon(Lag).png FrameIcon(Lag).png FrameIcon(Lag).png FrameIcon(Lag).png FrameIcon(Lag).png FrameIcon(Lag).png FrameIcon(Lag).png FrameIcon(Lag).png FrameIcon(Lag).png FrameIcon(Lag).png FrameIcon(Lag).png FrameIcon(Lag).png FrameIcon(Lag).png FrameIcon(Lag).png FrameIcon(Lag).png FrameIcon(Lag).png FrameIcon(Lag).png
Head  FrameIcon(Vulnerable).png FrameIcon(Vulnerable).png FrameIcon(Vulnerable).png FrameIcon(Vulnerable).png FrameIcon(Vulnerable).png FrameIcon(Vulnerable).png FrameIcon(Vulnerable).png FrameIcon(Intangible).png FrameIcon(Intangible).png FrameIcon(Intangible).png FrameIcon(Intangible).png FrameIcon(Vulnerable).png FrameIcon(Vulnerable).png FrameIcon(Vulnerable).png FrameIcon(Vulnerable).png FrameIcon(Vulnerable).png FrameIcon(Vulnerable).png FrameIcon(Vulnerable).png FrameIcon(Vulnerable).png FrameIcon(Vulnerable).png FrameIcon(Vulnerable).png FrameIcon(Vulnerable).png FrameIcon(Vulnerable).png FrameIcon(Vulnerable).png FrameIcon(Vulnerable).png FrameIcon(Vulnerable).png FrameIcon(Vulnerable).png FrameIcon(Vulnerable).png FrameIcon(Vulnerable).png FrameIcon(Vulnerable).png FrameIcon(Vulnerable).png FrameIcon(Vulnerable).png FrameIcon(Vulnerable).png FrameIcon(Vulnerable).png FrameIcon(Vulnerable).png FrameIcon(Vulnerable).png FrameIcon(Vulnerable).png FrameIcon(Vulnerable).png FrameIcon(Vulnerable).png FrameIcon(Vulnerable).png FrameIcon(Vulnerable).png
Auto-cancel  FrameIcon(Autocancel).png FrameIcon(Autocancel).png FrameIcon(Autocancel).png FrameIcon(Autocancel).png FrameIcon(Autocancel).png FrameIcon(Autocancel).png FrameIcon(Autocancel).png FrameIcon(Autocancel).png FrameIcon(Autocancel).png FrameIcon(Autocancel).png FrameIcon(Autocancel).png FrameIcon(Autocancel).png FrameIcon(Autocancel).png FrameIcon(Autocancel).png FrameIcon(Autocancel).png FrameIcon(Autocancel).png FrameIcon(Autocancel).png FrameIcon(Autocancel).png FrameIcon(Autocancel).png FrameIcon(Autocancel).png FrameIcon(Autocancel).png FrameIcon(Autocancel).png FrameIcon(Autocancel).png FrameIcon(Autocancel).png FrameIcon(Autocancel).png FrameIcon(Autocancel).png FrameIcon(Autocancel).png FrameIcon(Autocancel).png FrameIcon(Autocancel).png FrameIcon(Autocancel).png FrameIcon(Autocancel).png FrameIcon(Autocancel).png FrameIcon(Autocancel).png FrameIcon(Autocancel).png FrameIcon(Autocancel).png FrameIcon(Autocancel).png FrameIcon(Autocancel).png FrameIcon(Autocancel).png FrameIcon(Autocancel).png FrameIcon(Autocancel).png FrameIcon(Autocancel).png

Landing lag

Animation length 4
L-cancelled animation length 4
Normal  FrameIcon(Lag).png FrameIcon(Lag).png FrameIcon(Lag).png FrameIcon(Lag).png
L-cancelled  FrameIcon(Lag).png FrameIcon(Lag).png FrameIcon(Lag).png FrameIcon(Lag).png
Legend (1 square = 1 frame)
Lag
Lag time
Hitbox
Hitbox
FrameIcon(HitboxChangeS).pngFrameIcon(HitboxChangeE).png
Hitbox change
Auto-canceling
Autocancel