Super Smash Bros. 4

Bowser (SSB4)/Down tilt

From SmashWiki, the Super Smash Bros. wiki
Jump to navigationJump to search
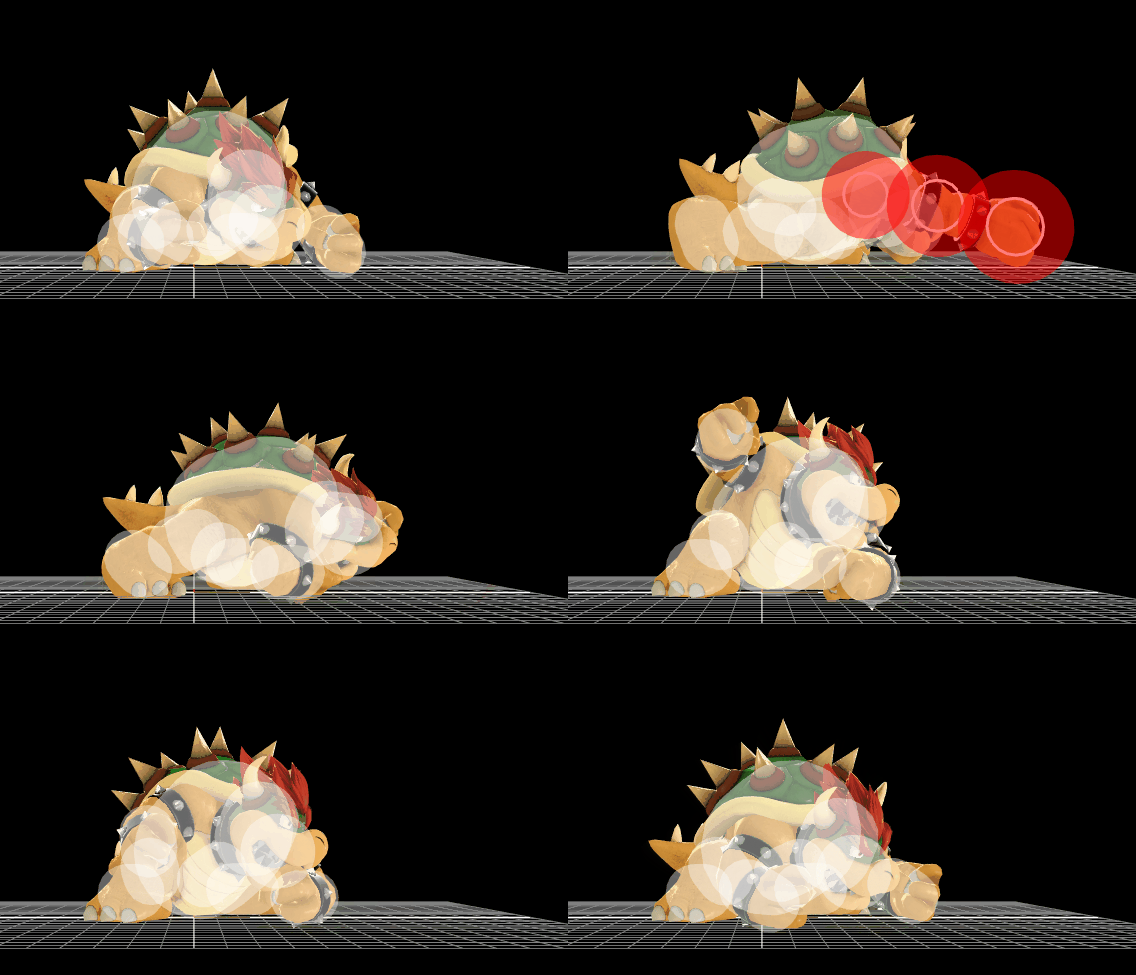
Hitbox visualization showing Bowser's down tilt.

Overview

Bowser lays in a prone position and throws two alternating hooks forward. Like in its previous appearances, this move functions uniquely from other down tilts in that it hits twice, but the two hits are not meant to connect into each other except at very low percentages. Should both hits connect, this move deals a whopping 25% total damage, being the most damaging down tilt in the game by a large margin. Even the first hit alone is tied with the Mii Gunner's down tilt for the highest base damage out of all down tilts in the game, dealing 14%. This additionally makes the move dangerous to shield at close range, as the first hit deals enough shieldstun for the second to connect before the opponent is able to act out of the shield, thus heavily damaging it. Furthermore, both hits have low base knockback and can cause tripping at very low percentages, especially the second, enabling them to set up combos and tech-chasing scenarios, while at high percentages, they are able to KO reliably at around 130% and 175% (respectively) from the center of Final Destination. Finally, like most of Bowser's ground attacks, the move renders Bowser's respective arms intangible during the frames their hitboxes are active. As such, it is one of the most versatile down tilts in the game thanks to its multiple functions. However, Bowser's down tilt does have its weaknesses, as it possesses rather slow startup and interruptibility for a down tilt, leaving it still fairly punishable.

Hitboxes

ID Part Damage SD Angle BK KS FKV Radius Bone Offset SDIx T% Clang Rebound Type Effect G A Sound Direct
Hit 1
0 0 14% 0 Sakurai angle 20 100 0 5.0 22 6.0 0.0 1.0 1.0x 1.0x 30% HitboxTableIcon(Clang).png HitboxTableIcon(Rebound).png Hand (type) Normal (effect) HitboxTableIcon(GroundedTrue).png HitboxTableIcon(AerialTrue).png M Kick SpecialsDirect.png
1 0 14% 0 Sakurai angle 20 100 0 4.5 22 -1.0 0.0 0.0 1.0x 1.0x 30% HitboxTableIcon(Clang).png HitboxTableIcon(Rebound).png Hand (type) Normal (effect) HitboxTableIcon(GroundedTrue).png HitboxTableIcon(AerialTrue).png M Kick SpecialsDirect.png
2 0 14% 0 Sakurai angle 20 100 0 4.0 20 0.0 0.0 0.0 1.0x 1.0x 30% HitboxTableIcon(Clang).png HitboxTableIcon(Rebound).png Hand (type) Normal (effect) HitboxTableIcon(GroundedTrue).png HitboxTableIcon(AerialTrue).png M Kick SpecialsDirect.png
Hit 2
0 0 11% 0 Sakurai angle 12 100 0 5.0 16 6.0 0.0 -1.0 1.0x 1.0x 30% HitboxTableIcon(Clang).png HitboxTableIcon(Rebound).png Hand (type) Normal (effect) HitboxTableIcon(GroundedTrue).png HitboxTableIcon(AerialTrue).png M Kick SpecialsDirect.png
1 0 11% 0 Sakurai angle 12 100 0 4.5 16 -1.0 0.0 0.0 1.0x 1.0x 30% HitboxTableIcon(Clang).png HitboxTableIcon(Rebound).png Hand (type) Normal (effect) HitboxTableIcon(GroundedTrue).png HitboxTableIcon(AerialTrue).png M Kick SpecialsDirect.png
2 0 11% 0 Sakurai angle 12 100 0 4.0 14 0.0 0.0 0.0 1.0x 1.0x 30% HitboxTableIcon(Clang).png HitboxTableIcon(Rebound).png Hand (type) Normal (effect) HitboxTableIcon(GroundedTrue).png HitboxTableIcon(AerialTrue).png M Kick SpecialsDirect.png

Timing

Hit 1 10-12
Right arm intangible 10-12
Hit 2 20-22
Left arm intangible 20-22
Animation length 45
Hitboxes  FrameIcon(Lag).png FrameIcon(Lag).png FrameIcon(Lag).png FrameIcon(Lag).png FrameIcon(Lag).png FrameIcon(Lag).png FrameIcon(Lag).png FrameIcon(Lag).png FrameIcon(Lag).png FrameIcon(Hitbox).png FrameIcon(Hitbox).png FrameIcon(Hitbox).png FrameIcon(Lag).png FrameIcon(Lag).png FrameIcon(Lag).png FrameIcon(Lag).png FrameIcon(Lag).png FrameIcon(Lag).png FrameIcon(Lag).png FrameIcon(Hitbox).png FrameIcon(Hitbox).png FrameIcon(Hitbox).png FrameIcon(Lag).png FrameIcon(Lag).png FrameIcon(Lag).png FrameIcon(Lag).png FrameIcon(Lag).png FrameIcon(Lag).png FrameIcon(Lag).png FrameIcon(Lag).png FrameIcon(Lag).png FrameIcon(Lag).png FrameIcon(Lag).png FrameIcon(Lag).png FrameIcon(Lag).png FrameIcon(Lag).png FrameIcon(Lag).png FrameIcon(Lag).png FrameIcon(Lag).png FrameIcon(Lag).png FrameIcon(Lag).png FrameIcon(Lag).png FrameIcon(Lag).png FrameIcon(Lag).png FrameIcon(Lag).png
Arm  FrameIcon(Vulnerable).png FrameIcon(Vulnerable).png FrameIcon(Vulnerable).png FrameIcon(Vulnerable).png FrameIcon(Vulnerable).png FrameIcon(Vulnerable).png FrameIcon(Vulnerable).png FrameIcon(Vulnerable).png FrameIcon(Vulnerable).png FrameIcon(Intangible).png FrameIcon(Intangible).png FrameIcon(Intangible).png FrameIcon(Vulnerable).png FrameIcon(Vulnerable).png FrameIcon(Vulnerable).png FrameIcon(Vulnerable).png FrameIcon(Vulnerable).png FrameIcon(Vulnerable).png FrameIcon(Vulnerable).png FrameIcon(Intangible).png FrameIcon(Intangible).png FrameIcon(Intangible).png FrameIcon(Vulnerable).png FrameIcon(Vulnerable).png FrameIcon(Vulnerable).png FrameIcon(Vulnerable).png FrameIcon(Vulnerable).png FrameIcon(Vulnerable).png FrameIcon(Vulnerable).png FrameIcon(Vulnerable).png FrameIcon(Vulnerable).png FrameIcon(Vulnerable).png FrameIcon(Vulnerable).png FrameIcon(Vulnerable).png FrameIcon(Vulnerable).png FrameIcon(Vulnerable).png FrameIcon(Vulnerable).png FrameIcon(Vulnerable).png FrameIcon(Vulnerable).png FrameIcon(Vulnerable).png FrameIcon(Vulnerable).png FrameIcon(Vulnerable).png FrameIcon(Vulnerable).png FrameIcon(Vulnerable).png FrameIcon(Vulnerable).png
Legend (1 square = 1 frame)
Lag
Lag time
Hitbox
Hitbox
FrameIcon(Vulnerable).png
Vulnerable
Intangibility
Intangible
Interruptibility
Interruptible