Welcome to SmashWiki! Log in or create an account and join the community, and don't forget to read this first!
Notices
The Skill parameter has been removed from Smasher infoboxes, and in its place are the new "Best historical ranking" and "Best tournament result" parameters. SmashWiki needs help adding these new parameters to Smasher infoboxes, refer to the guidelines here for what should be included in these new parameters.
When adding results to Smasher pages, include each tournament's entrant number in addition to the player's placement, and use the {{Trn}} template with the matching game specified. Please also fix old results on Smasher pages that do not abide to this standard. Refer to our Smasher article guidelines to see how results tables should be formatted.
Check out our project page for ongoing projects that SmashWiki needs help with.
Super Smash Bros. Brawl

Falco (SSBB)/Forward smash

From SmashWiki, the Super Smash Bros. wiki
Jump to navigationJump to search
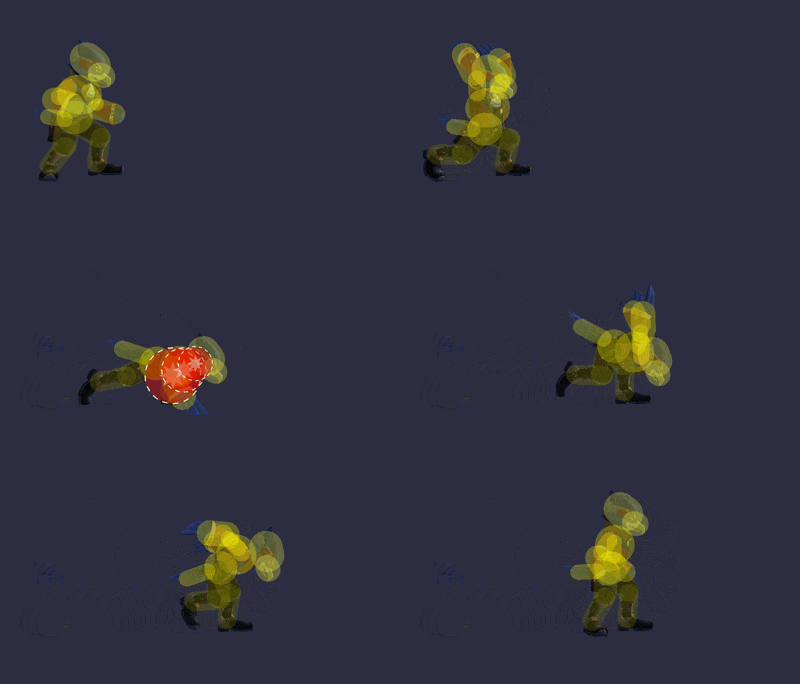
Hitbox visualization showing Falco's forward smash.

Overview[edit]

Falco brings his arms down in a chopping manner. The move deals 15% clean and 10% late. The move is Falco's strongest attack knockback wise, KOing at around 130%, but despite its power, the move is very sluggish, hitting on frame 16, and must be sweetspotted for efficient KOs. The move thus often necessitates a hard read to be used effectively and as such, players often turn to Falco's up smash for more guaranteed punishes.

Hitboxes[edit]

ID Part Damage SD Angle BK KS FKV Radius Bone Offset SDIx T% Clang Rebound Type Effect G A Sound Direct
Clean hit
0 0 15% 0 Sakurai angle 40 88 0 2.2 28 0.0 1.0 1.5 1.0x 0.5x 0% HitboxTableIcon(NoClang).png HitboxTableIcon(NoRebound).png Hand (type) Slash (effect) HitboxTableIcon(GroundedTrue).png HitboxTableIcon(AerialTrue).png L Slash SpecialsDirect.png
1 0 15% 0 Sakurai angle 40 88 0 3.0 28 3.2 1.0 1.5 1.0x 0.5x 0% HitboxTableIcon(NoClang).png HitboxTableIcon(NoRebound).png Hand (type) Slash (effect) HitboxTableIcon(GroundedTrue).png HitboxTableIcon(AerialTrue).png L Slash SpecialsDirect.png
2 0 15% 0 Sakurai angle 40 88 0 4.0 28 0.65 1.0 1.5 1.0x 0.5x 0% HitboxTableIcon(NoClang).png HitboxTableIcon(NoRebound).png Hand (type) Slash (effect) HitboxTableIcon(GroundedTrue).png HitboxTableIcon(AerialTrue).png L Slash SpecialsDirect.png
Late hit
0 0 10% 0 Sakurai angle 10 90 0 9.0 0 0.0 5.0 13.0 1.0x 1.0x 0% HitboxTableIcon(Clang).png HitboxTableIcon(Rebound).png Hand (type) Slash (effect) HitboxTableIcon(GroundedTrue).png HitboxTableIcon(AerialTrue).png M Slash SpecialsDirect.png

Timing[edit]

Charges between 12-13
Clean hit 16-20
Late hit 21
Animation length 49
FrameIcon(Lag).png FrameIcon(Lag).png FrameIcon(Lag).png FrameIcon(Lag).png FrameIcon(Lag).png FrameIcon(Lag).png FrameIcon(Lag).png FrameIcon(Lag).png FrameIcon(Lag).png FrameIcon(Lag).png FrameIcon(Lag).png FrameIcon(LagChargeS).png FrameIcon(LagChargeE).png FrameIcon(Lag).png FrameIcon(Lag).png FrameIcon(Hitbox).png FrameIcon(Hitbox).png FrameIcon(Hitbox).png FrameIcon(Hitbox).png FrameIcon(HitboxChangeS).png FrameIcon(HitboxChangeE).png FrameIcon(Lag).png FrameIcon(Lag).png FrameIcon(Lag).png FrameIcon(Lag).png FrameIcon(Lag).png FrameIcon(Lag).png FrameIcon(Lag).png FrameIcon(Lag).png FrameIcon(Lag).png FrameIcon(Lag).png FrameIcon(Lag).png FrameIcon(Lag).png FrameIcon(Lag).png FrameIcon(Lag).png FrameIcon(Lag).png FrameIcon(Lag).png FrameIcon(Lag).png FrameIcon(Lag).png FrameIcon(Lag).png FrameIcon(Lag).png FrameIcon(Lag).png FrameIcon(Lag).png FrameIcon(Lag).png FrameIcon(Lag).png FrameIcon(Lag).png FrameIcon(Lag).png FrameIcon(Lag).png FrameIcon(Lag).png
Legend (1 square = 1 frame)
Lag
Lag time
ChargeCharge
Charge interval
Hitbox
Hitbox
Interruptibility
Interruptible