King K. Rool (SSBU)/Neutral attack/Hit 1
Overview
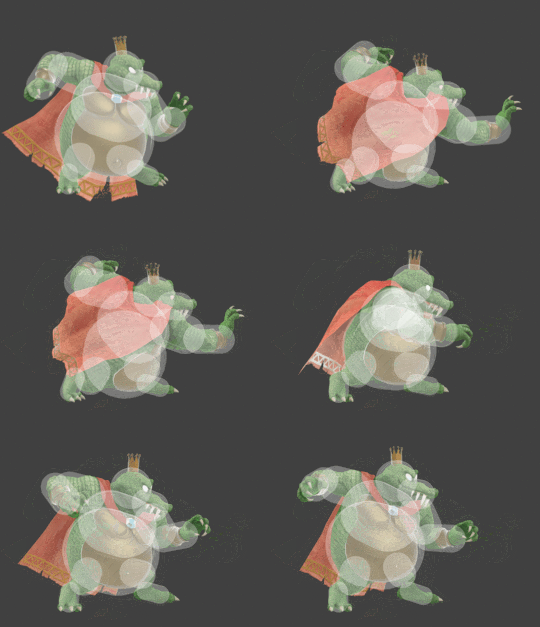
King K. Rool does a quick palm strike. Coming out Frame 4, this is King K. Rool's fastest move if we consider Hit 2 to use Hit 1's transition. As a result, it's handy to use in disadvantageous situations. While the move's hitbox doesn't quite match its animation, it is still quite large in terms of horizontal range, especially for a neutral attack. It is also slightly disjointed, due to the hands not being hurtboxes. To make it easier to get the jab combo, Hit 1 is programmed to deal 4 extra frames of hitstun after the regular calculation.
Due to some quirks with King K. Rool's traction, it is possible for him to slide with neutral attack just after a dash is over and the skid begins; this is once dash attack is no longer possible. This makes for an interesting approach option thanks to the attack's already solid horizontal range. In addition, due to K. Rool's height, this can also catch jumps efficiently without much commitment, making it a very valuable tool in neutral.
Neutral attack Hit 1 has one specific use on its own, in that it allows for regrabs out of bury states. This combats those who don't mash when trying to escape down throw into up smash, acting as the strongest mash deterrent that K. Rool has. However, it is very easy to mash out of down throw to Jab while buried if the opponent is actually trying to get out, thus making it extremely unlikely to lead to loops. Even if it works, mid-level mashing tends to leave K. Rool with very few frames to follow up, causing for a potential negative on hit punish. Confirming into Hits 2-3 is a reasonable alternative, being one of K. Rool's easiest and highest damage combos to do using this at mid%s, hitting opponents during the 12 frames of popout lag. This also leads to useful ledgetrap situations while helping K. Rool manage stale-move negation. However, up throw tends to be more consistent for damage building.
This move is the safest neutral attack on shield out of Hits 1-3, at -16. As a result, for mixups on shield, this is the optimal choice. However, it isn't as safe as many neutral attacks; for example Terry's is -6. It's very vulnerable to many out of shield options in the game, so spacing is necessary. On hit without cancelling however, it becomes -3 at 100% and continues to reliably increase in safety in 25% intervals. As a result, this can be used for something similar to tick throws: hitting an opponent and mixing up with a grab after, though this is on hit, not block. This is a highly useful option, as it can lead to K. Rool's highly useful grab game.
Neutral attack is also extremely useful for comboing out of down tilt. At mid percentages, hitting neutral attack on down tilt with a punish opportunity is guaranteed, allowing for consistent confirms thereafter. This even goes for lower percentages on bury popout, a grab if they attempt to shield in panic. Dash attack tends to be the preferred followup outside of grab for a combination of consistency and damage. Should this be attempted at low percentages, a player should note the risks of hitting shield.
This concept is especially notable against stick mashers, as those who use it have can pop out in an immediate tech situation if they pop out while holding up[1]. This is known as Bury Tech Situation Storage. This happens due to ASDI, as well as the Sakurai angle always resulting in a 0 below 60 knockback units. This provides potential lock combos or tech punishes at any percentage, allowing for explosive damage. Using down aerial after this tends to hit missed techs (for a lock pre-25%, then neutral attack hit 2 for a dash attack) or successful techs for a grounded meteor smash from 50%+, or grab confirm prior to that. A document on who can be hit with Hit 1 out of down throw and down tilt buries can be found here[2].
While Hit 1 can lock, it doesn't hit all opponents after the bounce when they've missed the tech[3]. Ken is a good example of this. Usually, going into Hit 2 is recommended in these cases to try and score the lock, or using down aerial. Note that they can always getup attack in these situations, however.
Hitboxes
Timing
| Hitboxes | 4-5 |
|---|---|
| Earliest continuable frame | 6 |
| Interruptible | 25 |
| Animation length | 47 |
Lag time |
Hitbox |
Earliest continuable point |
Interruptible |
Trivia
- Despite not having an ID 2 hitbox, the scripts have a flag for a hitbox with this ID to have the 4 extra frames of hitstun. This implies there used to be an ID 2 hitbox, but it was removed.
- Despite being a "punch" attack, this attack uses kick SFX.
- Hitbox ID 4 is effectively unused, due to being in the same spot, targeting the same grounded/aerial opponents and having a higher ID.
|
