Welcome to SmashWiki! Log in or create an account and join the community, and don't forget to read this first!
Notices
The Skill parameter has been removed from Smasher infoboxes, and in its place are the new "Best historical ranking" and "Best tournament result" parameters. SmashWiki needs help adding these new parameters to Smasher infoboxes, refer to the guidelines here for what should be included in these new parameters.
When adding results to Smasher pages, include each tournament's entrant number in addition to the player's placement, and use the {{Trn}} template with the matching game specified. Please also fix old results on Smasher pages that do not abide to this standard. Refer to our Smasher article guidelines to see how results tables should be formatted.
Check out our project page for ongoing projects that SmashWiki needs help with.
Super Smash Bros. Melee

Fox (SSBM)/Back aerial

From SmashWiki, the Super Smash Bros. wiki
< Fox (SSBM)
Revision as of 14:40, November 14, 2013 by Scr7 (talk | contribs)
Jump to navigationJump to search

Overview

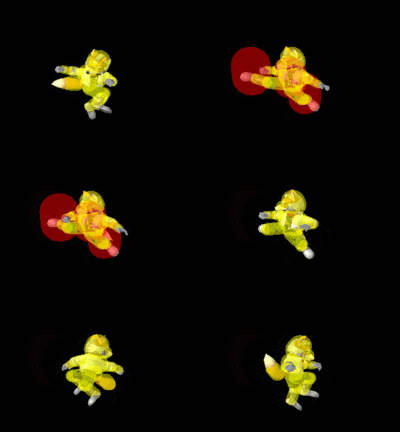
Hitboxes of Fox's back aerial.

Fox does a kick backwards, having good KO potential knockback when it first comes out. Like his neutral aerial, it is a sex kick, so the move has a quick startup and a relatively high duration but it lower than that of his neutral aerial. One of Fox's best edgeguarding moves, being effective at edgeguarding opponents near or off the ledge, either from an edge option or from an onstage combo. One can also SHFFL this move and can potentially do great in combos, such as a followup to a waveshine. Can also be used to space against opponents. Overall, a great move to use in competitive play, having good power and speed.

Hitboxes

ID Part Damage SD Angle BK KS FKV Radius Bone Offset Clang Rebound Effect G A Sound
Clean
0 0 15% 0 Sakurai angle 0 100 0 0.014639688 4 0.0 0.0 0.0 HitboxTableIcon(Clang).png HitboxTableIcon(Rebound).png Normal (effect) HitboxTableIcon(GroundedTrue).png HitboxTableIcon(AerialTrue).png L Kick
1 0 15% 0 Sakurai angle 0 100 0 0.019967472 13 0.015967728 0.0 0.0 HitboxTableIcon(Clang).png HitboxTableIcon(Rebound).png Normal (effect) HitboxTableIcon(GroundedTrue).png HitboxTableIcon(AerialTrue).png L Kick
2 0 9% 0 Sakurai angle 0 100 0 0.013311648 7 0.007983864 0.0 0.0 HitboxTableIcon(Clang).png HitboxTableIcon(Rebound).png Normal (effect) HitboxTableIcon(GroundedTrue).png HitboxTableIcon(AerialTrue).png M Kick
Late
0 0 9% 0 Sakurai angle 0 100 0 0.013311648 4 0.0 0.0 0.0 HitboxTableIcon(Clang).png HitboxTableIcon(Rebound).png Normal (effect) HitboxTableIcon(GroundedTrue).png HitboxTableIcon(AerialTrue).png M Kick
1 0 9% 0 Sakurai angle 0 100 0 0.015967728 13 0.015967728 0.0 0.0 HitboxTableIcon(Clang).png HitboxTableIcon(Rebound).png Normal (effect) HitboxTableIcon(GroundedTrue).png HitboxTableIcon(AerialTrue).png M Kick
2 0 9% 0 Sakurai angle 0 100 0 0.013311648 7 0.007983864 0.0 0.0 HitboxTableIcon(Clang).png HitboxTableIcon(Rebound).png Normal (effect) HitboxTableIcon(GroundedTrue).png HitboxTableIcon(AerialTrue).png M Kick

Timing

Attack

Initial autocancel 1-3
Clean hit 4-7
Late hit 8-19
Ending atocancel 23-
Interruptible 38
Animation length 39
FrameIcon(Lag).png FrameIcon(Lag).png FrameIcon(Lag).png FrameIcon(Hitbox).png FrameIcon(Hitbox).png FrameIcon(Hitbox).png FrameIcon(HitboxChangeS).png FrameIcon(HitboxChangeE).png FrameIcon(Hitbox).png FrameIcon(Hitbox).png FrameIcon(Hitbox).png FrameIcon(Hitbox).png FrameIcon(Hitbox).png FrameIcon(Hitbox).png FrameIcon(Hitbox).png FrameIcon(Hitbox).png FrameIcon(Hitbox).png FrameIcon(Hitbox).png FrameIcon(Hitbox).png FrameIcon(Lag).png FrameIcon(Lag).png FrameIcon(Lag).png FrameIcon(Lag).png FrameIcon(Lag).png FrameIcon(Lag).png FrameIcon(Lag).png FrameIcon(Lag).png FrameIcon(Lag).png FrameIcon(Lag).png FrameIcon(Lag).png FrameIcon(Lag).png FrameIcon(Lag).png FrameIcon(Lag).png FrameIcon(Lag).png FrameIcon(Lag).png FrameIcon(Lag).png FrameIcon(Lag).png FrameIcon(Lag).png FrameIcon(Interruptible).png
FrameIcon(Autocancel).png FrameIcon(Autocancel).png FrameIcon(Autocancel).png FrameIcon(Blank).png FrameIcon(Blank).png FrameIcon(Blank).png FrameIcon(Blank).png FrameIcon(Blank).png FrameIcon(Blank).png FrameIcon(Blank).png FrameIcon(Blank).png FrameIcon(Blank).png FrameIcon(Blank).png FrameIcon(Blank).png FrameIcon(Blank).png FrameIcon(Blank).png FrameIcon(Blank).png FrameIcon(Blank).png FrameIcon(Blank).png FrameIcon(Blank).png FrameIcon(Blank).png FrameIcon(Blank).png FrameIcon(Autocancel).png FrameIcon(Autocancel).png FrameIcon(Autocancel).png FrameIcon(Autocancel).png FrameIcon(Autocancel).png FrameIcon(Autocancel).png FrameIcon(Autocancel).png FrameIcon(Autocancel).png FrameIcon(Autocancel).png FrameIcon(Autocancel).png FrameIcon(Autocancel).png FrameIcon(Autocancel).png FrameIcon(Autocancel).png FrameIcon(Autocancel).png FrameIcon(Autocancel).png FrameIcon(Autocancel).png FrameIcon(Autocancel).png

Landing lag

Animation length 20
L-cancelled animation length 10