Welcome to SmashWiki! Log in or create an account and join the community, and don't forget to read this first!
Notices
The Skill parameter has been removed from Smasher infoboxes, and in its place are the new "Best historical ranking" and "Best tournament result" parameters. SmashWiki needs help adding these new parameters to Smasher infoboxes, refer to the guidelines here for what should be included in these new parameters.
When adding results to Smasher pages, include each tournament's entrant number in addition to the player's placement, and use the {{Trn}} template with the matching game specified. Please also fix old results on Smasher pages that do not abide to this standard. Refer to our Smasher article guidelines to see how results tables should be formatted.
Check out our project page for ongoing projects that SmashWiki needs help with.
Super Smash Bros. Ultimate

King K. Rool (SSBU)/Neutral attack/Hit 1

From SmashWiki, the Super Smash Bros. wiki
< King K. Rool (SSBU)‎ | Neutral attack
Revision as of 23:31, December 5, 2019 by Plague von Karma (talk | contribs) (Zeckemyro fixed the timing so the warning can go away.)
Jump to navigationJump to search
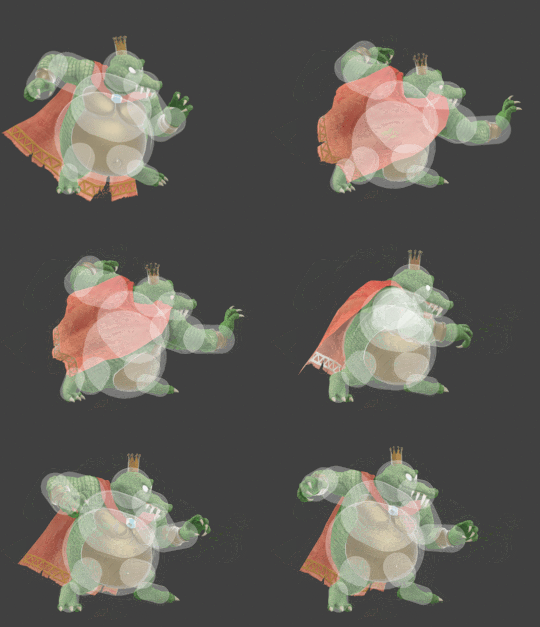
Hitbox visualization showing King K. Rool's Hit 1 of neutral attack.

Overview

King K. Rool does a quick palm strike. Coming out Frame 4, this is King K. Rool's fastest move if we consider Hit 2 to use Hit 1's transition. As a result, it's handy to use in disadvantageous situations. While the move's hitbox doesn't quite match its animation, it is still quite large in terms of horizontal range, especially for a neutral attack. It is also slightly disjointed, due to the hands not being hurtboxes. To make it easier to get the jab combo, Hit 1 is programmed to deal 4 extra frames of hitstun after the regular calculation.

Neutral attack Hit 1 has one specific use on its own, in that it allows for regrabs out of bury states. This combats those who don't mash when trying to escape down throw into up smash, acting as the strongest mash deterrent that K. Rool has. However, it is very easy to mash out of down throw to Jab if the opponent is actually trying to, thus making it extremely unlikely to lead to loops. Confirming into Hits 2-3 is a reasonable alternative, being one of K. Rool's easiest and highest damage combos to do at mid%s.

It's also good for comboing out of down tilt even at lower percentages, usually allowing for a grab or dash attack.

While Hit 1 can lock, it doesn't hit all opponents, especially after they've missed the tech and are laying down. Ken is a good example of this. Usually, going into Hit 2 is recommended in these cases to try and score the lock, or using down aerial.

Hitboxes

ID Part Rehit rate Damage SD Angle Angle type BK KS FKV Set weight Radius Bone Offset SDI× T% Clang Rebound Effect Type G A Sound Direct Hit bits Hit part Blockable Reflectable Absorbable Flinchless No GFX Heedless
0 0 0 2.5% 0 Sakurai angle Standard 30 30 0 HitboxTableIcon(False).png 2 top 0.0 9.0 10.0 1.8× 1.0× 0% HitboxTableIcon(Clang).png HitboxTableIcon(Rebound).png Normal (effect) Hand (type) HitboxTableIcon(GroundedTrue).png HitboxTableIcon(AerialTrue).png M Kick SpecialsDirect.png All All HitboxTableIcon(Blockable).png HitboxTableIcon(Unreflectable).png HitboxTableIcon(Unabsorbable).png HitboxTableIcon(False).png HitboxTableIcon(False).png HitboxTableIcon(False).png
1 0 0 2.5% 0 Sakurai angle Standard 30 30 0 HitboxTableIcon(False).png 2.2 top 0.0 9.0 12.5 1.8× 1.0× 0% HitboxTableIcon(Clang).png HitboxTableIcon(Rebound).png Normal (effect) Hand (type) HitboxTableIcon(GroundedTrue).png HitboxTableIcon(AerialTrue).png M Kick SpecialsDirect.png All All HitboxTableIcon(Blockable).png HitboxTableIcon(Unreflectable).png HitboxTableIcon(Unabsorbable).png HitboxTableIcon(False).png HitboxTableIcon(False).png HitboxTableIcon(False).png
3 0 0 2.5% 0 AngleIcon180.png Standard 30 15 0 HitboxTableIcon(False).png 2.5 top 0.0 9.0 18.5 1.8× 1.0× 0% HitboxTableIcon(Clang).png HitboxTableIcon(Rebound).png Normal (effect) Hand (type) HitboxTableIcon(GroundedTrue).png HitboxTableIcon(AerialTrue).png M Kick SpecialsDirect.png All All HitboxTableIcon(Blockable).png HitboxTableIcon(Unreflectable).png HitboxTableIcon(Unabsorbable).png HitboxTableIcon(False).png HitboxTableIcon(False).png HitboxTableIcon(False).png
4 0 0 2.5% 0 Sakurai angle Standard 30 15 0 HitboxTableIcon(False).png 2.5 top 0.0 9.0 18.5 1.8× 1.0× 0% HitboxTableIcon(Clang).png HitboxTableIcon(Rebound).png Normal (effect) Hand (type) HitboxTableIcon(GroundedTrue).png HitboxTableIcon(AerialTrue).png M Kick SpecialsDirect.png All All HitboxTableIcon(Blockable).png HitboxTableIcon(Unreflectable).png HitboxTableIcon(Unabsorbable).png HitboxTableIcon(False).png HitboxTableIcon(False).png HitboxTableIcon(False).png

Timing

Hitboxes 4-5
Earliest continuable frame 6
Interruptible 25
Animation length 47
FrameIcon(Lag).png FrameIcon(Lag).png FrameIcon(Lag).png FrameIcon(Hitbox).png FrameIcon(Hitbox).png FrameIcon(LagContinuableS).png FrameIcon(LagContinuableE).png FrameIcon(Lag).png FrameIcon(Lag).png FrameIcon(Lag).png FrameIcon(Lag).png FrameIcon(Lag).png FrameIcon(Lag).png FrameIcon(Lag).png FrameIcon(Lag).png FrameIcon(Lag).png FrameIcon(Lag).png FrameIcon(Lag).png FrameIcon(Lag).png FrameIcon(Lag).png FrameIcon(Lag).png FrameIcon(Lag).png FrameIcon(Lag).png FrameIcon(Lag).png FrameIcon(Interruptible).png FrameIcon(Interruptible).png FrameIcon(Interruptible).png FrameIcon(Interruptible).png FrameIcon(Interruptible).png FrameIcon(Interruptible).png FrameIcon(Interruptible).png FrameIcon(Interruptible).png FrameIcon(Interruptible).png FrameIcon(Interruptible).png FrameIcon(Interruptible).png FrameIcon(Interruptible).png FrameIcon(Interruptible).png FrameIcon(Interruptible).png FrameIcon(Interruptible).png FrameIcon(Interruptible).png FrameIcon(Interruptible).png FrameIcon(Interruptible).png FrameIcon(Interruptible).png FrameIcon(Interruptible).png FrameIcon(Interruptible).png FrameIcon(Interruptible).png FrameIcon(Interruptible).png
Legend (1 square = 1 frame)
Lag
Lag time
Hitbox
Hitbox
FrameIcon(BlankContinuableS).pngFrameIcon(BlankContinuableE).png
Earliest continuable point
Interruptibility
Interruptible

Trivia

  • Despite not having an ID 2 hitbox, the scripts have a flag for a hitbox with this ID to have the 4 extra frames of hitstun. This implies there used to be an ID 2 hitbox, but it was removed.
  • Despite being a "punch" attack, this attack uses kick SFX.
  • Hitbox ID 4 is effectively unused, due to being in the same spot, targeting the same grounded/aerial opponents and having a higher ID.