Super Smash Bros. Melee

Bowser (SSBM)/Down tilt

From SmashWiki, the Super Smash Bros. wiki
< Bowser (SSBM)
Revision as of 13:57, January 12, 2021 by Invisible Star (talk | contribs) (Added description.)
(diff) ← Older revision | Latest revision (diff) | Newer revision → (diff)
Jump to navigationJump to search
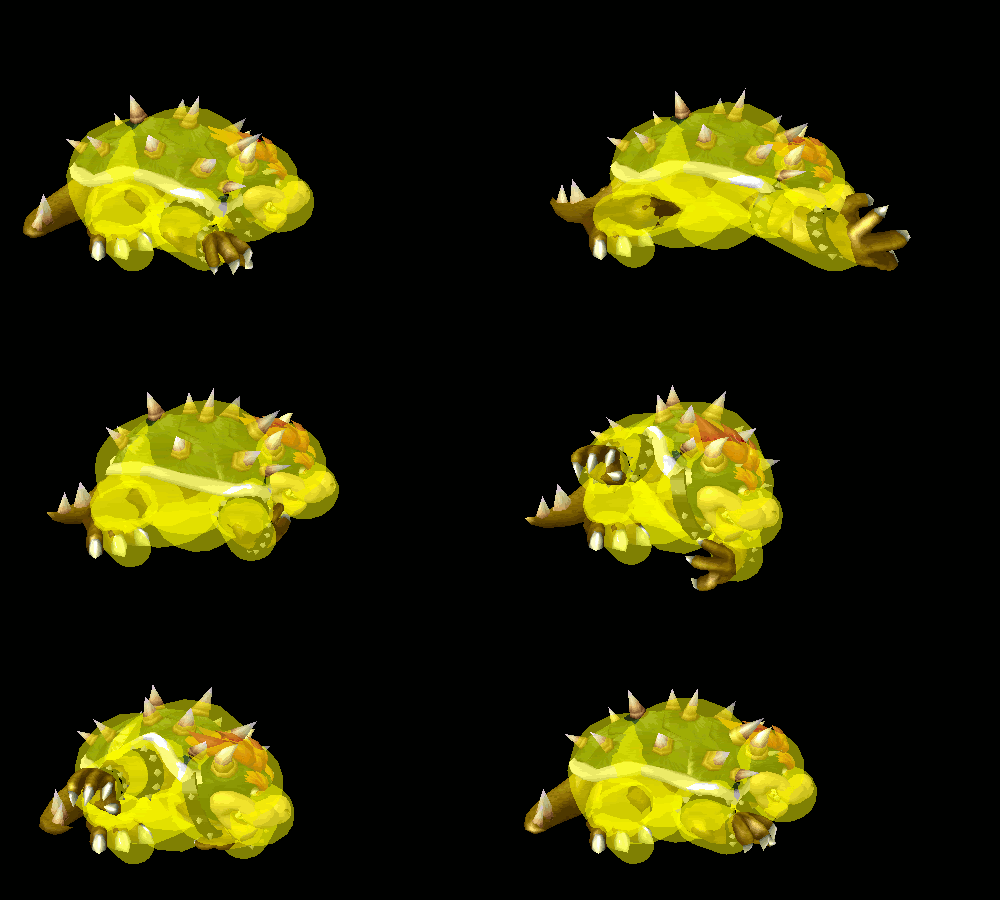
Hitbox visualization showing Bowser's down tilt.

Overview

Bowser slashes along the ground with his claws. With two separate hits, they cannot link together past very low percentages and the first hit is stronger. The first hit is one of the stronger down tilts in the game and can KO at higher percentages.

Hitboxes

ID Part Damage SD Angle BK KS FKV Radius Bone Offset Clang Rebound Effect G A Sound
Hit 1
0 0 13% 0 Sakurai angle 15 100 0 5.4684 65 0.0 0.0 0.0 HitboxTableIcon(Clang).png HitboxTableIcon(Rebound).png Slash (effect) HitboxTableIcon(GroundedTrue).png HitboxTableIcon(AerialTrue).png S Kick
1 0 13% 0 Sakurai angle 15 100 0 4.6872 61 0.0 0.0 0.0 HitboxTableIcon(Clang).png HitboxTableIcon(Rebound).png Slash (effect) HitboxTableIcon(GroundedTrue).png HitboxTableIcon(AerialTrue).png S Kick
Hit 2
0 0 10% 0 Sakurai angle 12 100 0 5.4684 38 0.0 0.0 0.0 HitboxTableIcon(Clang).png HitboxTableIcon(Rebound).png Slash (effect) HitboxTableIcon(GroundedTrue).png HitboxTableIcon(AerialTrue).png S Kick
1 0 10% 0 Sakurai angle 12 100 0 4.6872 34 0.0 0.0 0.0 HitboxTableIcon(Clang).png HitboxTableIcon(Rebound).png Slash (effect) HitboxTableIcon(GroundedTrue).png HitboxTableIcon(AerialTrue).png S Kick

Timing

Hit 1 14-18
Hit 2 27-31
Interruptible 55
Animation length 59
FrameIcon(Lag).png FrameIcon(Lag).png FrameIcon(Lag).png FrameIcon(Lag).png FrameIcon(Lag).png FrameIcon(Lag).png FrameIcon(Lag).png FrameIcon(Lag).png FrameIcon(Lag).png FrameIcon(Lag).png FrameIcon(Lag).png FrameIcon(Lag).png FrameIcon(Lag).png FrameIcon(Hitbox).png FrameIcon(Hitbox).png FrameIcon(Hitbox).png FrameIcon(Hitbox).png FrameIcon(Hitbox).png FrameIcon(Lag).png FrameIcon(Lag).png FrameIcon(Lag).png FrameIcon(Lag).png FrameIcon(Lag).png FrameIcon(Lag).png FrameIcon(Lag).png FrameIcon(Lag).png FrameIcon(Hitbox).png FrameIcon(Hitbox).png FrameIcon(Hitbox).png FrameIcon(Hitbox).png FrameIcon(Hitbox).png FrameIcon(Lag).png FrameIcon(Lag).png FrameIcon(Lag).png FrameIcon(Lag).png FrameIcon(Lag).png FrameIcon(Lag).png FrameIcon(Lag).png FrameIcon(Lag).png FrameIcon(Lag).png FrameIcon(Lag).png FrameIcon(Lag).png FrameIcon(Lag).png FrameIcon(Lag).png FrameIcon(Lag).png FrameIcon(Lag).png FrameIcon(Lag).png FrameIcon(Lag).png FrameIcon(Lag).png FrameIcon(Lag).png FrameIcon(Lag).png FrameIcon(Lag).png FrameIcon(Lag).png FrameIcon(Lag).png FrameIcon(Interruptible).png FrameIcon(Interruptible).png FrameIcon(Interruptible).png FrameIcon(Interruptible).png FrameIcon(Interruptible).png
Legend (1 square = 1 frame)
Lag
Lag time
Hitbox
Hitbox
Interruptibility
Interruptible