Welcome to SmashWiki! Log in or create an account and join the community, and don't forget to read this first!
Notices
The Skill parameter has been removed from Smasher infoboxes, and in its place are the new "Best historical ranking" and "Best tournament result" parameters. SmashWiki needs help adding these new parameters to Smasher infoboxes, refer to the guidelines here for what should be included in these new parameters.
When adding results to Smasher pages, include each tournament's entrant number in addition to the player's placement, and use the {{Trn}} template with the matching game specified. Please also fix old results on Smasher pages that do not abide to this standard. Refer to our Smasher article guidelines to see how results tables should be formatted.
Check out our project page for ongoing projects that SmashWiki needs help with.
Super Smash Bros. Brawl

Mario (SSBB)/Neutral attack/Hit 3: Difference between revisions

From SmashWiki, the Super Smash Bros. wiki
Jump to navigationJump to search
(→‎Post hit data: Hardly any hitbox data pages actually have this, so I guess we decided against including them at some point? Also the launch speed values seem to be around 1000x higher than they should be, but maybe that's how launch speed was tracked back then?)
No edit summary
 
Line 1: Line 1:
{{ArticleIcons|ssbb=y}}
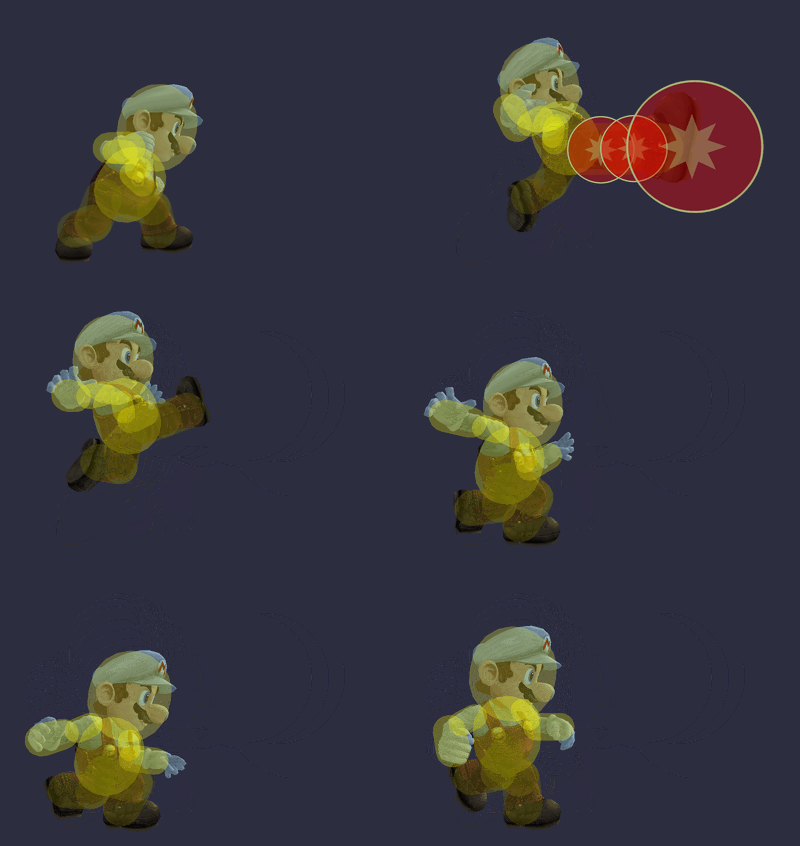
{{cleanup|The hitbox table data suggests that the foot hitbox is supposed to shrink for the last 2 active frames, but the hitbox gif doesn't show this. I don't know which one is wrong though.}}
:''For an overview of the overall natural combo, see [[Mario (SSBB)/Neutral attack|here]].''
[[File:MarioJab3SSBB.gif|thumb|400px|Hitbox visualization showing Mario's third jab.]]
[[File:MarioJab3SSBB.gif|thumb|400px|Hitbox visualization showing Mario's third jab.]]

Latest revision as of 18:52, February 5, 2025

An icon for use on pages that need cleanup. This article or section may require a cleanup.
The editor who added this tag believes this page should be cleaned up for the following reason: The hitbox table data suggests that the foot hitbox is supposed to shrink for the last 2 active frames, but the hitbox gif doesn't show this. I don't know which one is wrong though.
You can discuss this issue on the talk page or edit this page to improve it.
For an overview of the overall natural combo, see here.
Hitbox visualization showing Mario's third jab.

Overview[edit]

Competitive.png This article or section may require competitive expertise.
You can discuss this issue on the talk page or edit this page to improve it.

Hitboxes[edit]

ID Part Damage SD Angle BK KS FKV Radius Bone Offset SDIx T% Clang Rebound Type Effect G A Sound Direct
Clean hit
0 0 4% 0 Sakurai angle 30 95 0 5.0 17 0.0 5.5 0.0 1.0x 1.0x 0% HitboxTableIcon(Clang).png HitboxTableIcon(Rebound).png Foot (type) Normal (effect) HitboxTableIcon(GroundedTrue).png HitboxTableIcon(AerialTrue).png M Kick SpecialsDirect.png
1 0 4% 0 Sakurai angle 30 95 0 2.5 17 0.0 1.0 0.0 1.0x 1.0x 0% HitboxTableIcon(Clang).png HitboxTableIcon(Rebound).png Foot (type) Normal (effect) HitboxTableIcon(GroundedTrue).png HitboxTableIcon(AerialTrue).png M Kick SpecialsDirect.png
2 0 4% 0 Sakurai angle 30 95 0 2.5 17 0.0 -1.5 0.0 1.0x 1.0x 0% HitboxTableIcon(Clang).png HitboxTableIcon(Rebound).png Foot (type) Normal (effect) HitboxTableIcon(GroundedTrue).png HitboxTableIcon(AerialTrue).png M Kick SpecialsDirect.png
Late hit hit
0 0 4% 0 Sakurai angle 30 95 0 3.6 17 0.0 5.5 0.0 1.0x 1.0x 0% HitboxTableIcon(Clang).png HitboxTableIcon(Rebound).png Foot (type) Normal (effect) HitboxTableIcon(GroundedTrue).png HitboxTableIcon(AerialTrue).png M Kick SpecialsDirect.png
1 0 4% 0 Sakurai angle 30 95 0 2.5 17 0.0 1.0 0.0 1.0x 1.0x 0% HitboxTableIcon(Clang).png HitboxTableIcon(Rebound).png Foot (type) Normal (effect) HitboxTableIcon(GroundedTrue).png HitboxTableIcon(AerialTrue).png M Kick SpecialsDirect.png
2 0 4% 0 Sakurai angle 30 95 0 2.5 17 0.0 -1.5 0.0 1.0x 1.0x 0% HitboxTableIcon(Clang).png HitboxTableIcon(Rebound).png Foot (type) Normal (effect) HitboxTableIcon(GroundedTrue).png HitboxTableIcon(AerialTrue).png M Kick SpecialsDirect.png

Timing[edit]

Clean hit 7-8
Late hit 9-10
Interruptible 30
Animation length 39
FrameIcon(Lag).png FrameIcon(Lag).png FrameIcon(Lag).png FrameIcon(Lag).png FrameIcon(Lag).png FrameIcon(Lag).png FrameIcon(Hitbox).png FrameIcon(HitboxChangeS).png FrameIcon(HitboxChangeE).png FrameIcon(Hitbox).png FrameIcon(Lag).png FrameIcon(Lag).png FrameIcon(Lag).png FrameIcon(Lag).png FrameIcon(Lag).png FrameIcon(Lag).png FrameIcon(Lag).png FrameIcon(Lag).png FrameIcon(Lag).png FrameIcon(Lag).png FrameIcon(Lag).png FrameIcon(Lag).png FrameIcon(Lag).png FrameIcon(Lag).png FrameIcon(Lag).png FrameIcon(Lag).png FrameIcon(Lag).png FrameIcon(Lag).png FrameIcon(Lag).png FrameIcon(Interruptible).png FrameIcon(Interruptible).png FrameIcon(Interruptible).png FrameIcon(Interruptible).png FrameIcon(Interruptible).png FrameIcon(Interruptible).png FrameIcon(Interruptible).png FrameIcon(Interruptible).png FrameIcon(Interruptible).png FrameIcon(Interruptible).png
Legend (1 square = 1 frame)
Lag
Lag time
Hitbox
Hitbox
FrameIcon(HitboxChangeS).pngFrameIcon(HitboxChangeE).png
Hitbox change
Interruptibility
Interruptible