Super Smash Bros. Ultimate

Ganondorf (SSBU)/Up smash: Difference between revisions

From SmashWiki, the Super Smash Bros. wiki
Jump to navigationJump to search
m (Text replacement - " " to " ")
 
Line 3: Line 3:
{{competitive expertise}}
==Overview==
==Overview==
Ganondorf swings his sword upward in a front-to-back arc, akin to {{SSBU|Ike}}. While it has somewhat slow startup and relatively high ending lag, this is offset by the move's solid vertical and horizontal disjoint, very high power and incredible damage output. If spaced, the move can be surprisingly difficult to punish on block, despite it being -25 on shield if he hits opponents with the back hit. The move's combination of range and power makes it one of Ganondorf's best tools for pressuring opponents standing on platforms from underneath. Compared to Ike's up smash, Ganondorf's has faster startup, lower ending lag, and superior power.
However, unlike Ike's similar-looking up smash, this move has a slight blindspot directly in front of Ganondorf that can cause it to potentially whiff against some opponents if they are very close to (or practically inside) him, and another blindspot behind him that can cause it to whiff against crouching or prone opponents, despite the move's animation.
==Hitboxes==
==Hitboxes==
{{UltimateHitboxTableHeader}}

Latest revision as of 13:50, May 30, 2024

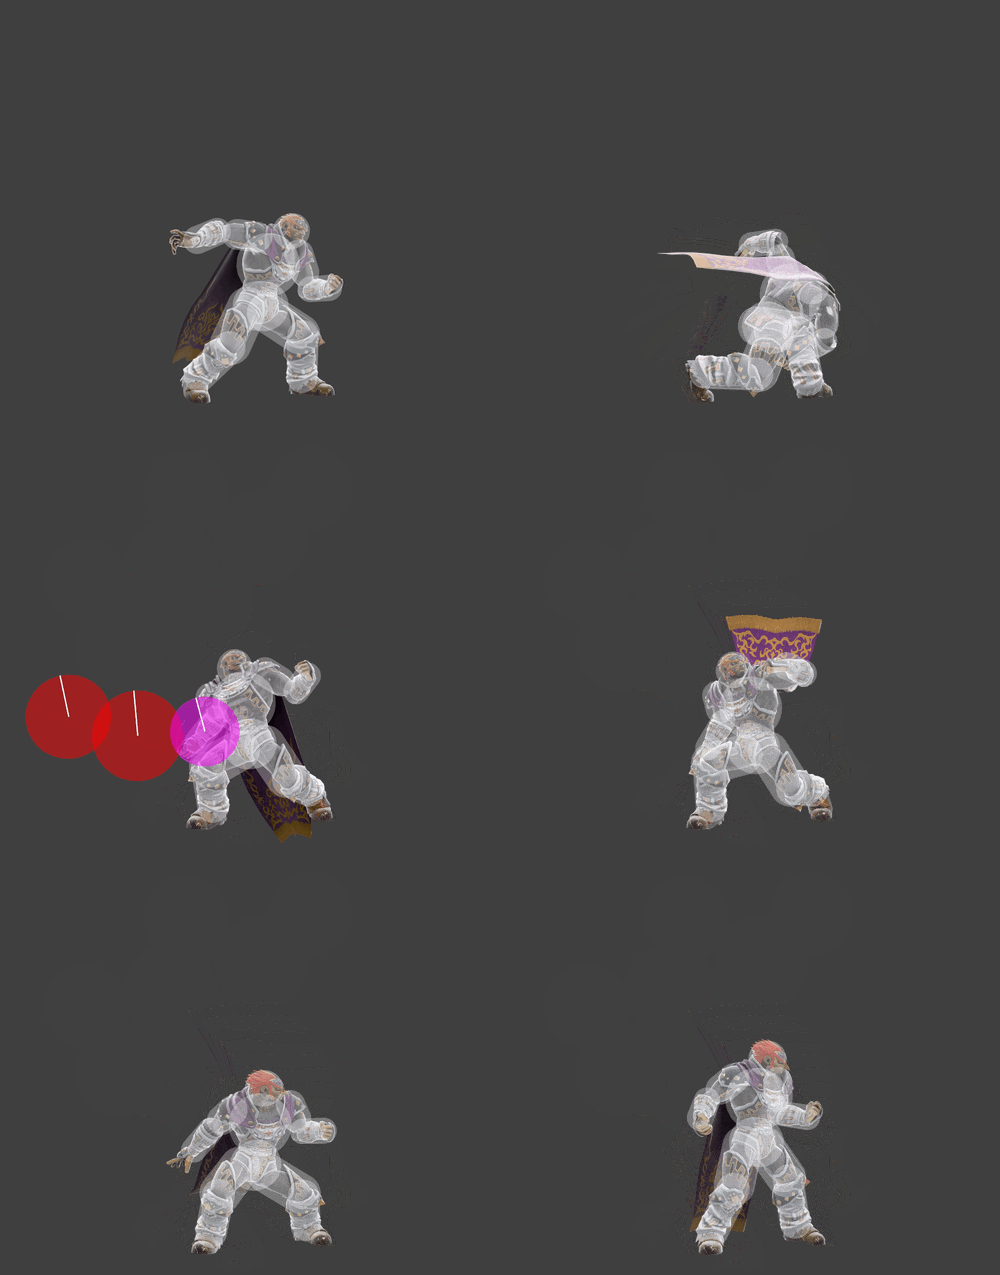
Hitbox visualization showing Ganondorf's up smash.
Competitive.png This article or section may require competitive expertise.
You can discuss this issue on the talk page or edit this page to improve it.

Overview[edit]

Ganondorf swings his sword upward in a front-to-back arc, akin to Ike. While it has somewhat slow startup and relatively high ending lag, this is offset by the move's solid vertical and horizontal disjoint, very high power and incredible damage output. If spaced, the move can be surprisingly difficult to punish on block, despite it being -25 on shield if he hits opponents with the back hit. The move's combination of range and power makes it one of Ganondorf's best tools for pressuring opponents standing on platforms from underneath. Compared to Ike's up smash, Ganondorf's has faster startup, lower ending lag, and superior power.

However, unlike Ike's similar-looking up smash, this move has a slight blindspot directly in front of Ganondorf that can cause it to potentially whiff against some opponents if they are very close to (or practically inside) him, and another blindspot behind him that can cause it to whiff against crouching or prone opponents, despite the move's animation.

Hitboxes[edit]

ID Part Rehit rate Damage SD Angle Angle type BK KS FKV Set weight Radius Bone Offset SDI× T% Clang Rebound Effect Type G A Sound Direct Hit bits Hit part Blockable Reflectable Absorbable Flinchless No GFX Heedless
0 0 0 24.0% 0 AngleIcon85.png Standard 40 71 0 HitboxTableIcon(False).png 5.0 haver 0.0 6.5 0.0 1.0× 1.0× 0% HitboxTableIcon(Clang).png HitboxTableIcon(Rebound).png Slash (effect) Sword (type) HitboxTableIcon(GroundedTrue).png HitboxTableIcon(AerialTrue).png L Slash SpecialsDirect.png All All HitboxTableIcon(Blockable).png HitboxTableIcon(Unreflectable).png HitboxTableIcon(Unabsorbable).png HitboxTableIcon(False).png HitboxTableIcon(False).png HitboxTableIcon(False).png
1 0 0 24.0% 0 AngleIcon78.png Standard 40 71 0 HitboxTableIcon(False).png 4.5 haver 0.0 14.5 0.0 1.0× 1.0× 0% HitboxTableIcon(Clang).png HitboxTableIcon(Rebound).png Slash (effect) Sword (type) HitboxTableIcon(GroundedTrue).png HitboxTableIcon(AerialTrue).png L Slash SpecialsDirect.png All All HitboxTableIcon(Blockable).png HitboxTableIcon(Unreflectable).png HitboxTableIcon(Unabsorbable).png HitboxTableIcon(False).png HitboxTableIcon(False).png HitboxTableIcon(False).png
2 0 0 21.0% 0 AngleIcon75.png Standard 40 75 0 HitboxTableIcon(False).png 4.0 haver 2.0 0.0 0.0 1.0× 1.0× 0% HitboxTableIcon(Clang).png HitboxTableIcon(Rebound).png Slash (effect) Sword (type) HitboxTableIcon(GroundedTrue).png HitboxTableIcon(AerialTrue).png L Slash SpecialsDirect.png All All HitboxTableIcon(Blockable).png HitboxTableIcon(Unreflectable).png HitboxTableIcon(Unabsorbable).png HitboxTableIcon(False).png HitboxTableIcon(False).png HitboxTableIcon(False).png

Timing[edit]

Charges between 9-10
Hitboxes 20-25
Interruptible 62
Animation length 70
FrameIcon(Lag).png FrameIcon(Lag).png FrameIcon(Lag).png FrameIcon(Lag).png FrameIcon(Lag).png FrameIcon(Lag).png FrameIcon(Lag).png FrameIcon(Lag).png FrameIcon(LagChargeS).png FrameIcon(LagChargeE).png FrameIcon(Lag).png FrameIcon(Lag).png FrameIcon(Lag).png FrameIcon(Lag).png FrameIcon(Lag).png FrameIcon(Lag).png FrameIcon(Lag).png FrameIcon(Lag).png FrameIcon(Lag).png FrameIcon(Hitbox).png FrameIcon(Hitbox).png FrameIcon(Hitbox).png FrameIcon(Hitbox).png FrameIcon(Hitbox).png FrameIcon(Hitbox).png FrameIcon(Lag).png FrameIcon(Lag).png FrameIcon(Lag).png FrameIcon(Lag).png FrameIcon(Lag).png FrameIcon(Lag).png FrameIcon(Lag).png FrameIcon(Lag).png FrameIcon(Lag).png FrameIcon(Lag).png FrameIcon(Lag).png FrameIcon(Lag).png FrameIcon(Lag).png FrameIcon(Lag).png FrameIcon(Lag).png FrameIcon(Lag).png FrameIcon(Lag).png FrameIcon(Lag).png FrameIcon(Lag).png FrameIcon(Lag).png FrameIcon(Lag).png FrameIcon(Lag).png FrameIcon(Lag).png FrameIcon(Lag).png FrameIcon(Lag).png FrameIcon(Lag).png FrameIcon(Lag).png FrameIcon(Lag).png FrameIcon(Lag).png FrameIcon(Lag).png FrameIcon(Lag).png FrameIcon(Lag).png FrameIcon(Lag).png FrameIcon(Lag).png FrameIcon(Lag).png FrameIcon(Lag).png FrameIcon(Interruptible).png FrameIcon(Interruptible).png FrameIcon(Interruptible).png FrameIcon(Interruptible).png FrameIcon(Interruptible).png FrameIcon(Interruptible).png FrameIcon(Interruptible).png FrameIcon(Interruptible).png FrameIcon(Interruptible).png
Legend (1 square = 1 frame)
Lag
Lag time
ChargeCharge
Charge interval
Hitbox
Hitbox
Interruptibility
Interruptible