Super Smash Bros. 4

Cloud (SSB4)/Back aerial: Difference between revisions

From SmashWiki, the Super Smash Bros. wiki
Jump to navigationJump to search
No edit summary
(→‎Overview: Stuff about Sm4sh Cloud's back-air)
Line 3: Line 3:


==Overview==
==Overview==
{{competitive expertise}}
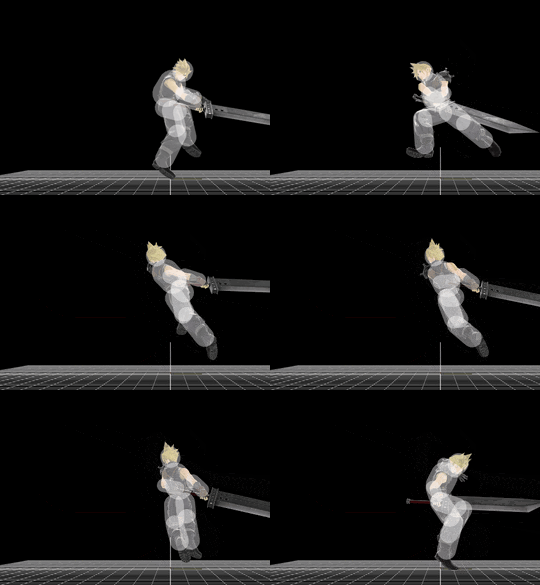
An outward slash with the Buster Sword. It sports a mixed bag of attributes, with passable speed, poor activity, high ending lag, solid KO potential, and low landing lag. It autocancels out of a short hop, and its surprisingly low activity (only 2 frames) is made up for with hitboxes much larger than the sword itself. This combination of traits make it a good option for stuffing out aerial approaches, erecting Walls of Pain, or use as a relatively safe kill move when spaced.
 
While the move has next to no combo potential on its own, it can be confirmed into with a landing up aerial or autocanceled down aerial, the latter doubling as a kill-confirm at high percents.
 
When cornering and/or ledgetrapping opponents, Cloud's back aerial is also of use in mindgames. Its power and impressive reach force opposing fighters to respect the threat from a distance at which they may not be able to fight back. With the intimidating prospect of a long-range kill move on the table, Cloud can take advantage of a nervous opponent by suddenly opting for an empty hop, grab, or back aerials of varying delay to throw off their timing.
 
Though not his most infamous air attack, Cloud's back aerial is still a respectable and versatile move that a good deal of the cast wouldn't object to having in their own arsenal.
 
==Hitboxes==
==Hitboxes==
{{SSB4HitboxTableHeader}}

Revision as of 17:37, April 28, 2024

Hitbox visualization showing Cloud's back aerial.

Overview

An outward slash with the Buster Sword. It sports a mixed bag of attributes, with passable speed, poor activity, high ending lag, solid KO potential, and low landing lag. It autocancels out of a short hop, and its surprisingly low activity (only 2 frames) is made up for with hitboxes much larger than the sword itself. This combination of traits make it a good option for stuffing out aerial approaches, erecting Walls of Pain, or use as a relatively safe kill move when spaced.

While the move has next to no combo potential on its own, it can be confirmed into with a landing up aerial or autocanceled down aerial, the latter doubling as a kill-confirm at high percents.

When cornering and/or ledgetrapping opponents, Cloud's back aerial is also of use in mindgames. Its power and impressive reach force opposing fighters to respect the threat from a distance at which they may not be able to fight back. With the intimidating prospect of a long-range kill move on the table, Cloud can take advantage of a nervous opponent by suddenly opting for an empty hop, grab, or back aerials of varying delay to throw off their timing.

Though not his most infamous air attack, Cloud's back aerial is still a respectable and versatile move that a good deal of the cast wouldn't object to having in their own arsenal.

Hitboxes

ID Part Damage SD Angle BK KS FKV Radius Bone Offset SDIx T% Clang Rebound Type Effect G A Sound Direct
Early hit
0 0 13% 0 Sakurai angle 20 95 0 7.0 0 0.0 8.5 -15.0 to -7.0 1.0x 1.0x 0% HitboxTableIcon(Clang).png HitboxTableIcon(Rebound).png Sword (type) Slash (effect) HitboxTableIcon(GroundedTrue).png HitboxTableIcon(AerialTrue).png M Cloud Hit SpecialsDirect.png
Late hit
0 0 13% 0 Sakurai angle 20 95 0 7.0 0 0.0 16.0 -15.0 to -7.0 1.0x 1.0x 0% HitboxTableIcon(Clang).png HitboxTableIcon(Rebound).png Sword (type) Slash (effect) HitboxTableIcon(GroundedTrue).png HitboxTableIcon(AerialTrue).png M Cloud Hit SpecialsDirect.png

Timing

Attack

Initial autocancel 1-4
Hitboxes (early, late) 11, 12
Ending autocancel 37-
Interruptible 42
Animation length 56
FrameIcon(Lag).png FrameIcon(Lag).png FrameIcon(Lag).png FrameIcon(Lag).png FrameIcon(Lag).png FrameIcon(Lag).png FrameIcon(Lag).png FrameIcon(Lag).png FrameIcon(Lag).png FrameIcon(Lag).png FrameIcon(HitboxChangeS).png FrameIcon(HitboxChangeE).png FrameIcon(Lag).png FrameIcon(Lag).png FrameIcon(Lag).png FrameIcon(Lag).png FrameIcon(Lag).png FrameIcon(Lag).png FrameIcon(Lag).png FrameIcon(Lag).png FrameIcon(Lag).png FrameIcon(Lag).png FrameIcon(Lag).png FrameIcon(Lag).png FrameIcon(Lag).png FrameIcon(Lag).png FrameIcon(Lag).png FrameIcon(Lag).png FrameIcon(Lag).png FrameIcon(Lag).png FrameIcon(Lag).png FrameIcon(Lag).png FrameIcon(Lag).png FrameIcon(Lag).png FrameIcon(Lag).png FrameIcon(Lag).png FrameIcon(Lag).png FrameIcon(Lag).png FrameIcon(Lag).png FrameIcon(Lag).png FrameIcon(Lag).png FrameIcon(Interruptible).png FrameIcon(Interruptible).png FrameIcon(Interruptible).png FrameIcon(Interruptible).png FrameIcon(Interruptible).png FrameIcon(Interruptible).png FrameIcon(Interruptible).png FrameIcon(Interruptible).png FrameIcon(Interruptible).png FrameIcon(Interruptible).png FrameIcon(Interruptible).png FrameIcon(Interruptible).png FrameIcon(Interruptible).png FrameIcon(Interruptible).png FrameIcon(Interruptible).png
FrameIcon(Autocancel).png FrameIcon(Autocancel).png FrameIcon(Autocancel).png FrameIcon(Autocancel).png FrameIcon(Blank).png FrameIcon(Blank).png FrameIcon(Blank).png FrameIcon(Blank).png FrameIcon(Blank).png FrameIcon(Blank).png FrameIcon(Blank).png FrameIcon(Blank).png FrameIcon(Blank).png FrameIcon(Blank).png FrameIcon(Blank).png FrameIcon(Blank).png FrameIcon(Blank).png FrameIcon(Blank).png FrameIcon(Blank).png FrameIcon(Blank).png FrameIcon(Blank).png FrameIcon(Blank).png FrameIcon(Blank).png FrameIcon(Blank).png FrameIcon(Blank).png FrameIcon(Blank).png FrameIcon(Blank).png FrameIcon(Blank).png FrameIcon(Blank).png FrameIcon(Blank).png FrameIcon(Blank).png FrameIcon(Blank).png FrameIcon(Blank).png FrameIcon(Blank).png FrameIcon(Blank).png FrameIcon(Blank).png FrameIcon(Autocancel).png FrameIcon(Autocancel).png FrameIcon(Autocancel).png FrameIcon(Autocancel).png FrameIcon(Autocancel).png FrameIcon(Autocancel).png FrameIcon(Autocancel).png FrameIcon(Autocancel).png FrameIcon(Autocancel).png FrameIcon(Autocancel).png FrameIcon(Autocancel).png FrameIcon(Autocancel).png FrameIcon(Autocancel).png FrameIcon(Autocancel).png FrameIcon(Autocancel).png FrameIcon(Autocancel).png FrameIcon(Autocancel).png FrameIcon(Autocancel).png FrameIcon(Autocancel).png FrameIcon(Autocancel).png

Landing lag

Animation length 14
FrameIcon(Lag).png FrameIcon(Lag).png FrameIcon(Lag).png FrameIcon(Lag).png FrameIcon(Lag).png FrameIcon(Lag).png FrameIcon(Lag).png FrameIcon(Lag).png FrameIcon(Lag).png FrameIcon(Lag).png FrameIcon(Lag).png FrameIcon(Lag).png FrameIcon(Lag).png FrameIcon(Lag).png
Legend (1 square = 1 frame)
Lag
Lag time
Hitbox
Hitbox
FrameIcon(HitboxChangeS).pngFrameIcon(HitboxChangeE).png
Hitbox change
Auto-canceling
Autocancel
Interruptibility
Interruptible