Super Smash Bros. Ultimate

Sheik (SSBU)/Down tilt: Difference between revisions

From SmashWiki, the Super Smash Bros. wiki
Jump to navigationJump to search
mNo edit summary
No edit summary
Line 18: Line 18:
|r=3.2
|r=3.2
|bn=legr
|bn=legr
|xpos=0.0
|ypos=0.0
|zpos=0.0
|ff=1.0
|type=Foot
|type=Foot
|effect=Normal
|sfx=Kick
|sfx=Kick
|slvl=M
|slvl=M
Line 39: Line 34:
|xpos=3.0
|xpos=3.0
|ypos=-0.6
|ypos=-0.6
|zpos=0.0
|ff=1.0
|type=Foot
|type=Foot
|effect=Normal
|sfx=Kick
|sfx=Kick
|slvl=M
|slvl=M
Line 58: Line 50:
|xpos=4.0
|xpos=4.0
|ypos=-0.2
|ypos=-0.2
|zpos=0.0
|ff=1.0
|type=Foot
|type=Foot
|effect=Normal
|sfx=Kick
|sfx=Kick
|slvl=M
|slvl=M
Line 83: Line 72:


{{FrameIconLegend|lag=y|hitbox=y|interruptible=y}}
==Trivia==
*The move has a 40% trip chance that can never actually happen, due to its vertical launch angle.


{{MvSubNavSheik|g=SSBU}}
[[Category:Sheik (SSBU)]]
[[Category:Sheik (SSBU)]]
[[Category:Down tilts (SSBU)]]
[[Category:Down tilts (SSBU)]]

Revision as of 07:35, June 5, 2022

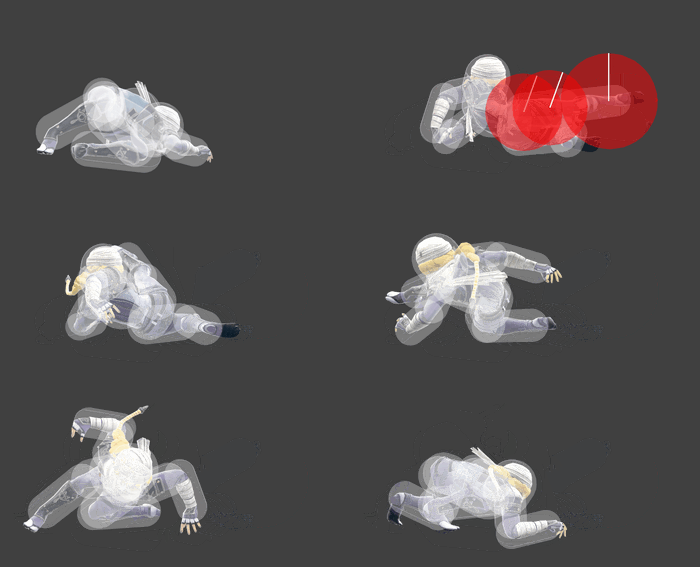
Hitbox visualization showing Sheik's down tilt.
Competitive.png This article or section may require competitive expertise.
You can discuss this issue on the talk page or edit this page to improve it.

Overview

Update History

Super Smash Bros. Ultimate 3.0.0

  • Buff Down tilt's tipper hitbox is easier to land.

Hitboxes

ID Part Rehit rate Damage SD Angle Angle type BK KS FKV Set weight Radius Bone Offset SDI× T% Clang Rebound Effect Type G A Sound Direct Hit bits Hit part Blockable Reflectable Absorbable Flinchless No GFX Heedless
0 0 0 4.5% 0 AngleIcon70.png Standard 37 100 0 HitboxTableIcon(False).png 3.2 legr 0.0 0.0 0.0 1.0× 1.0× 40% HitboxTableIcon(Clang).png HitboxTableIcon(Rebound).png Normal (effect) Foot (type) HitboxTableIcon(GroundedTrue).png HitboxTableIcon(AerialTrue).png M Kick SpecialsDirect.png All All HitboxTableIcon(Blockable).png HitboxTableIcon(Unreflectable).png HitboxTableIcon(Unabsorbable).png HitboxTableIcon(False).png HitboxTableIcon(False).png HitboxTableIcon(False).png
1 0 0 4.5% 0 AngleIcon70.png Standard 37 100 0 HitboxTableIcon(False).png 3.2 legr 3.0 -0.6 0.0 1.0× 1.0× 40% HitboxTableIcon(Clang).png HitboxTableIcon(Rebound).png Normal (effect) Foot (type) HitboxTableIcon(GroundedTrue).png HitboxTableIcon(AerialTrue).png M Kick SpecialsDirect.png All All HitboxTableIcon(Blockable).png HitboxTableIcon(Unreflectable).png HitboxTableIcon(Unabsorbable).png HitboxTableIcon(False).png HitboxTableIcon(False).png HitboxTableIcon(False).png
2 0 0 4.5% 0 AngleIcon90.png Standard 37 100 0 HitboxTableIcon(False).png 4.2 kneer 4.0 -0.2 0.0 1.0× 1.0× 40% HitboxTableIcon(Clang).png HitboxTableIcon(Rebound).png Normal (effect) Foot (type) HitboxTableIcon(GroundedTrue).png HitboxTableIcon(AerialTrue).png M Kick SpecialsDirect.png All All HitboxTableIcon(Blockable).png HitboxTableIcon(Unreflectable).png HitboxTableIcon(Unabsorbable).png HitboxTableIcon(False).png HitboxTableIcon(False).png HitboxTableIcon(False).png

Timing

Hitboxes 5-6
Interruptible 27
Animation length 29
FrameIcon(Lag).png FrameIcon(Lag).png FrameIcon(Lag).png FrameIcon(Lag).png FrameIcon(Hitbox).png FrameIcon(Hitbox).png FrameIcon(Lag).png FrameIcon(Lag).png FrameIcon(Lag).png FrameIcon(Lag).png FrameIcon(Lag).png FrameIcon(Lag).png FrameIcon(Lag).png FrameIcon(Lag).png FrameIcon(Lag).png FrameIcon(Lag).png FrameIcon(Lag).png FrameIcon(Lag).png FrameIcon(Lag).png FrameIcon(Lag).png FrameIcon(Lag).png FrameIcon(Lag).png FrameIcon(Lag).png FrameIcon(Lag).png FrameIcon(Lag).png FrameIcon(Lag).png FrameIcon(Interruptible).png FrameIcon(Interruptible).png FrameIcon(Interruptible).png
Legend (1 square = 1 frame)
Lag
Lag time
Hitbox
Hitbox
Interruptibility
Interruptible

Trivia

  • The move has a 40% trip chance that can never actually happen, due to its vertical launch angle.