Super Smash Bros. Ultimate

King K. Rool (SSBU)/Down tilt: Difference between revisions

From SmashWiki, the Super Smash Bros. wiki
Jump to navigationJump to search
(added ult icon to the top)
Line 42: Line 42:
|xpos=0.0
|xpos=0.0
|ypos=3.5
|ypos=3.5
|zpos=16.5
|zpos=16.5 to 18.0
|ff=1.0
|ff=1.0
|g=no
|g=no
Line 64: Line 64:
|sfx=Kick
|sfx=Kick
|slvl=L
|slvl=L
|a=f
}}
}}
{{UltimateHitboxTableRow
Line 76: Line 77:
|xpos=0.0
|xpos=0.0
|ypos=5.5
|ypos=5.5
|zpos=13.0
|zpos=13.0 to 23.0
|xpos2=0.0
|ypos2=5.5
|zpos2=23.0
|ff=0.2
|ff=0.2
|sfx=Kick
|sfx=Kick

Revision as of 00:24, December 10, 2019

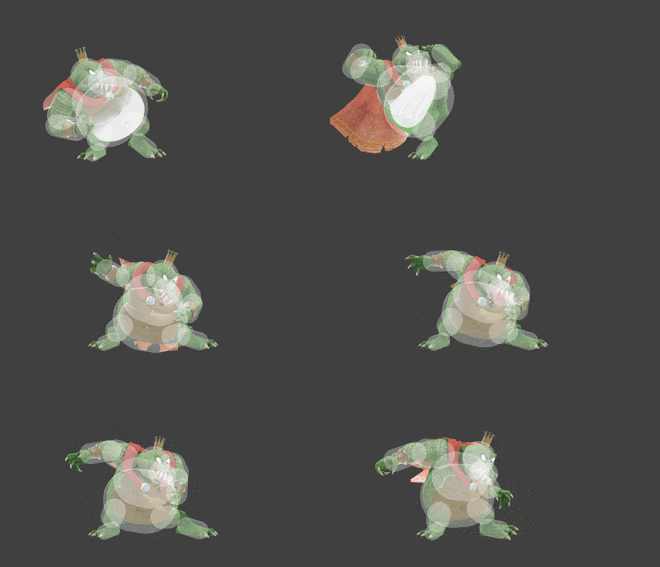
Hitbox visualization showing King K. Rool's down tilt.

Overview

King K. Rool's down tilt is among his largest commitments in his kit, being a frame 13 tilt. Down tilt has 4 unique hitboxes, all with different purposes, including a bury.

The first is an aerial-only stomp hitbox on frame 13. This hitbox is extremely strong, often ending stocks as low as 90% at the edge. This can occasionally connect out of down throw when trying to do bury storage with the bury hitbox as the opponent mashes out, creating a trap. The stomp hitbox also goes down and transitions into another hitbox especially for hitting the ledge and 2-framing opponents, which is almost as powerful as the first.

There is also a bury hitbox once the foot comes down for grounded opponents, that has a minor disjoint as well. Being a generic bury, down tilt's bury is affected by rage and stock differences[1]. This bury is quite strong, allowing for combos even at lower percentages, such as through knockback storage with neutral attack into Instant Dash Attack or a grab. This is also one of the most reliable down aerial meteor smash storage confirms due to the strength of the bury providing enough advantage for it. Forward smash is also a very common option out of this for its strong kill power. Generally, the reward for hitting a down tilt bury is usually a KO due to the options that it opens up for the K. Rool player, with little chance for the opponent to fight back.

Should the bury hitbox not connect, there is also an earthquake that goes out, known colloquially as "quake" by the K. Rool playerbase. This doesn't have any reliable hit advantage at lower percentages (+8 on hit at 0, tested on Mario, which isn't enough for followups at all[2]), but is very good for resetting neutral. It also has very favorable situations for followups, exploiting reaction time and poor panic options.

Hitboxes

ID Part Rehit rate Damage SD Angle Angle type BK KS FKV Set weight Radius Bone Offset SDI× T% Clang Rebound Effect Type G A Sound Direct Hit bits Hit part Blockable Reflectable Absorbable Flinchless No GFX Heedless
Aerial-only hitbox
0 0 0 13% 0 Sakurai angle Standard 40 85 0 HitboxTableIcon(False).png 4.5 kneel 2.5 -0.5 0.0 1.0× 1.0× 0% HitboxTableIcon(Clang).png HitboxTableIcon(Rebound).png Normal (effect) Typeless (type) HitboxTableIcon(GroundedFalse).png HitboxTableIcon(AerialTrue).png L Kick SpecialsDirect.png All All HitboxTableIcon(Blockable).png HitboxTableIcon(Unreflectable).png HitboxTableIcon(Unabsorbable).png HitboxTableIcon(False).png HitboxTableIcon(False).png HitboxTableIcon(False).png
Stomp, Bury and Quake
0 0 0 10.0% 0 Sakurai angle Standard 80 50 0 HitboxTableIcon(False).png 5.0 top 0.0 3.5 16.5 to 18.0 1.0× 1.0× 0% HitboxTableIcon(Clang).png HitboxTableIcon(Rebound).png Normal (effect) Typeless (type) HitboxTableIcon(GroundedFalse).png HitboxTableIcon(AerialTrue).png L Kick SpecialsDirect.png All All HitboxTableIcon(Blockable).png HitboxTableIcon(Unreflectable).png HitboxTableIcon(Unabsorbable).png HitboxTableIcon(False).png HitboxTableIcon(False).png HitboxTableIcon(False).png
1 0 0 8.0% 0 Sakurai angle Standard 30 50 0 HitboxTableIcon(False).png 5.0 top 0.0 3.5 16.5 1.0× 1.0× 0% HitboxTableIcon(Clang).png HitboxTableIcon(Rebound).png Bury (effect) Typeless (type) HitboxTableIcon(GroundedTrue).png HitboxTableIcon(AerialFalse).png L Kick SpecialsDirect.png All All HitboxTableIcon(Blockable).png HitboxTableIcon(Unreflectable).png HitboxTableIcon(Unabsorbable).png HitboxTableIcon(False).png HitboxTableIcon(False).png HitboxTableIcon(False).png
2 0 0 7.0% 0 AngleIcon85.png Standard 100 25 0 HitboxTableIcon(False).png 10.0 top 0.0 5.5 13.0 to 23.0 0.2× 1.0× 0% HitboxTableIcon(Clang).png HitboxTableIcon(Rebound).png Normal (effect) Typeless (type) HitboxTableIcon(GroundedTrue).png HitboxTableIcon(AerialTrue).png L Kick SpecialsDirect.png All All HitboxTableIcon(Blockable).png HitboxTableIcon(Unreflectable).png HitboxTableIcon(Unabsorbable).png HitboxTableIcon(False).png HitboxTableIcon(False).png HitboxTableIcon(False).png

Timing

Aerial-only stomp early 13
Aerial-only stomp late, bury and quake 14-15
Interruptible 43
Animation length 60
Hitboxes  FrameIcon(Lag).png FrameIcon(Lag).png FrameIcon(Lag).png FrameIcon(Lag).png FrameIcon(Lag).png FrameIcon(Lag).png FrameIcon(Lag).png FrameIcon(Lag).png FrameIcon(Lag).png FrameIcon(Lag).png FrameIcon(Lag).png FrameIcon(Lag).png FrameIcon(HitboxChangeS).png FrameIcon(HitboxChangeE).png FrameIcon(Hitbox).png FrameIcon(Lag).png FrameIcon(Lag).png FrameIcon(Lag).png FrameIcon(Lag).png FrameIcon(Lag).png FrameIcon(Lag).png FrameIcon(Lag).png FrameIcon(Lag).png FrameIcon(Lag).png FrameIcon(Lag).png FrameIcon(Lag).png FrameIcon(Lag).png FrameIcon(Lag).png FrameIcon(Lag).png FrameIcon(Lag).png FrameIcon(Lag).png FrameIcon(Lag).png FrameIcon(Lag).png FrameIcon(Lag).png FrameIcon(Lag).png FrameIcon(Lag).png FrameIcon(Lag).png FrameIcon(Lag).png FrameIcon(Lag).png FrameIcon(Lag).png FrameIcon(Lag).png FrameIcon(Lag).png FrameIcon(Interruptible).png FrameIcon(Interruptible).png FrameIcon(Interruptible).png FrameIcon(Interruptible).png FrameIcon(Interruptible).png FrameIcon(Interruptible).png FrameIcon(Interruptible).png FrameIcon(Interruptible).png FrameIcon(Interruptible).png FrameIcon(Interruptible).png FrameIcon(Interruptible).png FrameIcon(Interruptible).png FrameIcon(Interruptible).png FrameIcon(Interruptible).png FrameIcon(Interruptible).png FrameIcon(Interruptible).png FrameIcon(Interruptible).png FrameIcon(Interruptible).png
Legend (1 square = 1 frame)
Lag
Lag time
Hitbox
Hitbox
FrameIcon(HitboxChangeS).pngFrameIcon(HitboxChangeE).png
Hitbox change
Interruptibility
Interruptible