Super Smash Bros. 4

Wario (SSB4)/Up special/Default: Difference between revisions

From SmashWiki, the Super Smash Bros. wiki
Jump to navigationJump to search
(added an overview for the move.)
Line 3: Line 3:


==Overview==
==Overview==
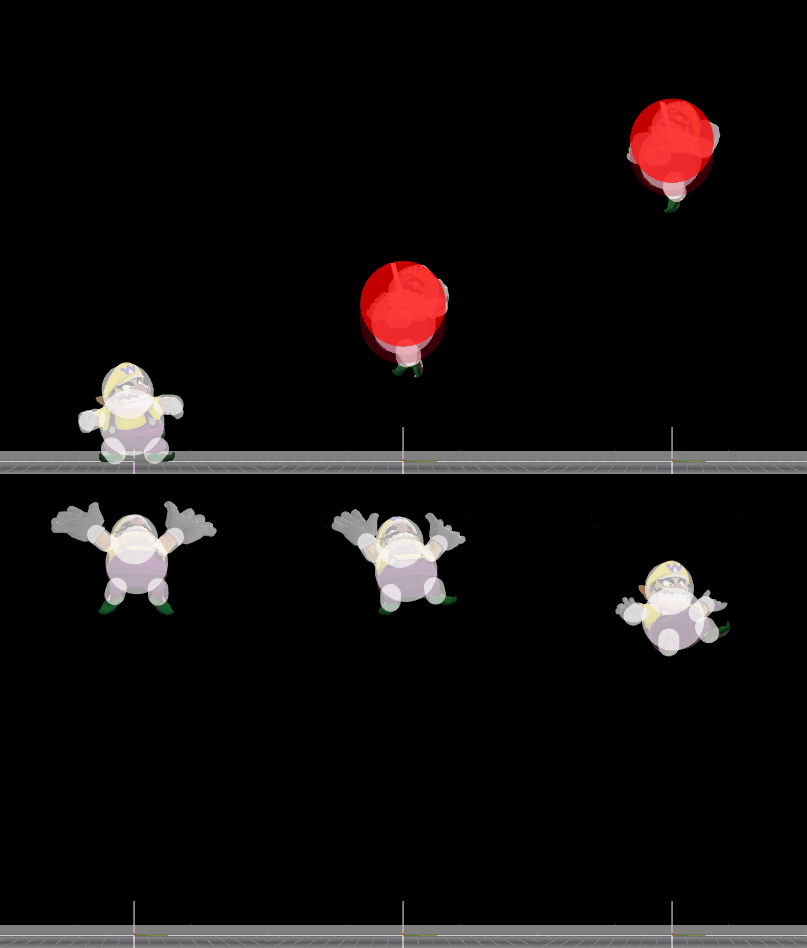
Wario spin-jumps into the air, hitting enemies multiple times. The final hit has good diagonal knockback, though it is relatively easy to DI out of, and the move can be steered left or right. It deals 13% if all hits connect, and has somewhat decent kill power. As a recovery move, it is rather predictable, and the hitboxes aren't big enough to consistently cover edeguard attempts, and as such, this move in recovery is mainly used as a mixup, or a last resort recovery attempt, should he lose the bike and not have waft charged. As an attacking move, the multi-hits have trouble linking into the final hit, especially on lighter characters, making it rather risky to attack with. It also has a hitbox in the body that launches mostly upwards, however it is extremely uncommon to pull off, since it is quite small and the hand hitboxes out-prioritize it.
Wario spin-jumps into the air, hitting enemies multiple times. The attack is relatively easy to DI out of, and the move can be steered left or right. It deals 13% if all hits connect, and has somewhat decent kill power. As a recovery move, it is rather predictable, and the hitboxes aren't big enough to consistently cover edeguard attempts, and as such, this move in recovery is mainly used as a mixup, or a last resort recovery attempt, should he lose the bike and not have waft charged. As an attacking move, the multi-hits have trouble linking into the final hit, especially on lighter characters, making it rather risky to attack with. It also has a hitbox in the body that launches mostly upwards, however it is extremely uncommon to pull off, since it is quite small and the hand hitboxes out-prioritize it.


The move can also be used as an out of shield option, being his fastest one when jumping out of shield and jump cancelling into it, being frame 6.

Revision as of 21:40, September 21, 2018

Hitbox visualization showing Wario's Corkscrew.

Overview

Wario spin-jumps into the air, hitting enemies multiple times. The attack is relatively easy to DI out of, and the move can be steered left or right. It deals 13% if all hits connect, and has somewhat decent kill power. As a recovery move, it is rather predictable, and the hitboxes aren't big enough to consistently cover edeguard attempts, and as such, this move in recovery is mainly used as a mixup, or a last resort recovery attempt, should he lose the bike and not have waft charged. As an attacking move, the multi-hits have trouble linking into the final hit, especially on lighter characters, making it rather risky to attack with. It also has a hitbox in the body that launches mostly upwards, however it is extremely uncommon to pull off, since it is quite small and the hand hitboxes out-prioritize it.

The move can also be used as an out of shield option, being his fastest one when jumping out of shield and jump cancelling into it, being frame 6.

Hitboxes

ID Part Damage SD Angle BK KS FKV Radius Bone Offset SDIx T% Clang Rebound Type Effect G A Sound Direct
Hit 1
0 0 5% 0 AngleIcon85.png 0 100 110 3.0 0 0.0 5.0 8.0 1.0x 1.0x 0% HitboxTableIcon(Clang).png HitboxTableIcon(Rebound).png Spin (type) Normal (effect) HitboxTableIcon(GroundedTrue).png HitboxTableIcon(AerialTrue).png L Punch SpecialsDirect.png
1 0 5% 0 AngleIcon115.png 0 100 110 3.0 0 0.0 11.0 -1.0 1.0x 1.0x 0% HitboxTableIcon(Clang).png HitboxTableIcon(Rebound).png Spin (type) Normal (effect) HitboxTableIcon(GroundedTrue).png HitboxTableIcon(AerialTrue).png L Punch SpecialsDirect.png
2 0 5% 0 AngleIcon85.png 0 100 90 3.0 0 0.0 11.0 8.0 1.0x 1.0x 0% HitboxTableIcon(Clang).png HitboxTableIcon(Rebound).png Spin (type) Normal (effect) HitboxTableIcon(GroundedTrue).png HitboxTableIcon(AerialTrue).png L Punch SpecialsDirect.png
3 0 5% 0 AngleIcon105.png 0 100 90 3.0 0 0.0 11.0 8.0 1.0x 1.0x 0% HitboxTableIcon(Clang).png HitboxTableIcon(Rebound).png Spin (type) Normal (effect) HitboxTableIcon(GroundedTrue).png HitboxTableIcon(AerialTrue).png L Punch SpecialsDirect.png
Hit 2-5 (loop)
0 0 1% 0 AngleIcon104.png 0 100 100 6.5 0 0.0 11.0 0.0 0.5x 1.0x 0% HitboxTableIcon(Clang).png HitboxTableIcon(Rebound).png Spin (type) Normal (effect) HitboxTableIcon(GroundedTrue).png HitboxTableIcon(AerialTrue).png M Punch SpecialsDirect.png
Final hit
0 0 4% 0 AngleIcon45.png 70 130 0 5.5 22 3.0 0.0 0.0 1.0x 2.5x 0% HitboxTableIcon(Clang).png HitboxTableIcon(Rebound).png Spin (type) Normal (effect) HitboxTableIcon(GroundedTrue).png HitboxTableIcon(AerialTrue).png L Punch SpecialsDirect.png
1 0 4% 0 AngleIcon45.png 70 130 0 5.5 16 3.0 0.0 0.0 1.0x 2.5x 0% HitboxTableIcon(Clang).png HitboxTableIcon(Rebound).png Spin (type) Normal (effect) HitboxTableIcon(GroundedTrue).png HitboxTableIcon(AerialTrue).png L Punch SpecialsDirect.png
2 0 4% 0 AngleIcon85.png 60 130 0 4.0 0 0.0 8.0 0.0 1.0x 1.0x 0% HitboxTableIcon(Clang).png HitboxTableIcon(Rebound).png Spin (type) Normal (effect) HitboxTableIcon(GroundedTrue).png HitboxTableIcon(AerialTrue).png L Punch SpecialsDirect.png

Timing

Hit 1 6-7
Looping hits 8-18
Final hit 24-25
Animation length 52
FrameIcon(Lag).png FrameIcon(Lag).png FrameIcon(Lag).png FrameIcon(Lag).png FrameIcon(Lag).png FrameIcon(Hitbox).png FrameIcon(HitboxChangeS).png FrameIcon(HitboxChangeE).png FrameIcon(Hitbox).png FrameIcon(Hitbox).png FrameIcon(Hitbox).png FrameIcon(Hitbox).png FrameIcon(Hitbox).png FrameIcon(Hitbox).png FrameIcon(Hitbox).png FrameIcon(Hitbox).png FrameIcon(Hitbox).png FrameIcon(Hitbox).png FrameIcon(Lag).png FrameIcon(Lag).png FrameIcon(Lag).png FrameIcon(Lag).png FrameIcon(Lag).png FrameIcon(Hitbox).png FrameIcon(Hitbox).png FrameIcon(Lag).png FrameIcon(Lag).png FrameIcon(Lag).png FrameIcon(Lag).png FrameIcon(Lag).png FrameIcon(Lag).png FrameIcon(Lag).png FrameIcon(Lag).png FrameIcon(Lag).png FrameIcon(Lag).png FrameIcon(Lag).png FrameIcon(Lag).png FrameIcon(Lag).png FrameIcon(Lag).png FrameIcon(Lag).png FrameIcon(Lag).png FrameIcon(Lag).png FrameIcon(Lag).png FrameIcon(Lag).png FrameIcon(Lag).png FrameIcon(Lag).png FrameIcon(Lag).png FrameIcon(Lag).png FrameIcon(Lag).png FrameIcon(Lag).png FrameIcon(Lag).png FrameIcon(Lag).png


Legend (1 square = 1 frame)
Lag
Lag time
Hitbox
Hitbox
FrameIcon(HitboxChangeS).pngFrameIcon(HitboxChangeE).png
Hitbox change