Super Smash Bros. 4

Bowser (SSB4)/Down special/Default: Difference between revisions

From SmashWiki, the Super Smash Bros. wiki
Jump to navigationJump to search
m (turning some unknowns into knowns)
(Added “Overview” on down special. Fixed the technical data problem.)
Tag: Mobile edit
Line 4: Line 4:
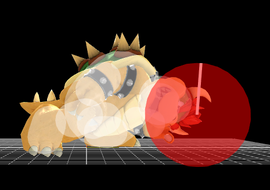
[[File:BowserBowserBombLanding.png|thumb|270px|Hitbox visualization showing Bowser's Bowser Bomb's landing.]]
[[File:BowserBowserBombLanding.png|thumb|270px|Hitbox visualization showing Bowser's Bowser Bomb's landing.]]
{{competitive expertise}}
{{technical data}}
==Overview==
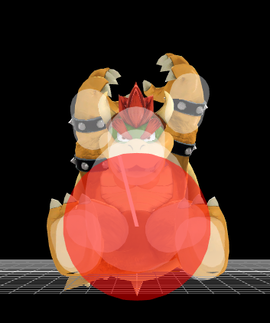
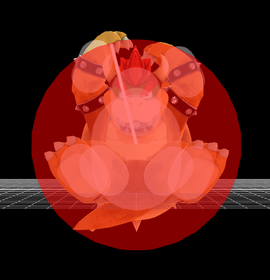
{{SSB4|Bowser}} prepares to jump up-right and does a sitting position with hands in above head level and starts moving down fast. Has normal [[knockback]]. The [[hitbox]] area is large enough to hit opponents in him.


==Hitboxes==
==Hitboxes==

Revision as of 18:51, August 14, 2018

Hitbox visualization showing Bowser's Bowser Bomb's initial hitbox.
Hitbox visualization showing Bowser's Bowser Bomb's fall.
Hitbox visualization showing Bowser's Bowser Bomb's landing.
Competitive.png This article or section may require competitive expertise.
You can discuss this issue on the talk page or edit this page to improve it.

Overview

Bowser prepares to jump up-right and does a sitting position with hands in above head level and starts moving down fast. Has normal knockback. The hitbox area is large enough to hit opponents in him.

Hitboxes

Ground

ID Part Damage SD Angle BK KS FKV Radius Bone Offset SDIx T% Clang Rebound Type Effect G A Sound Direct
Hit 1
0 0 4% 0 AngleIcon85.png 0 100 90 8.0 0 0.0 5.0 17.0 1.0x 1.0x 0% HitboxTableIcon(NoClang).png HitboxTableIcon(NoRebound).png Body (type) Normal (effect) HitboxTableIcon(GroundedTrue).png HitboxTableIcon(AerialTrue).png M Kick SpecialsDirect.png
ID Part Rehit rate Damage SD Angle BK KS FKV Radius Bone Offset SDIx T% Clang Rebound Type Effect G A Sound Direct Hit bits Blockable Reflectable Absorbable Piercing Heedless No GFX Flinchless Stretch
Hit 2
0 0 0 20% 5 AngleIcon76.png Standard 45 75 0 8.3 0 0.0 5.2 0.0 1.0x 1.0x 0% HitboxTableIcon(Clang).png HitboxTableIcon(Rebound).png Body (type) Normal (effect) HitboxTableIcon(GroundedTrue).png HitboxTableIcon(AerialTrue).png L Kick SpecialsDirect.png 63 HitboxTableIcon(Blockable).png HitboxTableIcon(Unreflectable).png HitboxTableIcon(Unabsorbable).png HitboxTableIcon(False).png HitboxTableIcon(False).png HitboxTableIcon(False).png HitboxTableIcon(False).png
Landing
0 0 0 11% 5 AngleIcon76.png Standard 60 72 0 14.0 0 0.0 6.0 0.0 1.0x 1.0x 0% HitboxTableIcon(Clang).png HitboxTableIcon(Rebound).png Body (type) Normal (effect) HitboxTableIcon(GroundedTrue).png HitboxTableIcon(AerialFalse).png M Kick SpecialsDirect.png 63 HitboxTableIcon(Blockable).png HitboxTableIcon(Unreflectable).png HitboxTableIcon(Unabsorbable).png HitboxTableIcon(False).png HitboxTableIcon(False).png HitboxTableIcon(False).png HitboxTableIcon(False).png

Air

ID Part Rehit rate Damage SD Angle BK KS FKV Radius Bone Offset SDIx T% Clang Rebound Type Effect G A Sound Direct Hit bits Blockable Reflectable Absorbable Piercing Heedless No GFX Flinchless Stretch
0 0 0 20% 5 AngleIcon76.png Standard 45 75 0 8.3 0 0.0 5.2 0.0 1.0x 1.0x 0% HitboxTableIcon(Clang).png HitboxTableIcon(Rebound).png Body (type) Normal (effect) HitboxTableIcon(GroundedTrue).png HitboxTableIcon(AerialTrue).png L Kick SpecialsDirect.png 63 HitboxTableIcon(Blockable).png HitboxTableIcon(Unreflectable).png HitboxTableIcon(Unabsorbable).png HitboxTableIcon(False).png HitboxTableIcon(False).png HitboxTableIcon(False).png HitboxTableIcon(False).png