Bowser (SSB4)/Back aerial: Difference between revisions
(Wait... somehow I forgot about Yoshi's d-air and Bowser's very own n-air. wut) |
Serpent King (talk | contribs) No edit summary |
||
| Line 1: | Line 1: | ||
{{ArticleIcons|ssb4=y}} | {{ArticleIcons|ssb4=y}} | ||
[[File:BowserBAir.gif|thumb|270px|Hitbox visualization showing Bowser's back aerial.]] | |||
==Overview== | ==Overview== | ||
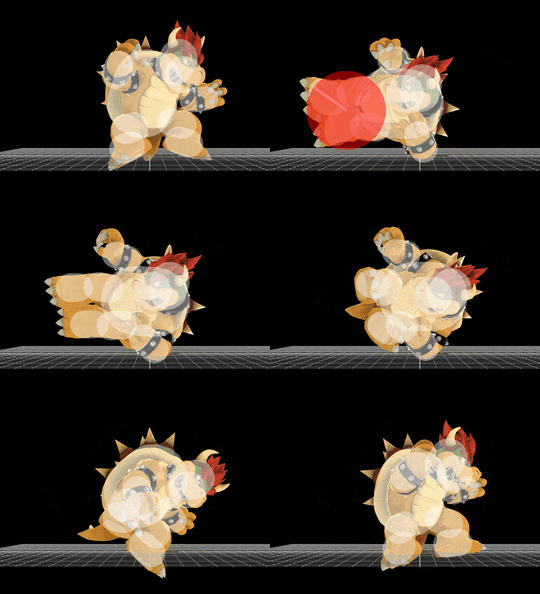
Bowser performs a dropkick behind himself. It has decent speed, coming out on frame 9, along with moderate ending lag, and lacks a late hit unlike most back aerials of its kind, instead only lasting three frames. However, it is notable for the very high damage it deals, at a whopping 19%; it is the most damaging back aerial in the game without damage modifications, and the fourth most damaging aerial attack overall. The move is not lacking in power, either, as it possesses enough knockback to KO from the center of {{SSB4|Final Destination}} at around 100%, and it launches at a relatively low angle as well, making it a terrific [[edgeguarding]] tool and even better for KOs near edges. Lastly, it [[autocancel]]s in a short hop, allowing Bowser to both use the move to good effect during an aerial approach, and to safely wear off shields with it, due to its high damage output and therefore significant shield pushback making it hard for opponents to [[punish]] in time if properly [[space]]d. | Bowser performs a dropkick behind himself. It has decent speed, coming out on frame 9, along with moderate ending lag, and lacks a late hit unlike most back aerials of its kind, instead only lasting three frames. However, it is notable for the very high damage it deals, at a whopping 19%; it is the most damaging back aerial in the game without damage modifications, and the fourth most damaging aerial attack overall. The move is not lacking in power, either, as it possesses enough knockback to KO from the center of {{SSB4|Final Destination}} at around 100%, and it launches at a relatively low angle as well, making it a terrific [[edgeguarding]] tool and even better for KOs near edges. Lastly, it [[autocancel]]s in a short hop, allowing Bowser to both use the move to good effect during an aerial approach, and to safely wear off shields with it, due to its high damage output and therefore significant shield pushback making it hard for opponents to [[punish]] in time if properly [[space]]d. | ||
Revision as of 16:31, December 5, 2017
Overview
Bowser performs a dropkick behind himself. It has decent speed, coming out on frame 9, along with moderate ending lag, and lacks a late hit unlike most back aerials of its kind, instead only lasting three frames. However, it is notable for the very high damage it deals, at a whopping 19%; it is the most damaging back aerial in the game without damage modifications, and the fourth most damaging aerial attack overall. The move is not lacking in power, either, as it possesses enough knockback to KO from the center of Final Destination at around 100%, and it launches at a relatively low angle as well, making it a terrific edgeguarding tool and even better for KOs near edges. Lastly, it autocancels in a short hop, allowing Bowser to both use the move to good effect during an aerial approach, and to safely wear off shields with it, due to its high damage output and therefore significant shield pushback making it hard for opponents to punish in time if properly spaced.
The move's drawbacks are its rather short range (especially vertically), short hitbox duration, and extremely high landing lag at 40 frames, tied with Bowser and Pikachu's down aerials as the aerial attack with the highest landing lag in the game. Due to these factors, the move often requires strict timing to be landed effectively without punishment, as unlike most aerials of its kind, it cannot be safely thrown off when transitioning to the ground. Nevertheless, the advantages of Bowser's back aerial generally offset its drawbacks, making it one of his most useful moves.
Hitboxes
| ID | Part | Damage | SD | Angle | BK | KS | FKV | Radius | Bone | Offset | SDIx | H× | T% | Clang | Rebound | Type | Effect | G | A | Sound | Direct | ||
|---|---|---|---|---|---|---|---|---|---|---|---|---|---|---|---|---|---|---|---|---|---|---|---|
| 0 | 0 | 19% | 0 | 20 | 88 | 0 | 7.0 | 0 | 0.0 | 8.0 | -13.0 | 1.0x | 1.0x | 0% | |||||||||
Timing
| Initial autocancel | 1-2 |
|---|---|
| Hitboxes | 9-11 |
| Ending autocancel | 31- |
| Interruptibility | 45 |
Landing lag
| Animation length | 40 |
|---|
Lag time |
Hitbox |
Autocancel |
Interruptible |
|
