Super Smash Bros. Melee

Mewtwo (SSBM)/Side special: Difference between revisions

From SmashWiki, the Super Smash Bros. wiki
Jump to navigationJump to search
(Created article, using frame data from https://www.angelfire.com/games5/superdoodleman/Mewtwo_frames_11.6.05.txt and manually counting frames on https://meleeframedata.com/mewtwo#special-group)
 
m (Added {{technical details}} banner)
 
Line 2: Line 2:
{{disambig2|the hitbox visualization in ''[[Super Smash Bros. Melee]]''|the move itself|Confusion}}
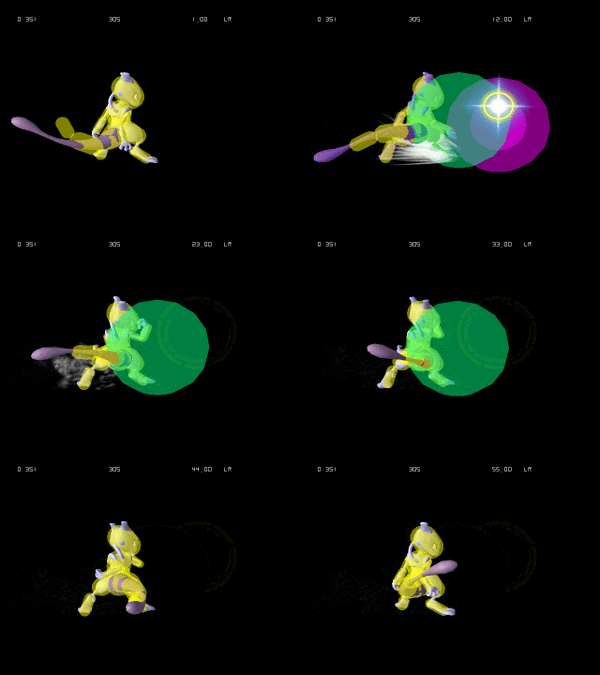
[[File:MewtwoConfusionSSBM.gif|thumb|300px|Hitbox visualization showing Mewtwo's confusion.]]
[[File:MewtwoConfusionSSBM.gif|thumb|300px|Hitbox visualization showing Mewtwo's confusion.]]
{{Technical data|Missing timing for when M2 successfully grabs the opponent, as well as the hitboxes.}}
==Overview==
==Overview==
{{competitive expertise}}

Latest revision as of 17:23, October 25, 2024

This article is about the hitbox visualization in Super Smash Bros. Melee. For the move itself, see Confusion.
Hitbox visualization showing Mewtwo's confusion.
Data.png This article or section may require additional technical data.
The editor who added this tag elaborates: Missing timing for when M2 successfully grabs the opponent, as well as the hitboxes.
You can discuss this issue on the talk page or edit this page to improve it.

Overview[edit]

Competitive.png This article or section may require competitive expertise.
You can discuss this issue on the talk page or edit this page to improve it.

Timing[edit]

Miss[edit]

Grab 12-15
Reflects 12-38
Animation length 55
FrameIcon(Lag).png FrameIcon(Lag).png FrameIcon(Lag).png FrameIcon(Lag).png FrameIcon(Lag).png FrameIcon(Lag).png FrameIcon(Lag).png FrameIcon(Lag).png FrameIcon(Lag).png FrameIcon(Lag).png FrameIcon(Lag).png FrameIcon(Grab).png FrameIcon(Grab).png FrameIcon(Grab).png FrameIcon(Grab).png FrameIcon(Lag).png FrameIcon(Lag).png FrameIcon(Lag).png FrameIcon(Lag).png FrameIcon(Lag).png FrameIcon(Lag).png FrameIcon(Lag).png FrameIcon(Lag).png FrameIcon(Lag).png FrameIcon(Lag).png FrameIcon(Lag).png FrameIcon(Lag).png FrameIcon(Lag).png FrameIcon(Lag).png FrameIcon(Lag).png FrameIcon(Lag).png FrameIcon(Lag).png FrameIcon(Lag).png FrameIcon(Lag).png FrameIcon(Lag).png FrameIcon(Lag).png FrameIcon(Lag).png FrameIcon(Lag).png FrameIcon(Lag).png FrameIcon(Lag).png FrameIcon(Lag).png FrameIcon(Lag).png FrameIcon(Lag).png FrameIcon(Lag).png FrameIcon(Lag).png FrameIcon(Lag).png FrameIcon(Lag).png FrameIcon(Lag).png FrameIcon(Lag).png FrameIcon(Lag).png FrameIcon(Lag).png FrameIcon(Lag).png FrameIcon(Lag).png FrameIcon(Lag).png FrameIcon(Lag).png
FrameIcon(Blank).png FrameIcon(Blank).png FrameIcon(Blank).png FrameIcon(Blank).png FrameIcon(Blank).png FrameIcon(Blank).png FrameIcon(Blank).png FrameIcon(Blank).png FrameIcon(Blank).png FrameIcon(Blank).png FrameIcon(Blank).png FrameIcon(Reflect).png FrameIcon(Reflect).png FrameIcon(Reflect).png FrameIcon(Reflect).png FrameIcon(Reflect).png FrameIcon(Reflect).png FrameIcon(Reflect).png FrameIcon(Reflect).png FrameIcon(Reflect).png FrameIcon(Reflect).png FrameIcon(Reflect).png FrameIcon(Reflect).png FrameIcon(Reflect).png FrameIcon(Reflect).png FrameIcon(Reflect).png FrameIcon(Reflect).png FrameIcon(Reflect).png FrameIcon(Reflect).png FrameIcon(Reflect).png FrameIcon(Reflect).png FrameIcon(Reflect).png FrameIcon(Reflect).png FrameIcon(Reflect).png FrameIcon(Reflect).png FrameIcon(Reflect).png FrameIcon(Reflect).png FrameIcon(Reflect).png FrameIcon(Blank).png FrameIcon(Blank).png FrameIcon(Blank).png FrameIcon(Blank).png FrameIcon(Blank).png FrameIcon(Blank).png FrameIcon(Blank).png FrameIcon(Blank).png FrameIcon(Blank).png FrameIcon(Blank).png FrameIcon(Blank).png FrameIcon(Blank).png FrameIcon(Blank).png FrameIcon(Blank).png FrameIcon(Blank).png FrameIcon(Blank).png FrameIcon(Blank).png
Legend (1 square = 1 frame)
Lag
Lag time
Reflection
Reflect
Grab
Grab