Super Smash Bros. Melee

Luigi (SSBM)/Neutral aerial: Difference between revisions

From SmashWiki, the Super Smash Bros. wiki
Jump to navigationJump to search
m (Removing editorial wording and second person pronouns)
 
Line 4: Line 4:
==Overview==
==Overview==


Luigi's kick, known as ''Plumber's Boot'', at first glance looks like a stereotypical [[Sex kick]]. The hitbox comes out on frame 3, the move lasts longer and gets weaker the longer it's out, it's a Nair, and it has a fast landing lag of 7 frames when successfully L-cancelled. One '''big''' difference, though, is the angle this move sends opponents: specifically, 90 degrees straight up on both the early and late hits. This, combined with Luigi's difficulty in approaching from the air, changes the role of the move from that of most Nairs/Sex kicks (being approaching moves/neutral openers), to that of several roles: A combo starter, a combo extender, and a combo breaker.
Luigi's neutral aerial, known as "Plumber's Boot", is a [[sex kick]]. It comes out on frame 3, the move lasts longer and gets weaker the longer it's out, and it has a fast landing lag of 7 frames when successfully L-cancelled. A notable difference to other sex kicks is the angle it sends opponents: specifically, 90 degrees straight up. This, combined with Luigi's difficulty in approaching from the air, changes the role of the move from that of most sex kicks (being approaching moves/neutral openers), to that of several roles: A combo starter, a combo extender, and a combo breaker.


The move's fast startup and large priority means that, when you're being combo'ed and out of hitstun, throwing the move out has a decent chance to beat the opponent's next combo move, and even lead to a reversal, as it's such a good combo starter. However, you do this at your own peril, as just spamming it typically leads to it being baited out by opponents and then massively punished. In addition, because the move launches players upward, it can be used to juggle opponents, especially fast-fallers, with the strong hit being used at early percents and the weak hit at mid-to-late percents, though you'll typically want to mix in other launchers such as Luigi's up-tilt or down-smash to unstale it.
The move's fast startup and large priority means that throwing the move out has a decent chance to beat the opponent's next combo move, and even lead to a reversal, as it's a good combo starter. In addition, because the move launches players upward, it can be used to juggle opponents, especially fast-fallers, with the strong hit being used at early percents and the weak hit at mid-to-late percents mixed with other launchers such as up tilt or down smash to unstale it.


==Hitboxes==
==Hitboxes==

Latest revision as of 07:35, September 16, 2023

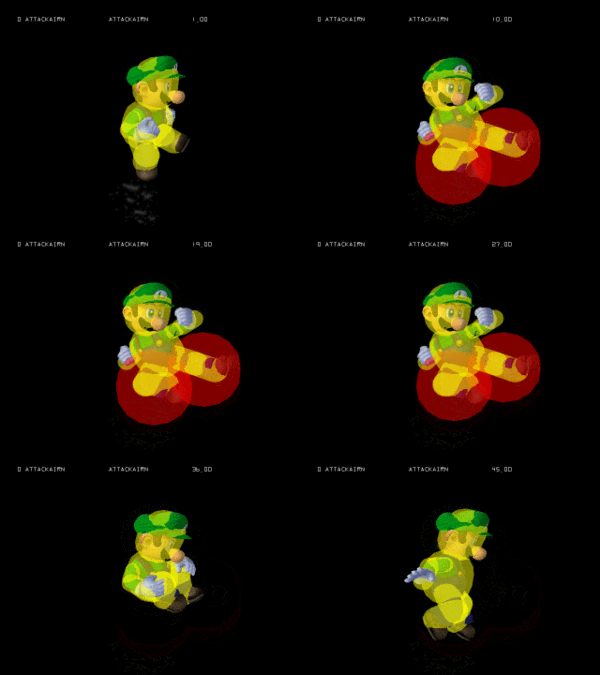
Hitbox visualization showing Luigi's neutral aerial.
Competitive.png This article or section may require competitive expertise.
You can discuss this issue on the talk page or edit this page to improve it.

Overview[edit]

Luigi's neutral aerial, known as "Plumber's Boot", is a sex kick. It comes out on frame 3, the move lasts longer and gets weaker the longer it's out, and it has a fast landing lag of 7 frames when successfully L-cancelled. A notable difference to other sex kicks is the angle it sends opponents: specifically, 90 degrees straight up. This, combined with Luigi's difficulty in approaching from the air, changes the role of the move from that of most sex kicks (being approaching moves/neutral openers), to that of several roles: A combo starter, a combo extender, and a combo breaker.

The move's fast startup and large priority means that throwing the move out has a decent chance to beat the opponent's next combo move, and even lead to a reversal, as it's a good combo starter. In addition, because the move launches players upward, it can be used to juggle opponents, especially fast-fallers, with the strong hit being used at early percents and the weak hit at mid-to-late percents mixed with other launchers such as up tilt or down smash to unstale it.

Hitboxes[edit]

ID Part Damage SD Angle BK KS FKV Radius Bone Offset Clang Rebound Effect G A Sound
Clean
0 0 15% 0 AngleIcon90.png 20 100 0 4.2966 55 0.7812 0.0 0.0 HitboxTableIcon(Clang).png HitboxTableIcon(Rebound).png Normal (effect) HitboxTableIcon(GroundedTrue).png HitboxTableIcon(AerialTrue).png L Kick
1 0 15% 0 AngleIcon90.png 20 100 0 4.2966 49 0.7812 0.0 0.0 HitboxTableIcon(Clang).png HitboxTableIcon(Rebound).png Normal (effect) HitboxTableIcon(GroundedTrue).png HitboxTableIcon(AerialTrue).png L Kick
Late
0 0 8% 0 AngleIcon90.png 20 100 0 4.2966 55 0.7812 0.0 0.0 HitboxTableIcon(Clang).png HitboxTableIcon(Rebound).png Normal (effect) HitboxTableIcon(GroundedTrue).png HitboxTableIcon(AerialTrue).png M Kick
1 0 8% 0 AngleIcon90.png 20 100 0 4.2966 49 0.7812 0.0 0.0 HitboxTableIcon(Clang).png HitboxTableIcon(Rebound).png Normal (effect) HitboxTableIcon(GroundedTrue).png HitboxTableIcon(AerialTrue).png M Kick

Timing[edit]

Attack[edit]

Initial autocancel 1-2
Clean hit 3-6
Late hit 7-31
Ending autocancel 36-
Animation length 45
FrameIcon(Lag).png FrameIcon(Lag).png FrameIcon(Hitbox).png FrameIcon(Hitbox).png FrameIcon(Hitbox).png FrameIcon(HitboxChangeS).png FrameIcon(HitboxChangeE).png FrameIcon(Hitbox).png FrameIcon(Hitbox).png FrameIcon(Hitbox).png FrameIcon(Hitbox).png FrameIcon(Hitbox).png FrameIcon(Hitbox).png FrameIcon(Hitbox).png FrameIcon(Hitbox).png FrameIcon(Hitbox).png FrameIcon(Hitbox).png FrameIcon(Hitbox).png FrameIcon(Hitbox).png FrameIcon(Hitbox).png FrameIcon(Hitbox).png FrameIcon(Hitbox).png FrameIcon(Hitbox).png FrameIcon(Hitbox).png FrameIcon(Hitbox).png FrameIcon(Hitbox).png FrameIcon(Hitbox).png FrameIcon(Hitbox).png FrameIcon(Hitbox).png FrameIcon(Hitbox).png FrameIcon(Hitbox).png FrameIcon(Lag).png FrameIcon(Lag).png FrameIcon(Lag).png FrameIcon(Lag).png FrameIcon(Lag).png FrameIcon(Lag).png FrameIcon(Lag).png FrameIcon(Lag).png FrameIcon(Lag).png FrameIcon(Lag).png FrameIcon(Lag).png FrameIcon(Lag).png FrameIcon(Lag).png FrameIcon(Lag).png
FrameIcon(Autocancel).png FrameIcon(Autocancel).png FrameIcon(Blank).png FrameIcon(Blank).png FrameIcon(Blank).png FrameIcon(Blank).png FrameIcon(Blank).png FrameIcon(Blank).png FrameIcon(Blank).png FrameIcon(Blank).png FrameIcon(Blank).png FrameIcon(Blank).png FrameIcon(Blank).png FrameIcon(Blank).png FrameIcon(Blank).png FrameIcon(Blank).png FrameIcon(Blank).png FrameIcon(Blank).png FrameIcon(Blank).png FrameIcon(Blank).png FrameIcon(Blank).png FrameIcon(Blank).png FrameIcon(Blank).png FrameIcon(Blank).png FrameIcon(Blank).png FrameIcon(Blank).png FrameIcon(Blank).png FrameIcon(Blank).png FrameIcon(Blank).png FrameIcon(Blank).png FrameIcon(Blank).png FrameIcon(Blank).png FrameIcon(Blank).png FrameIcon(Blank).png FrameIcon(Blank).png FrameIcon(Autocancel).png FrameIcon(Autocancel).png FrameIcon(Autocancel).png FrameIcon(Autocancel).png FrameIcon(Autocancel).png FrameIcon(Autocancel).png FrameIcon(Autocancel).png FrameIcon(Autocancel).png FrameIcon(Autocancel).png FrameIcon(Autocancel).png

Landing lag[edit]

Animation length 15
L-cancelled animation length 7
Normal  FrameIcon(Lag).png FrameIcon(Lag).png FrameIcon(Lag).png FrameIcon(Lag).png FrameIcon(Lag).png FrameIcon(Lag).png FrameIcon(Lag).png FrameIcon(Lag).png FrameIcon(Lag).png FrameIcon(Lag).png FrameIcon(Lag).png FrameIcon(Lag).png FrameIcon(Lag).png FrameIcon(Lag).png FrameIcon(Lag).png
L-cancelled  FrameIcon(Lag).png FrameIcon(Lag).png FrameIcon(Lag).png FrameIcon(Lag).png FrameIcon(Lag).png FrameIcon(Lag).png FrameIcon(Lag).png FrameIcon(Blank).png FrameIcon(Blank).png FrameIcon(Blank).png FrameIcon(Blank).png FrameIcon(Blank).png FrameIcon(Blank).png FrameIcon(Blank).png FrameIcon(Blank).png
Legend (1 square = 1 frame)
Lag
Lag time
Hitbox
Hitbox
FrameIcon(HitboxChangeS).pngFrameIcon(HitboxChangeE).png
Hitbox change
Auto-canceling
Autocancel