Super Smash Bros. Ultimate

King K. Rool (SSBU)/Forward smash: Difference between revisions

From SmashWiki, the Super Smash Bros. wiki
Jump to navigationJump to search
(→‎Overview: 33/33/33 is too weird and is too long.)
No edit summary
Line 17: Line 17:
A heavy hitting, straight punch. One of the strongest forward smashes in the game power-wise, KOing as soon as 70% from center-stage. On top of this, forward smash's glove is a disjoint, enabling the move to function as a hard punish for poor spacing on the opponent's part. Forward smash has unusual damage numbers, as well as sourspots and sweetspots. The sourspots are near-impossible to connect due to the sweetspots having higher hitbox priority, adding to the move's overall consistency. However, they can definitely be connected. Due to the odd damage numbers, a forward smash angled upwards will KO the earliest.


However, at the same time, forward smash is considered to be one of King K. Rool's worst moves. This is due to its poor frame data (coming out frame 19), blindspot up close, FAF of 62 and lack of confirms. As a result, the move is frequently relegated to being a punish for opponents being hit by [[King K. Rool (SSBU)/Down tilt|down tilt]], or a [[shield break]] punish.  
However, at the same time, forward smash is considered to be one of King K. Rool's worst moves. This is due to its poor frame data (coming out frame 19), blindspot up close, FAF of 62 and lack of confirms. As a result, the move is frequently relegated to being a punish for opponents being hit by [[../Down tilt|down tilt]], or a [[shield break]] punish.  


It can be used as a mixup out of [[King K. Rool (SSBU)/Down throw|down throw]] should the opponent not mash to escape up smash for a very early stock, however, and notably hits {{SSBU|Ganondorf}} angled up while buried, changing the 1/3 into a 50/50<ref>https://docs.google.com/spreadsheets/d/1mRJlTcb260JBwbyOTdrs63SrNPY_a6Vat13kkH7QMnY/edit?usp=sharing</ref>.
It can be used as a mixup out of [[../Down throw|down throw]] should the opponent not mash to escape up smash for a very early stock, however, and notably hits {{SSBU|Ganondorf}} angled up while buried, changing the 1/3 into a 50/50<ref>https://docs.google.com/spreadsheets/d/1mRJlTcb260JBwbyOTdrs63SrNPY_a6Vat13kkH7QMnY/edit?usp=sharing</ref>.


==Hitboxes==
==Hitboxes==

Revision as of 22:56, August 21, 2021

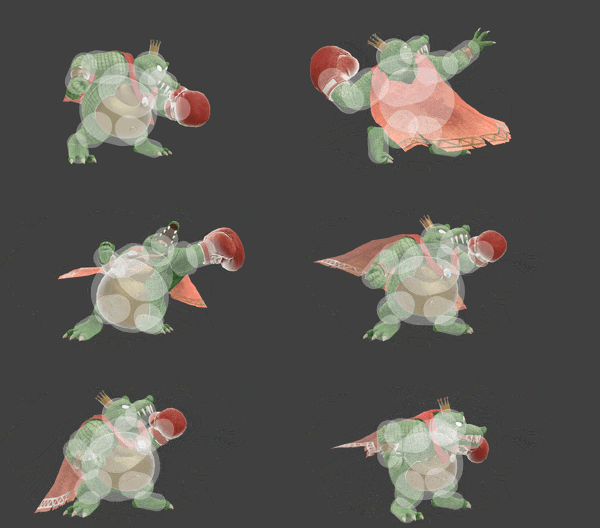
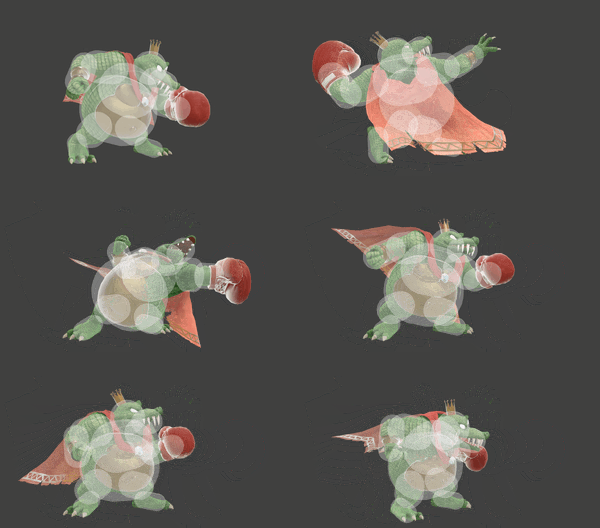
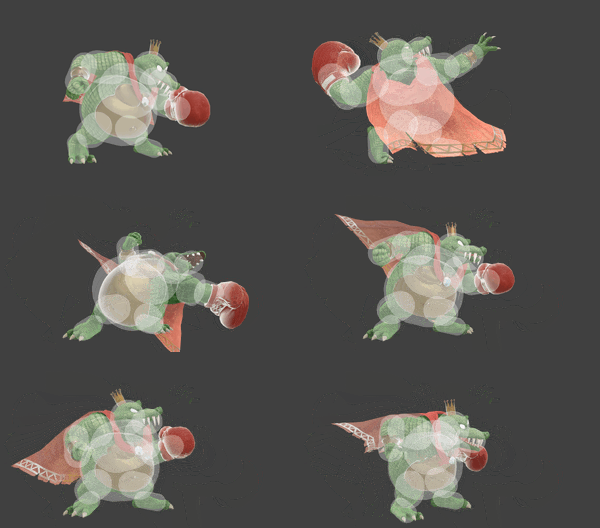
King K. Rool forward smash hitbox visualizations
KingKRoolFSmashUpSSBU.gif
KingKRoolFSmashSSBU.gif
KingKRoolFSmashDownSSBU.gif

Overview

A heavy hitting, straight punch. One of the strongest forward smashes in the game power-wise, KOing as soon as 70% from center-stage. On top of this, forward smash's glove is a disjoint, enabling the move to function as a hard punish for poor spacing on the opponent's part. Forward smash has unusual damage numbers, as well as sourspots and sweetspots. The sourspots are near-impossible to connect due to the sweetspots having higher hitbox priority, adding to the move's overall consistency. However, they can definitely be connected. Due to the odd damage numbers, a forward smash angled upwards will KO the earliest.

However, at the same time, forward smash is considered to be one of King K. Rool's worst moves. This is due to its poor frame data (coming out frame 19), blindspot up close, FAF of 62 and lack of confirms. As a result, the move is frequently relegated to being a punish for opponents being hit by down tilt, or a shield break punish.

It can be used as a mixup out of down throw should the opponent not mash to escape up smash for a very early stock, however, and notably hits Ganondorf angled up while buried, changing the 1/3 into a 50/50[1].

Hitboxes

ID Part Rehit rate Damage SD Angle Angle type BK KS FKV Set weight Radius Bone Offset SDI× T% Clang Rebound Effect Type G A Sound Direct Hit bits Hit part Blockable Reflectable Absorbable Flinchless No GFX Heedless
Angled High
0 0 0 19.950001% 0 Sakurai angle Standard 40 96 0 HitboxTableIcon(False).png 5.2 arml 6.5 0.0 0.0 1.2× 1.0× 0% HitboxTableIcon(Clang).png HitboxTableIcon(Rebound).png Normal (effect) Hand (type) HitboxTableIcon(GroundedTrue).png HitboxTableIcon(AerialTrue).png L Punch SpecialsDirect.png All All HitboxTableIcon(Blockable).png HitboxTableIcon(Unreflectable).png HitboxTableIcon(Unabsorbable).png HitboxTableIcon(False).png HitboxTableIcon(False).png HitboxTableIcon(False).png
1 0 0 17.325001% 0 Sakurai angle Standard 40 96 0 HitboxTableIcon(False).png 3.8 arml -2.0 0.0 0.5 1.2× 1.0× 0% HitboxTableIcon(Clang).png HitboxTableIcon(Rebound).png Normal (effect) Hand (type) HitboxTableIcon(GroundedTrue).png HitboxTableIcon(AerialTrue).png L Punch SpecialsDirect.png All All HitboxTableIcon(Blockable).png HitboxTableIcon(Unreflectable).png HitboxTableIcon(Unabsorbable).png HitboxTableIcon(False).png HitboxTableIcon(False).png HitboxTableIcon(False).png
Angled Straight
0 0 0 19.0% 0 Sakurai angle Standard 40 96 0 HitboxTableIcon(False).png 5.2 arml 6.5 0.0 0.0 1.2× 1.0× 0% HitboxTableIcon(Clang).png HitboxTableIcon(Rebound).png Normal (effect) Hand (type) HitboxTableIcon(GroundedTrue).png HitboxTableIcon(AerialTrue).png L Punch SpecialsDirect.png All All HitboxTableIcon(Blockable).png HitboxTableIcon(Unreflectable).png HitboxTableIcon(Unabsorbable).png HitboxTableIcon(False).png HitboxTableIcon(False).png HitboxTableIcon(False).png
1 0 0 16.5% 0 Sakurai angle Standard 40 96 0 HitboxTableIcon(False).png 3.8 arml -2.0 0.0 0.5 1.2× 1.0× 0% HitboxTableIcon(Clang).png HitboxTableIcon(Rebound).png Normal (effect) Hand (type) HitboxTableIcon(GroundedTrue).png HitboxTableIcon(AerialTrue).png L Punch SpecialsDirect.png All All HitboxTableIcon(Blockable).png HitboxTableIcon(Unreflectable).png HitboxTableIcon(Unabsorbable).png HitboxTableIcon(False).png HitboxTableIcon(False).png HitboxTableIcon(False).png
Angled Low
0 0 0 19.57% 0 Sakurai angle Standard 40 96 0 HitboxTableIcon(False).png 5.2 arml 6.5 0.0 0.0 1.2× 1.0× 0% HitboxTableIcon(Clang).png HitboxTableIcon(Rebound).png Normal (effect) Hand (type) HitboxTableIcon(GroundedTrue).png HitboxTableIcon(AerialTrue).png L Punch SpecialsDirect.png All All HitboxTableIcon(Blockable).png HitboxTableIcon(Unreflectable).png HitboxTableIcon(Unabsorbable).png HitboxTableIcon(False).png HitboxTableIcon(False).png HitboxTableIcon(False).png
1 0 0 16.995001% 0 Sakurai angle Standard 40 96 0 HitboxTableIcon(False).png 3.8 arml -2.0 0.0 0.5 1.2× 1.0× 0% HitboxTableIcon(Clang).png HitboxTableIcon(Rebound).png Normal (effect) Hand (type) HitboxTableIcon(GroundedTrue).png HitboxTableIcon(AerialTrue).png L Punch SpecialsDirect.png All All HitboxTableIcon(Blockable).png HitboxTableIcon(Unreflectable).png HitboxTableIcon(Unabsorbable).png HitboxTableIcon(False).png HitboxTableIcon(False).png HitboxTableIcon(False).png

Timing

Angle Frames 1-10
Charges between 10-11
Hitboxes 19-20
Interruptible 62
Animation length 84
Hitboxes  FrameIcon(Lag).png FrameIcon(Lag).png FrameIcon(Lag).png FrameIcon(Lag).png FrameIcon(Lag).png FrameIcon(Lag).png FrameIcon(Lag).png FrameIcon(Lag).png FrameIcon(Lag).png FrameIcon(LagChargeS).png FrameIcon(LagChargeE).png FrameIcon(Lag).png FrameIcon(Lag).png FrameIcon(Lag).png FrameIcon(Lag).png FrameIcon(Lag).png FrameIcon(Lag).png FrameIcon(Lag).png FrameIcon(Hitbox).png FrameIcon(Hitbox).png FrameIcon(Lag).png FrameIcon(Lag).png FrameIcon(Lag).png FrameIcon(Lag).png FrameIcon(Lag).png FrameIcon(Lag).png FrameIcon(Lag).png FrameIcon(Lag).png FrameIcon(Lag).png FrameIcon(Lag).png FrameIcon(Lag).png FrameIcon(Lag).png FrameIcon(Lag).png FrameIcon(Lag).png FrameIcon(Lag).png FrameIcon(Lag).png FrameIcon(Lag).png FrameIcon(Lag).png FrameIcon(Lag).png FrameIcon(Lag).png FrameIcon(Lag).png FrameIcon(Lag).png FrameIcon(Lag).png FrameIcon(Lag).png FrameIcon(Lag).png FrameIcon(Lag).png FrameIcon(Lag).png FrameIcon(Lag).png FrameIcon(Lag).png FrameIcon(Lag).png FrameIcon(Lag).png FrameIcon(Lag).png FrameIcon(Lag).png FrameIcon(Lag).png FrameIcon(Lag).png FrameIcon(Lag).png FrameIcon(Lag).png FrameIcon(Lag).png FrameIcon(Lag).png FrameIcon(Lag).png FrameIcon(Lag).png FrameIcon(Interruptible).png FrameIcon(Interruptible).png FrameIcon(Interruptible).png FrameIcon(Interruptible).png FrameIcon(Interruptible).png FrameIcon(Interruptible).png FrameIcon(Interruptible).png FrameIcon(Interruptible).png FrameIcon(Interruptible).png FrameIcon(Interruptible).png FrameIcon(Interruptible).png FrameIcon(Interruptible).png FrameIcon(Interruptible).png FrameIcon(Interruptible).png FrameIcon(Interruptible).png FrameIcon(Interruptible).png FrameIcon(Interruptible).png FrameIcon(Interruptible).png FrameIcon(Interruptible).png FrameIcon(Interruptible).png FrameIcon(Interruptible).png FrameIcon(Interruptible).png FrameIcon(Interruptible).png
Legend (1 square = 1 frame)
Lag
Lag time
ChargeCharge
Charge interval
Hitbox
Hitbox
Interruptibility
Interruptible