Bowser (SSB4)/Down special/Default: Difference between revisions
From SmashWiki, the Super Smash Bros. wiki
Jump to navigationJump to search
Daniel1204 (talk | contribs) mNo edit summary |
|||
| (4 intermediate revisions by 3 users not shown) | |||
| Line 1: | Line 1: | ||
{{ArticleIcons|ssb4=y}} | {{ArticleIcons|ssb4=y}} | ||
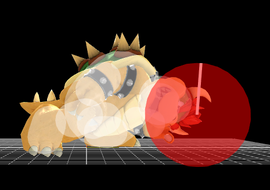
{{ | {{disambig2|the hitbox visualization in ''[[Super Smash Bros. 4]]''|the move itself|Bowser Bomb}}[[File:BowserBowserBombGround.png|thumb|270px|Hitbox visualization showing Bowser's Bowser Bomb's initial hitbox.]] | ||
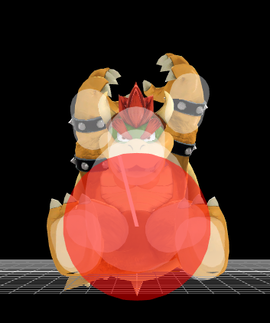
{{ | [[File:BowserBowserBombFall.png|thumb|270px|Hitbox visualization showing Bowser's Bowser Bomb's fall.]] | ||
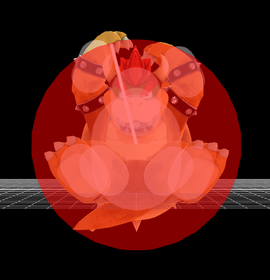
[[File:BowserBowserBombLanding.png|thumb|270px|Hitbox visualization showing Bowser's Bowser Bomb's landing.]] | |||
==Overview== | |||
{{SSB4|Bowser}} prepares to jump up-right and does a sitting position with hands in above head level and starts moving down fast. Has normal [[knockback]]. The [[hitbox]] area is large enough to hit opponents in him. | |||
==Hitboxes== | ==Hitboxes== | ||
| Line 50: | Line 54: | ||
|sfx=Kick | |sfx=Kick | ||
|slvl=L | |slvl=L | ||
| | |hitbits=63 | ||
|i25=0 | |i25=0 | ||
|i26=15 | |i26=15 | ||
| Line 58: | Line 62: | ||
|absorbable=0 | |absorbable=0 | ||
|rehit=0 | |rehit=0 | ||
| | |piercing=0 | ||
|i33=0 | |i33=0 | ||
|i34=0 | |i34=0 | ||
|i35=0 | |i35=0 | ||
| | |heedless=0 | ||
| | |noff=0 | ||
| | |nogfx=0 | ||
| | |flinchless=0 | ||
|i40=0 | |i40=0 | ||
}} | }} | ||
| Line 89: | Line 93: | ||
|sfx=Kick | |sfx=Kick | ||
|slvl=M | |slvl=M | ||
| | |hitbits=63 | ||
|i25=0 | |i25=0 | ||
|i26=15 | |i26=15 | ||
| Line 97: | Line 101: | ||
|absorbable=0 | |absorbable=0 | ||
|rehit=0 | |rehit=0 | ||
| | |piercing=0 | ||
|i33=0 | |i33=0 | ||
|i34=0 | |i34=0 | ||
|i35=0 | |i35=0 | ||
| | |heedless=0 | ||
| | |noff=0 | ||
| | |nogfx=0 | ||
| | |flinchless=0 | ||
|i40=0 | |i40=0 | ||
}} | }} | ||
| Line 130: | Line 134: | ||
|sfx=Kick | |sfx=Kick | ||
|slvl=L | |slvl=L | ||
| | |hitbits=63 | ||
|i25=0 | |i25=0 | ||
|i26=15 | |i26=15 | ||
| Line 138: | Line 142: | ||
|absorbable=0 | |absorbable=0 | ||
|rehit=0 | |rehit=0 | ||
| | |piercing=0 | ||
|i33=0 | |i33=0 | ||
|i34=0 | |i34=0 | ||
|i35=0 | |i35=0 | ||
| | |heedless=0 | ||
| | |noff=0 | ||
| | |nogfx=0 | ||
| | |flinchless=0 | ||
|i40=0 | |i40=0 | ||
}} | }} | ||
| Line 152: | Line 156: | ||
{{MvSubNavBowser|g=SSB4}} | {{MvSubNavBowser|g=SSB4}} | ||
[[Category:Bowser (SSB4)]] | [[Category:Bowser (SSB4)]] | ||
[[Category:Special | [[Category:Special moves (SSB4)]] | ||
[[Category:Down special moves (SSB4)]] | [[Category:Down special moves (SSB4)]] | ||
Latest revision as of 14:13, May 17, 2020
Overview[edit]
Bowser prepares to jump up-right and does a sitting position with hands in above head level and starts moving down fast. Has normal knockback. The hitbox area is large enough to hit opponents in him.
Hitboxes[edit]
Ground[edit]
| ID | Part | Damage | SD | Angle | BK | KS | FKV | Radius | Bone | Offset | SDIx | H× | T% | Clang | Rebound | Type | Effect | G | A | Sound | Direct | ||||||||||||||||||||
|---|---|---|---|---|---|---|---|---|---|---|---|---|---|---|---|---|---|---|---|---|---|---|---|---|---|---|---|---|---|---|---|---|---|---|---|---|---|---|---|---|---|
| Hit 1 | |||||||||||||||||||||||||||||||||||||||||
| 0 | 0 | 4% | 0 | 0 | 100 | 90 | 8.0 | 0 | 0.0 | 5.0 | 17.0 | 1.0x | 1.0x | 0% | |||||||||||||||||||||||||||
Air[edit]
|


