| Welcome to SmashWiki! Log in or create an account and join the community, and don't forget to read this first! |
| Notices |
|---|
| The Skill parameter has been removed from Smasher infoboxes, and in its place are the new "Best historical ranking" and "Best tournament result" parameters. SmashWiki needs help adding these new parameters to Smasher infoboxes, refer to the guidelines here for what should be included in these new parameters. |
| When adding results to Smasher pages, include each tournament's entrant number in addition to the player's placement, and use the {{Trn}} template with the matching game specified. Please also fix old results on Smasher pages that do not abide to this standard. Refer to our Smasher article guidelines to see how results tables should be formatted. |
| Check out our project page for ongoing projects that SmashWiki needs help with. |
Falco (SSB4)/Up special/Default: Difference between revisions
(New Page: {{ArticleIcons|ssb4=y}} {{competitive expertise}} {{technical data}} ==Hitboxes== Looping hit hits up to 7 times. {{SSB4HitboxTableHeader}} {{HitboxTableTitle|Charge (looping hit)|42...) |
m (Text replacement - "== ([^=])" to "== $1") |
||
| (10 intermediate revisions by 7 users not shown) | |||
| Line 1: | Line 1: | ||
{{ArticleIcons|ssb4=y}} | {{ArticleIcons|ssb4=y}} | ||
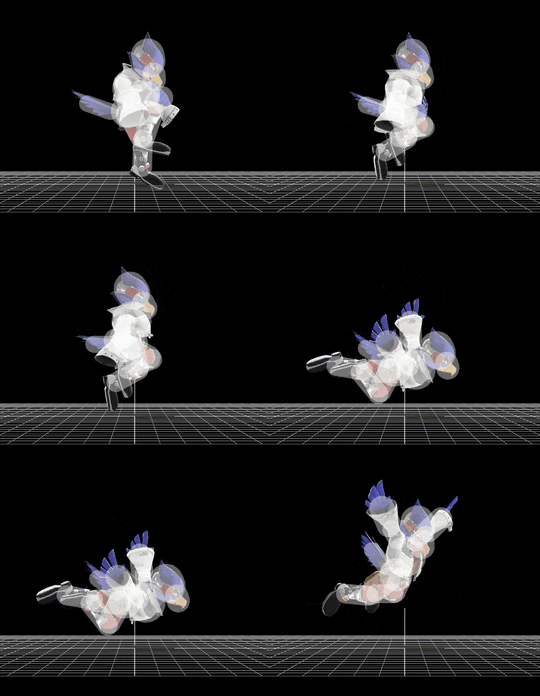
{{ | {{disambig2|the hitbox visualization in ''[[Super Smash Bros. 4]]''|the move itself|Fire Bird}}[[File:FalcoFireBird.gif|thumb|270px|Hitbox visualization showing Falco's Fire Bird.]] | ||
{{ | |||
==Overview== | |||
Falco performs the Fire Bird, cloaking himself in fire, before launching off in any direction. It is a very poor recovery move, having long startup, small and weak hitboxes, and when compared to {{SSB4|Fox}}'s [[Fire Fox]], it travels noticeably less distance. Due to these traits, Falco becomes very susceptible to [[gimp]]ing, and combined with his side special also being an easily telegraphed recovery move, Falco's recovery is quite weak. | |||
Fire Bird can be mixed up somewhat, via altering angles slightly or [[b-reversing]] the move to shift momentum during the start, thus being able to possibly dodge attacks. Fire Bird as an attack is very weak, with poorly connecting multi-hits and a final hit that has very weak [[knockback growth]], and thus is generally never used as an attack. | |||
==Hitboxes== | ==Hitboxes== | ||
Looping hit hits up to 7 times. | Looping hit hits up to 7 times. | ||
{{SSB4HitboxTableHeader}} | {{SSB4HitboxTableHeader}} | ||
{{HitboxTableTitle|Charge ( | {{HitboxTableTitle|Charge (hits 1-7)|42}} | ||
{{SSB4HitboxTableRow | {{SSB4HitboxTableRow | ||
|id=0 | |id=0 | ||
| Line 31: | Line 34: | ||
|slvl=M | |slvl=M | ||
}} | }} | ||
{{HitboxTableTitle|Attack (hit 1)|42}} | {{HitboxTableTitle|Attack (hit 1 (clean))|42}} | ||
{{SSB4HitboxTableRow | {{SSB4HitboxTableRow | ||
|id=0 | |id=0 | ||
| Line 52: | Line 55: | ||
|slvl=M | |slvl=M | ||
}} | }} | ||
{{HitboxTableTitle|Attack (hit 2-7 | {{HitboxTableTitle|Attack (hit 1 (late) + hits 2-7)|42}} | ||
{{SSB4HitboxTableRow | {{SSB4HitboxTableRow | ||
|id=0 | |id=0 | ||
| Line 95: | Line 98: | ||
}} | }} | ||
|} | |} | ||
==Timing== | |||
{|class="wikitable" | |||
!Looping hits (Charge) | |||
|20, 22, 24, 26, 28, 30, 32 | |||
|- | |||
!Hit 1 (Attack) | |||
|43-46 | |||
|- | |||
!Looping hits (Attack) | |||
|47, 49, 51, 53, 55, 57, 59 | |||
|- | |||
!Final hit | |||
|61 | |||
|- | |||
!Animation length | |||
|90 | |||
|} | |||
{{FrameStripStart}} | |||
{{FrameStrip|t=Lag|c=19}}{{FrameStrip|t=Hitbox|c=1}}{{FrameStrip|t=Lag|c=1}}{{FrameStrip|t=Hitbox|c=1}}{{FrameStrip|t=Lag|c=1}}{{FrameStrip|t=Hitbox|c=1}}{{FrameStrip|t=Lag|c=1}}{{FrameStrip|t=Hitbox|c=1}}{{FrameStrip|t=Lag|c=1}}{{FrameStrip|t=Hitbox|c=1}}{{FrameStrip|t=Lag|c=1}}{{FrameStrip|t=Hitbox|c=1}}{{FrameStrip|t=Lag|c=1}}{{FrameStrip|t=Hitbox|c=1}}{{FrameStrip|t=Lag|c=10}}{{FrameStrip|t=Hitbox|c=4|e=HitboxChangeS}}{{FrameStrip|t=Hitbox|c=1|s=HitboxChangeE}}{{FrameStrip|t=Lag|c=1}}{{FrameStrip|t=Hitbox|c=1}}{{FrameStrip|t=Lag|c=1}}{{FrameStrip|t=Hitbox|c=1}}{{FrameStrip|t=Lag|c=1}}{{FrameStrip|t=Hitbox|c=1}}{{FrameStrip|t=Lag|c=1}}{{FrameStrip|t=Hitbox|c=1}}{{FrameStrip|t=Lag|c=1}}{{FrameStrip|t=Hitbox|c=1}}{{FrameStrip|t=Lag|c=1}}{{FrameStrip|t=Hitbox|c=1}}{{FrameStrip|t=Lag|c=1}}{{FrameStrip|t=Hitbox|c=1}}{{FrameStrip|t=Lag|c=29}} | |||
{{FrameStripEnd}} | |||
{{FrameIconLegend|lag=y|hitboxchange=y|hitbox=y}} | |||
{{MvSubNavFalco|g=SSB4}} | {{MvSubNavFalco|g=SSB4}} | ||
[[Category:Falco (SSB4)]] | [[Category:Falco (SSB4)]] | ||
[[Category:Special | [[Category:Special moves (SSB4)]] | ||
[[Category:Up special moves (SSB4)]] | |||
Latest revision as of 20:12, April 12, 2022
Overview[edit]
Falco performs the Fire Bird, cloaking himself in fire, before launching off in any direction. It is a very poor recovery move, having long startup, small and weak hitboxes, and when compared to Fox's Fire Fox, it travels noticeably less distance. Due to these traits, Falco becomes very susceptible to gimping, and combined with his side special also being an easily telegraphed recovery move, Falco's recovery is quite weak.
Fire Bird can be mixed up somewhat, via altering angles slightly or b-reversing the move to shift momentum during the start, thus being able to possibly dodge attacks. Fire Bird as an attack is very weak, with poorly connecting multi-hits and a final hit that has very weak knockback growth, and thus is generally never used as an attack.
Hitboxes[edit]
Looping hit hits up to 7 times.
Timing[edit]
| Looping hits (Charge) | 20, 22, 24, 26, 28, 30, 32 |
|---|---|
| Hit 1 (Attack) | 43-46 |
| Looping hits (Attack) | 47, 49, 51, 53, 55, 57, 59 |
| Final hit | 61 |
| Animation length | 90 |
Lag time |
Hitbox |
Hitbox change |
|
