Fox (SSBM)/Back aerial: Difference between revisions
No edit summary |
|||
| (3 intermediate revisions by 3 users not shown) | |||
| Line 3: | Line 3: | ||
==Overview== | ==Overview== | ||
[[File:Fox Back Aerial Hitbox Melee.gif|thumb|Hitboxes of Fox's back aerial.]] | [[File:Fox Back Aerial Hitbox Melee.gif|thumb|Hitboxes of Fox's back aerial.]] | ||
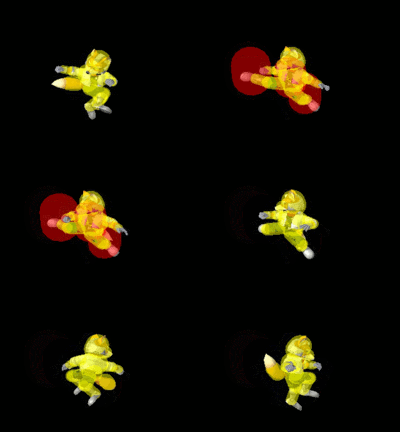
Fox does a kick backwards, having good KO potential knockback when it first comes out. Like his {{mvsub|Fox|SSBM|neutral aerial}}, it is a [[sex kick]], so the move has a quick [[startup]] and a relatively high duration but lower than that of his neutral aerial. One of Fox's best [[edgeguarding]] moves, being effective at edgeguarding opponents near or off the ledge, either from an [[edge]] option or from an onstage [[combo]]. One can also [[SHFFL]] this move and can potentially do great in combos, such as a followup to a [[waveshine]]. Can also be used to [[space]] against opponents. Overall, a great move to use in competitive play, having good power and speed. | Fox does a kick backwards, having good KO potential knockback when it first comes out. Like his {{mvsub|Fox|SSBM|neutral aerial}}, it is a [[sex kick]], so the move has a quick [[startup]] and a relatively high duration but lower than that of his neutral aerial. It also is a very good move at shield pressuring. One of Fox's best [[edgeguarding]] moves, being effective at edgeguarding opponents near or off the ledge, either from an [[edge]] option or from an onstage [[combo]]. One can also [[SHFFL]] this move and can potentially do great in combos, such as a followup to a [[waveshine]]. Can also be used to [[space]] against opponents. Overall, a great move to use in competitive play, having good power and speed. | ||
Compared to Fox's neutral air, back air is slightly worse on block (at best -2 compared to 0), but its longer reach and the shape of its hitbox makes it better for beating some options out of shield, and significantly harder to cover with drift away. | |||
==Hitboxes== | ==Hitboxes== | ||
| Line 105: | Line 107: | ||
|8-19 | |8-19 | ||
|- | |- | ||
!Ending | !Ending autocancel | ||
|23- | |23- | ||
|- | |- | ||
| Line 116: | Line 118: | ||
{{FrameStripStart}} | {{FrameStripStart}} | ||
{{FrameStrip|t=Lag|c=3}}{{FrameStrip|t=Hitbox|c=4|e=HitboxChangeS}}{{FrameStrip|t=Hitbox|c=12|s=HitboxChangeE}}{{FrameStrip|t=Lag|c= | {{FrameStrip|t=Lag|c=3}}{{FrameStrip|t=Hitbox|c=4|e=HitboxChangeS}}{{FrameStrip|t=Hitbox|c=12|s=HitboxChangeE}}{{FrameStrip|t=Lag|c=18}}{{FrameStrip|t=Interruptible|c=2}} | ||
|- | |- | ||
{{FrameStrip|t=Autocancel|c=3}}{{FrameStrip|t=Blank|c=19}}{{FrameStrip|t=Autocancel|c=17}} | {{FrameStrip|t=Autocancel|c=3}}{{FrameStrip|t=Blank|c=19}}{{FrameStrip|t=Autocancel|c=17}} | ||
Latest revision as of 04:00, September 21, 2022
Overview[edit]
Fox does a kick backwards, having good KO potential knockback when it first comes out. Like his neutral aerial, it is a sex kick, so the move has a quick startup and a relatively high duration but lower than that of his neutral aerial. It also is a very good move at shield pressuring. One of Fox's best edgeguarding moves, being effective at edgeguarding opponents near or off the ledge, either from an edge option or from an onstage combo. One can also SHFFL this move and can potentially do great in combos, such as a followup to a waveshine. Can also be used to space against opponents. Overall, a great move to use in competitive play, having good power and speed.
Compared to Fox's neutral air, back air is slightly worse on block (at best -2 compared to 0), but its longer reach and the shape of its hitbox makes it better for beating some options out of shield, and significantly harder to cover with drift away.
Hitboxes[edit]
Timing[edit]
Attack[edit]
| Initial autocancel | 1-3 |
|---|---|
| Clean hit | 4-7 |
| Late hit | 8-19 |
| Ending autocancel | 23- |
| Interruptible | 38 |
| Animation length | 39 |
Landing lag[edit]
| Animation length | 20 |
|---|---|
| L-cancelled animation length | 10 |
| Normal | ||||||||||||||||||||
| L-cancelled |
Lag time |
Hitbox |
Hitbox change |
Autocancel |
Interruptible |
Similar moves[edit]
