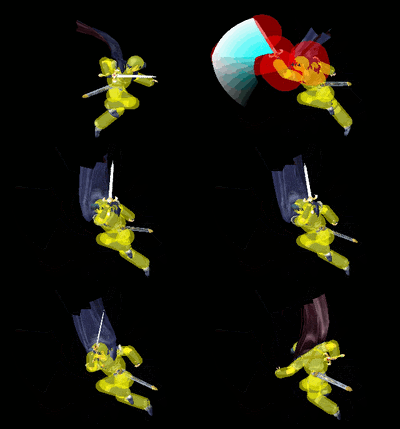
Marth (SSBM)/Back aerial: Difference between revisions
From SmashWiki, the Super Smash Bros. wiki
Jump to navigationJump to search
(who keeps naming these "attack data"?) |
mNo edit summary |
||
| (4 intermediate revisions by 3 users not shown) | |||
| Line 5: | Line 5: | ||
Marth does a bottom to top sword slash behind himself. It deals 9% damage on the base, 10% in the middle, and 13% when [[tipper|tipped]]. This move has the unusual property of turning Marth around in the air when he uses it, being the only attack in the game to do so along with its clone, {{mvsub|Roy|SSBM|back aerial|poss=y}}. In this regard, the move can potentially be used to setup a [[Ken Combo]]. It has some [[combo]] use, though a {{mvsub|Marth|SSBM|forward aerial}} is preferred in most situations due to sending opponents on a more favourable angle and having less [[ending lag]]. The move can also be used to perform a few techniques, such as [[jumping]] off the [[edge]] and using the back aerial to turn Marth around so he can grab the [[edge]] for an [[edgehog]]. | Marth does a bottom to top sword slash behind himself. It deals 9% damage on the base, 10% in the middle, and 13% when [[tipper|tipped]]. This move has the unusual property of turning Marth around in the air when he uses it, being the only attack in the game to do so along with its clone, {{mvsub|Roy|SSBM|back aerial|poss=y}}. In this regard, the move can potentially be used to setup a [[Ken Combo]]. It has some [[combo]] use, though a {{mvsub|Marth|SSBM|forward aerial}} is preferred in most situations due to sending opponents on a more favourable angle and having less [[ending lag]]. The move can also be used to perform a few techniques, such as [[jumping]] off the [[edge]] and using the back aerial to turn Marth around so he can grab the [[edge]] for an [[edgehog]]. | ||
==Hitboxes== | ==Hitboxes== | ||
{{MeleeHitboxTableHeader}} | {{MeleeHitboxTableHeader}} | ||
| Line 15: | Line 14: | ||
|ks=70 | |ks=70 | ||
|fkv=0 | |fkv=0 | ||
|r= | |r=1000 | ||
|bn=76 | |bn=76 | ||
|effect=Slash | |effect=Slash | ||
| Line 28: | Line 27: | ||
|ks=70 | |ks=70 | ||
|fkv=0 | |fkv=0 | ||
|r= | |r=1000 | ||
|bn=71 | |bn=71 | ||
|effect=Slash | |effect=Slash | ||
| Line 41: | Line 40: | ||
|ks=70 | |ks=70 | ||
|fkv=0 | |fkv=0 | ||
|r= | |r=1000 | ||
|bn=25 | |bn=25 | ||
|effect=Slash | |effect=Slash | ||
| Line 54: | Line 53: | ||
|ks=70 | |ks=70 | ||
|fkv=0 | |fkv=0 | ||
|r= | |r=1000 | ||
|bn=76 | |bn=76 | ||
|xpos= | |xpos=1200 | ||
|effect=Slash | |effect=Slash | ||
|slvl=L | |slvl=L | ||
| Line 87: | Line 86: | ||
|- | |- | ||
{{FrameStrip|t=Blank|c=31}}{{FrameStrip|t=Autocancel|c=8}} | {{FrameStrip|t=Blank|c=31}}{{FrameStrip|t=Autocancel|c=8}} | ||
{{FrameStripEnd}} | |||
===Landing lag=== | ===Landing lag=== | ||
| Line 103: | Line 102: | ||
|- | |- | ||
|L-cancelled {{FrameStrip|t=Lag|c=12}}{{FrameStrip|t=Blank|c=12}} | |L-cancelled {{FrameStrip|t=Lag|c=12}}{{FrameStrip|t=Blank|c=12}} | ||
{{FrameStripEnd}} | |||
{{FrameIconLegend|lag=y|hitbox=y|state=y|autocancel=y|interruptible=y}} | {{FrameIconLegend|lag=y|hitbox=y|state=y|autocancel=y|interruptible=y}} | ||
| Line 113: | Line 112: | ||
[[Category:Marth (SSBM)]] | [[Category:Marth (SSBM)]] | ||
[[Category:Back aerials]] | [[Category:Back aerials (SSBM)]] | ||
Latest revision as of 02:18, January 21, 2016
Overview[edit]
Marth does a bottom to top sword slash behind himself. It deals 9% damage on the base, 10% in the middle, and 13% when tipped. This move has the unusual property of turning Marth around in the air when he uses it, being the only attack in the game to do so along with its clone, Roy's back aerial. In this regard, the move can potentially be used to setup a Ken Combo. It has some combo use, though a forward aerial is preferred in most situations due to sending opponents on a more favourable angle and having less ending lag. The move can also be used to perform a few techniques, such as jumping off the edge and using the back aerial to turn Marth around so he can grab the edge for an edgehog.
Hitboxes[edit]
Timing[edit]
Attack[edit]
| Hitbox | 7-11 |
|---|---|
| Direction reversal | 32 |
| Ending autocancel | 32- |
| Interruptible | 35 |
| Animation length | 39 |
Landing lag[edit]
| Animation length | 24 |
|---|---|
| L-cancelled animation length | 12 |
| Normal | ||||||||||||||||||||||||
| L-cancelled |
Lag time |
Hitbox |
State change |
Autocancel |
Interruptible |
Similar moves[edit]
