Marth (SSBB)/Down aerial: Difference between revisions
(New Page: {{ArticleIcons|ssbb=y}} {{Cleanup|Needs work.}} ==Overview== Marth does a forward to backward downward sword slash. When tipped, it is a meteor smash with high base kn...) |
No edit summary |
||
| (36 intermediate revisions by 20 users not shown) | |||
| Line 1: | Line 1: | ||
{{ArticleIcons|ssbb=y}} | {{ArticleIcons|ssbb=y}} | ||
{{ | [[File:MarthDAirSSBB.gif|thumb|400px|Hitbox visualization showing Marth's down aerial.]] | ||
==Overview== | |||
Marth does a forward to backward downward sword slash. When [[tipper|tipped]], it is a powerful [[meteor smash]] with high [[knockback]]. However, unlike in ''Melee'', the sweetspot is outprioritized by the sourspots, making the meteor smash much more difficult to land. The end of the swing is slightly easier to tip with, so a [[RAR]] may help sweetspot it. With very low start-up of 6 frames, it is the second fastest meteor smash in the game (both {{SSBB|Falco}}'s and {{SSBB|Fox}}'s down aerials have a 5 frame startup). It is a risky and highly situational [[edgeguarding]] move, however, as it has very high [[ending lag|ending]] and [[landing lag]] and the sweetspot cannot be consistently landed, especially on more competent players. Potential setups exist, but most are highly unreliable, like stringing a [[forward aerial]] into his down aerial meteor smash on {{SSBB|Snake}}. True set ups are rare, however, on {{SSBB|Wolf}}, {{SSBB|King Dedede}}, and {{SSBB|Snake}}, two {{mvsub|Marth|SSBB|forward throw}}s (or in Dedede's case, 3) can be chained together into a down aerial, if spaced correctly. Those set ups can lead to potential [[0-death]]s unless the opponent successfully [[Smash DI]]'s to get sent onstage. Other set ups are landing the sweetspot out of a grab release, is notable for being more reliable and feasible in competitive play. However this setup only works on a few characters - working on {{SSBB|Meta Knight}}, {{SSBB|Lucas}}, {{SSBB|Squirtle}}, {{SSBB|Wario}}, a solo {{SSBB|Ice Climbers}} and {{SSBB|Ness}} only. In Squirtle's case, Marth can grab release [[chain grab]] across the stage and the platform in [[Smashville]] cannot save him from this because of Squirtle's short grab release animation. Furthermore, other than Squirtle, the setup is only fatal if Marth grabs those characters at a very specific distance from the ledge. The most reliable setup is a [[footstool jump]] and a down aerial; however, this must be done as soon as Marth jumps. Another good, arguably less situational use of down aerials for hitting opponents trying to juggle him when Marth is above them. It hits lower than his {{mvsub|Marth|SSBB|forward aerial}} but it's still not the most reliable down aerial to intercept juggle attempts with because it has low hitbox duration and while its range below is decent, many [[up aerial]]s still outrange his down aerial vertically. | |||
== | ==Hitboxes== | ||
{{BrawlHitboxTableHeader}} | |||
{{BrawlHitboxTableRow | |||
|id=0 | |||
|damage=12% | |||
|angle=361 | |||
|bk=30 | |||
|ks=70 | |||
|fkv=0 | |||
|r=259200 | |||
|bn=61 | |||
|zpos=60000 | |||
|ff=42000 | |||
|rawflags=00111010100000110000011001000010 | |||
}} | |||
{{BrawlHitboxTableRow | |||
|id=1 | |||
|damage=12% | |||
|angle=80 | |||
|bk=40 | |||
|ks=70 | |||
|fkv=0 | |||
|r=259200 | |||
|bn=65 | |||
|ff=42000 | |||
|rawflags=00111010100000110000011001000010 | |||
}} | |||
{{BrawlHitboxTableRow | |||
|id=2 | |||
|damage=14% | |||
|angle=280 | |||
|bk=40 | |||
|ks=80 | |||
|fkv=0 | |||
|r=259200 | |||
|bn=65 | |||
|zpos=300000 | |||
|ff=75000 | |||
|rawflags=00111010100000110001000010000010 | |||
}} | |||
{{BrawlHitboxTableRow | |||
|id=3 | |||
|damage=14% | |||
|angle=270 | |||
|bk=40 | |||
|ks=80 | |||
|fkv=0 | |||
|r=360000 | |||
|bn=0 | |||
|ypos=-204000 | |||
|zpos=120000 | |||
|rawflags=00111010100000110001000010000010 | |||
}} | |||
|} | |||
==Timing== | |||
===Attack=== | |||
{|class="wikitable" | |||
|- | |||
!Initial autocancel | |||
|1-5 | |||
|- | |||
!Hitboxes 0, 1, 2 | |||
|6-9 | |||
|- | |||
!Hitbox 3 | |||
|7 | |||
|- | |||
!Ending autocancel | |||
|48- | |||
|- | |||
!Interruptible | |||
|60 | |||
|- | |||
!Animation length | |||
|64 | |||
|} | |||
{{FrameStripStart}} | |||
{{FrameStrip|t=Lag|c=5}}{{FrameStrip|t=Hitbox|c=1|e=HitboxChangeS}}{{FrameStrip|t=HitboxChangeM|c=1}}{{FrameStrip|t=Hitbox|c=2|s=HitboxChangeE}}{{FrameStrip|t=Lag|c=50}}{{FrameStrip|t=Interruptible|c=5}} | |||
|- | |||
{{FrameStrip|t=Autocancel|c=5}}{{FrameStrip|t=Blank|c=42}}{{FrameStrip|t=Autocancel|c=17}} | |||
{{FrameStripEnd}} | |||
===Landing lag=== | |||
{|class="wikitable" | |||
|- | |||
!Animation length | |||
|32 | |||
|} | |||
{{FrameStripStart}} | |||
{{FrameStrip|t=Lag|c=32}} | |||
{{FrameStripEnd}} | |||
{{FrameIconLegend|lag=y|hitbox=y|hitboxchange=y|autocancel=y|interruptible=y}} | |||
== | ==Footstool spike== | ||
[[File:SSBB Marth Footstool Spike to Stage Spike.gif|thumb|Marth [[edgeguarding]] using a forward aerial to the footstool spike, then a [[stage spike]] to [[punish]] the opponent's [[meteor cancel]]. To perform it, Marth must short hop a [[footstool jump]] and immediately perform a [[down aerial]] while facing the same direction as his opponent. This will allow the [[sweet spot (hitbox)|tip of his sword]] to hit and [[meteor smash]] the opponent.]] | |||
To perform it, Marth must short hop a [[footstool jump]] and immediately perform a [[down aerial]] while facing the same direction as his opponent. This will allow the [[sweet spot (hitbox)|tip of his sword]] to hit and [[meteor smash]] the opponent. | '''Marth's footstool spike''' (using a footstool to setup the move) is also a method of sweetspotting the attack, though this is unreliable, because of the difficult read needed to land the footstool. | ||
Some [[character]]s are difficult or impossible to vertical space, as their falling speeds are too great. It is impossible to vertical space on {{SSBB|Donkey Kong}}, {{SSBB|Diddy Kong}}, {{SSBB|Captain Falcon}}, {{SSBB|Ike}}, Marth, {{SSBB|Ivysaur}}, {{SSBB|Ganondorf}}, {{SSBB|Pikachu}}, {{SSBB|Peach}}, {{SSBB|Zelda}}, {{SSBB|Sheik}}, {{SSBB|Sonic}}, and {{SSBB|Wario}}. However, it still works by footstool jump 2 times or more for a tipped down aerial to hit. It works best on small, light characters, such as {{SSBB|Kirby}}, {{SSBB|Meta Knight}}, and {{SSBB|Jigglypuff}}, but even {{SSBB|Bowser}} can be vertical spaced with little difficulty. | Some [[character]]s are difficult or impossible to vertical space, as their falling speeds are too great. It is impossible to vertical space on {{SSBB|Donkey Kong}}, {{SSBB|Diddy Kong}}, {{SSBB|Captain Falcon}}, {{SSBB|Ike}}, Marth, {{SSBB|Ivysaur}}, {{SSBB|Ganondorf}}, {{SSBB|Pikachu}}, {{SSBB|Peach}}, {{SSBB|Zelda}}, {{SSBB|Sheik}}, {{SSBB|Sonic}}, and {{SSBB|Wario}}. However, it still works by footstool jump 2 times or more for a tipped down aerial to hit. It works best on small, light characters, such as {{SSBB|Kirby}}, {{SSBB|Meta Knight}}, and {{SSBB|Jigglypuff}}, but even {{SSBB|Bowser}} can be vertical spaced with little difficulty. | ||
| Line 15: | Line 111: | ||
Toon Link is able to [[meteor smash]] with this technique, although his does not blend fluently like Marth's. It is about stunning the opponent to set up for the spike [[frame]]s at the beginning of Toon Link's down aerial. | Toon Link is able to [[meteor smash]] with this technique, although his does not blend fluently like Marth's. It is about stunning the opponent to set up for the spike [[frame]]s at the beginning of Toon Link's down aerial. | ||
Meta Knight is also able to perform a footstool jump to down aerial combo, but instead of spiking, the opponent is [[semi-spike]]d away | Meta Knight is also able to perform a footstool jump to down aerial combo, but instead of spiking, the opponent is [[semi-spike]]d away. This can be used to [[gimp]] and [[stage spike]], but a down aerial on its own is usually preferred. | ||
{{ | ===Vertical spacing tutorial video=== | ||
{{#widget:YouTube|id=mjKG4amJJ6E}} | |||
= | {{MvSubNavMarth|g=SSBB}} | ||
[[Category:Marth (SSBB)]] | [[Category:Marth (SSBB)]] | ||
[[Category:Down aerials | [[Category:Down aerials (SSBB)]] | ||
Latest revision as of 22:47, May 21, 2024
Overview[edit]
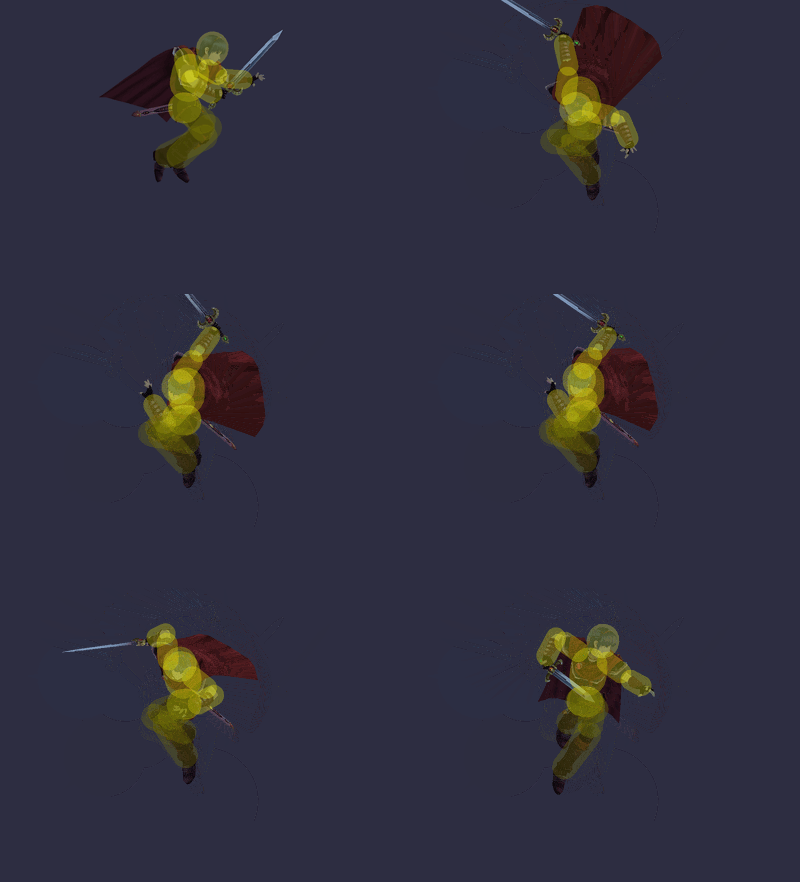
Marth does a forward to backward downward sword slash. When tipped, it is a powerful meteor smash with high knockback. However, unlike in Melee, the sweetspot is outprioritized by the sourspots, making the meteor smash much more difficult to land. The end of the swing is slightly easier to tip with, so a RAR may help sweetspot it. With very low start-up of 6 frames, it is the second fastest meteor smash in the game (both Falco's and Fox's down aerials have a 5 frame startup). It is a risky and highly situational edgeguarding move, however, as it has very high ending and landing lag and the sweetspot cannot be consistently landed, especially on more competent players. Potential setups exist, but most are highly unreliable, like stringing a forward aerial into his down aerial meteor smash on Snake. True set ups are rare, however, on Wolf, King Dedede, and Snake, two forward throws (or in Dedede's case, 3) can be chained together into a down aerial, if spaced correctly. Those set ups can lead to potential 0-deaths unless the opponent successfully Smash DI's to get sent onstage. Other set ups are landing the sweetspot out of a grab release, is notable for being more reliable and feasible in competitive play. However this setup only works on a few characters - working on Meta Knight, Lucas, Squirtle, Wario, a solo Ice Climbers and Ness only. In Squirtle's case, Marth can grab release chain grab across the stage and the platform in Smashville cannot save him from this because of Squirtle's short grab release animation. Furthermore, other than Squirtle, the setup is only fatal if Marth grabs those characters at a very specific distance from the ledge. The most reliable setup is a footstool jump and a down aerial; however, this must be done as soon as Marth jumps. Another good, arguably less situational use of down aerials for hitting opponents trying to juggle him when Marth is above them. It hits lower than his forward aerial but it's still not the most reliable down aerial to intercept juggle attempts with because it has low hitbox duration and while its range below is decent, many up aerials still outrange his down aerial vertically.
Hitboxes[edit]
Timing[edit]
Attack[edit]
| Initial autocancel | 1-5 |
|---|---|
| Hitboxes 0, 1, 2 | 6-9 |
| Hitbox 3 | 7 |
| Ending autocancel | 48- |
| Interruptible | 60 |
| Animation length | 64 |
Landing lag[edit]
| Animation length | 32 |
|---|
Lag time |
Hitbox |
Hitbox change |
Autocancel |
Interruptible |
Footstool spike[edit]

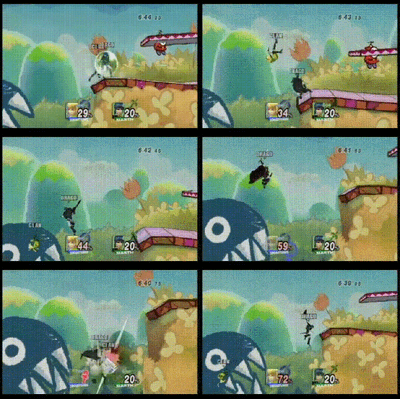
Marth's footstool spike (using a footstool to setup the move) is also a method of sweetspotting the attack, though this is unreliable, because of the difficult read needed to land the footstool.
Some characters are difficult or impossible to vertical space, as their falling speeds are too great. It is impossible to vertical space on Donkey Kong, Diddy Kong, Captain Falcon, Ike, Marth, Ivysaur, Ganondorf, Pikachu, Peach, Zelda, Sheik, Sonic, and Wario. However, it still works by footstool jump 2 times or more for a tipped down aerial to hit. It works best on small, light characters, such as Kirby, Meta Knight, and Jigglypuff, but even Bowser can be vertical spaced with little difficulty.
After testing, it has been confirmed that the combo can be used on certain characters, such as Link or Toon Link during their up special move.
Toon Link is able to meteor smash with this technique, although his does not blend fluently like Marth's. It is about stunning the opponent to set up for the spike frames at the beginning of Toon Link's down aerial.
Meta Knight is also able to perform a footstool jump to down aerial combo, but instead of spiking, the opponent is semi-spiked away. This can be used to gimp and stage spike, but a down aerial on its own is usually preferred.
Vertical spacing tutorial video[edit]
