Luigi (SSBM)/Dash attack: Difference between revisions
No edit summary |
Mariogeek2 (talk | contribs) m (→Timing: Added boost grab window) |
||
| (3 intermediate revisions by 3 users not shown) | |||
| Line 2: | Line 2: | ||
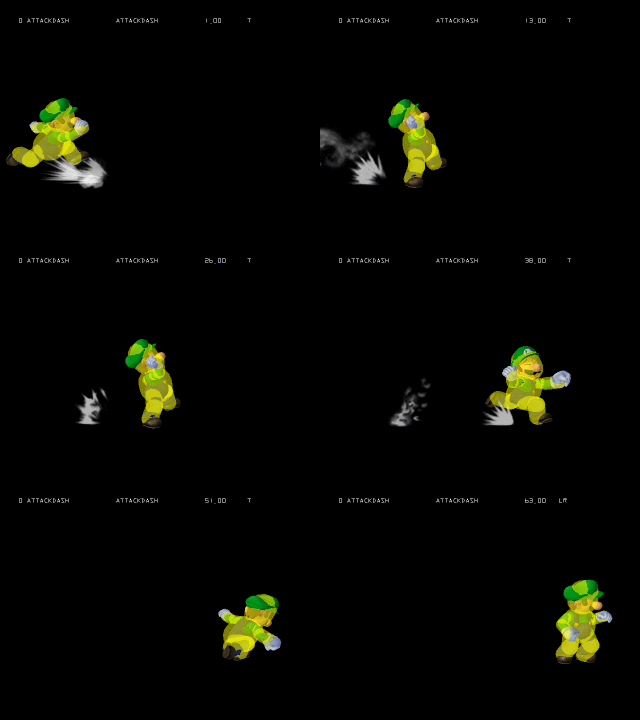
[[File:LuigiDashAttackSSBM.gif|thumb|400px|Hitbox visualization showing Luigi's dash attack.]] | [[File:LuigiDashAttackSSBM.gif|thumb|400px|Hitbox visualization showing Luigi's dash attack.]] | ||
==Overview== | ==Overview== | ||
Luigi dashes forward while throwing several weak punches. | Luigi dashes forward while throwing several weak punches. The move has very fast [[startup]] and has slightly disjointed [[hitbox]]es, but that is where its positive qualities end. Ironically named the '''Fists of Fear''', the move has no practical uses in [[neutral]] nor [[punish]]. In the very unlikely scenario that all of its hits connect, its [[damage]] output is only slightly above-average, dealing 11.1%, due to the way [[staling]] affects multi-hit moves, but it's far more likely the opponent will be knocked out of reach for the successive hits even without [[SDI]]. Additionally, the move's long duration, ⅓ of a second long [[end lag]], and very low [[hitstun]] from each punch make it extremely unsafe on hit, allowing Luigi to be easily [[punish]]ed when he hits someone with the move, while the move is also expectedly very unsafe on [[shield]]. The most crippling flaw is that, like its [[Luigi (SSB)/Dash attack|Smash 64 incarnation]], the move's final hitbox is missing, giving it no proper [[launch]]ing hit (an oversight that wouldn't be rectified until ''Brawl''), so the move has no [[KO]] power nor ability to put the opponent in any disadvantageous situation after hitting them with it, and further contributes to the aforementioned issue of the move being so unsafe on hit. This all leaves the move with no practical use. The only, extremely rare, niche that Luigi players have been able to fit this move into is as a [[jab reset]] tool, where its weak knockback and damage is an asset, rather than a liability, although this is usually overshadowed by [[Luigi (SSBM)/Neutral attack/Hit 1|jab 1]]. | ||
==Hitboxes== | ==Hitboxes== | ||
| Line 42: | Line 42: | ||
!Hitboxes | !Hitboxes | ||
|4, 10, 16, 22, 29, 37 | |4, 10, 16, 22, 29, 37 | ||
|- | |||
!Boost grab window | |||
|2-4 | |||
|- | |- | ||
!Interruptible | !Interruptible | ||
| Line 51: | Line 54: | ||
{{FrameStripStart}} | {{FrameStripStart}} | ||
{{FrameStrip|t=Lag|c=3}}{{FrameStrip|t=Hitbox|c=1}}{{FrameStrip|t=Lag|c=5}}{{FrameStrip|t=Hitbox|c=1}}{{FrameStrip|t=Lag|c=5}}{{FrameStrip|t=Hitbox|c=1}}{{FrameStrip|t=Lag|c=5}}{{FrameStrip|t=Hitbox|c=1}}{{FrameStrip|t=Lag|c=6}}{{FrameStrip|t=Hitbox|c=1}}{{FrameStrip|t=Lag|c=7}}{{FrameStrip|t=Hitbox|c=1}}{{FrameStrip|t=Lag|c=22}}{{FrameStrip|t=Interruptible|c=4}} | !Hitboxes {{FrameStrip|t=Lag|c=3}}{{FrameStrip|t=Hitbox|c=1}}{{FrameStrip|t=Lag|c=5}}{{FrameStrip|t=Hitbox|c=1}}{{FrameStrip|t=Lag|c=5}}{{FrameStrip|t=Hitbox|c=1}}{{FrameStrip|t=Lag|c=5}}{{FrameStrip|t=Hitbox|c=1}}{{FrameStrip|t=Lag|c=6}}{{FrameStrip|t=Hitbox|c=1}}{{FrameStrip|t=Lag|c=7}}{{FrameStrip|t=Hitbox|c=1}}{{FrameStrip|t=Lag|c=22}}{{FrameStrip|t=Interruptible|c=4}} | ||
|- | |||
!Boost grab {{FrameStrip|t=Blank|c=1}}{{FrameStrip|t=Continuable|c=3}}{{FrameStrip|t=Blank|c=59}} | |||
{{FrameStripEnd}} | {{FrameStripEnd}} | ||
Latest revision as of 01:04, December 18, 2024
Overview[edit]
Luigi dashes forward while throwing several weak punches. The move has very fast startup and has slightly disjointed hitboxes, but that is where its positive qualities end. Ironically named the Fists of Fear, the move has no practical uses in neutral nor punish. In the very unlikely scenario that all of its hits connect, its damage output is only slightly above-average, dealing 11.1%, due to the way staling affects multi-hit moves, but it's far more likely the opponent will be knocked out of reach for the successive hits even without SDI. Additionally, the move's long duration, ⅓ of a second long end lag, and very low hitstun from each punch make it extremely unsafe on hit, allowing Luigi to be easily punished when he hits someone with the move, while the move is also expectedly very unsafe on shield. The most crippling flaw is that, like its Smash 64 incarnation, the move's final hitbox is missing, giving it no proper launching hit (an oversight that wouldn't be rectified until Brawl), so the move has no KO power nor ability to put the opponent in any disadvantageous situation after hitting them with it, and further contributes to the aforementioned issue of the move being so unsafe on hit. This all leaves the move with no practical use. The only, extremely rare, niche that Luigi players have been able to fit this move into is as a jab reset tool, where its weak knockback and damage is an asset, rather than a liability, although this is usually overshadowed by jab 1.
Hitboxes[edit]
| ID | Part | Damage | SD | Angle | BK | KS | FKV | Radius | Bone | Offset | Clang | Rebound | Effect | G | A | Sound | ||
|---|---|---|---|---|---|---|---|---|---|---|---|---|---|---|---|---|---|---|
| Hits 1-6 | ||||||||||||||||||
| 0 | 0 | 2% | 0 | 2 | 100 | 0 | 3.906 | 0 | 0.0 | 7.812 | 7.812 | |||||||
| 1 | 0 | 2% | 0 | 2 | 100 | 0 | 3.1248 | 5 | 0.0 | 0.0 | 0.0 | |||||||
Timing[edit]
| Hitboxes | 4, 10, 16, 22, 29, 37 |
|---|---|
| Boost grab window | 2-4 |
| Interruptible | 59 |
| Animation length | 63 |
| Hitboxes | |||||||||||||||||||||||||||||||||||||||||||||||||||||||||||||||
|---|---|---|---|---|---|---|---|---|---|---|---|---|---|---|---|---|---|---|---|---|---|---|---|---|---|---|---|---|---|---|---|---|---|---|---|---|---|---|---|---|---|---|---|---|---|---|---|---|---|---|---|---|---|---|---|---|---|---|---|---|---|---|---|
| Boost grab |
Lag time |
Hitbox |
Interruptible |
|
