Super Smash Bros. Ultimate

Sephiroth (SSBU)/Down aerial: Difference between revisions

From SmashWiki, the Super Smash Bros. wiki
Jump to navigationJump to search
No edit summary
 
(2 intermediate revisions by one other user not shown)
Line 4: Line 4:
{{competitive expertise}}
==Overview==
==Overview==
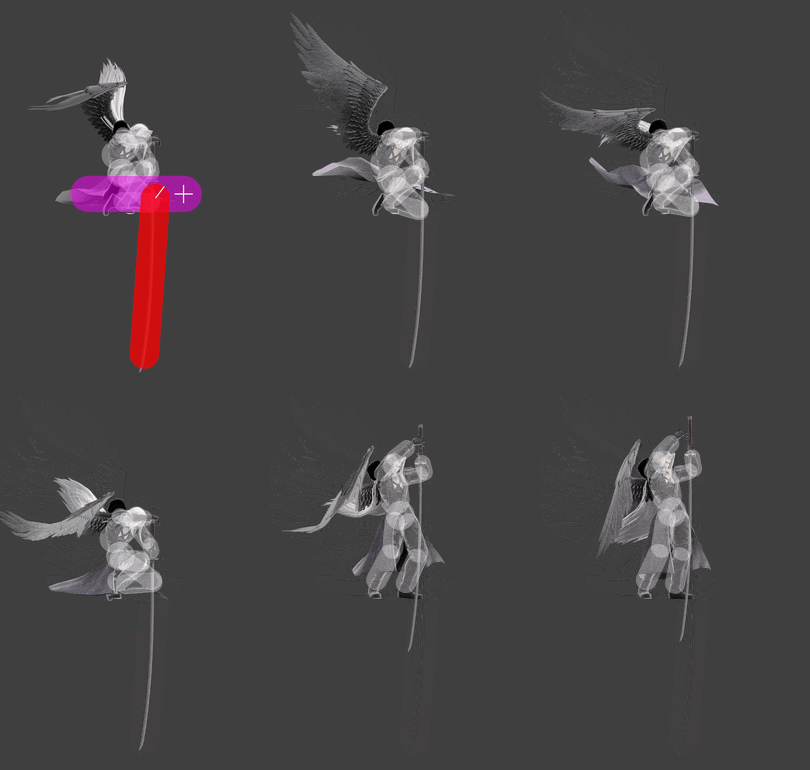
Sephiroth performs his iconic '''''Hell's Gate''''' move, being a [[stall-then-fall]] down aerial where he uses both hands to thrust Masamune downwards while falling at a high speed. Being a stabbing move, the [[sweet spot]] is situated around the tip of the blade but is only active during its initial frames, transitioning to dealing consistent damage across the entire blade after its spiking hitbox deactivates. Boasts impressive vertical range, being able to hit opponents who are below the ledge, or even below platforms on certain stages. This allows it to be used as a very consistent 2-frame punish move that can be safely performed on stage, made even more dangerous by the powerful [[meteor smash]] effect on the move's sweet spot. Additionally, Hell's Gate has a landing hitbox, visually indicated by small fissures forming beneath him. Masamune also briefly gets a hitbox upon landing, which can hit opponents beneath Sephiroth, however this hitbox lacks a meteor effect and is fairly weak [[knockback]] wise.
Due to the placement of its hitboxes, it is easier to land if Sephiroth has his back to the opponent. As such, a common set up for 2-framing recoveries is to [[roll]] to turn your back to ledge, and then perform Hell's Gate out of a [[short hop]] to allow time for the sweetspot to be active.
==Hitboxes==
==Hitboxes==
===Down aerial===
===Down aerial===
Line 260: Line 264:
*The ID 0 and 1 hitboxes for the down aerial's clean hit are coded as extended hitboxes despite not actually extending, which prevents them from interpolating.
*Despite the down aerial's late hit possessing three hitboxes, all of them cover the exact same space and hit the same targets, making the distinction between them pointless. This is also the case with the clean landing hit's ID 1 and 2 hitboxes.
*This move and animation is a reference to when Sephiroth kills Aerith in Final Fantasy 7.

[[Category:Sephiroth (SSBU)]]
[[Category:Sephiroth (SSBU)]]
[[Category:Down aerials (SSBU)]]
[[Category:Down aerials (SSBU)]]

Latest revision as of 00:04, April 27, 2024

Hitbox visualization showing Sephiroth's down aerial.
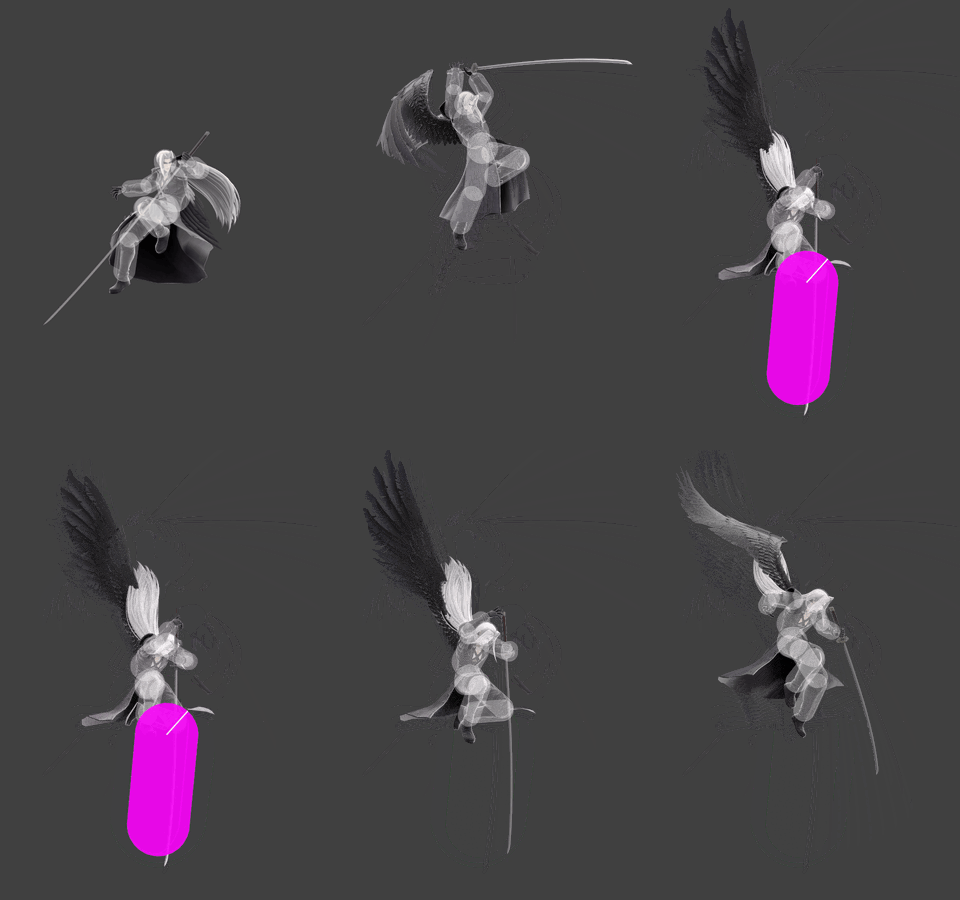
Hitbox visualization showing Sephiroth's down aerial, when landing.
Competitive.png This article or section may require competitive expertise.
You can discuss this issue on the talk page or edit this page to improve it.

Overview[edit]

Sephiroth performs his iconic Hell's Gate move, being a stall-then-fall down aerial where he uses both hands to thrust Masamune downwards while falling at a high speed. Being a stabbing move, the sweet spot is situated around the tip of the blade but is only active during its initial frames, transitioning to dealing consistent damage across the entire blade after its spiking hitbox deactivates. Boasts impressive vertical range, being able to hit opponents who are below the ledge, or even below platforms on certain stages. This allows it to be used as a very consistent 2-frame punish move that can be safely performed on stage, made even more dangerous by the powerful meteor smash effect on the move's sweet spot. Additionally, Hell's Gate has a landing hitbox, visually indicated by small fissures forming beneath him. Masamune also briefly gets a hitbox upon landing, which can hit opponents beneath Sephiroth, however this hitbox lacks a meteor effect and is fairly weak knockback wise.

Due to the placement of its hitboxes, it is easier to land if Sephiroth has his back to the opponent. As such, a common set up for 2-framing recoveries is to roll to turn your back to ledge, and then perform Hell's Gate out of a short hop to allow time for the sweetspot to be active.

Hitboxes[edit]

Down aerial[edit]

ID Part Rehit rate Damage SD Angle Angle type BK KS FKV Set weight Radius Bone Offset SDI× T% Clang Rebound Effect Type G A Sound Direct Hit bits Hit part Blockable Reflectable Absorbable Flinchless No GFX Heedless
Clean hit
0 0 0 15.0% 0 AngleIcon58.png Standard 75 65 0 HitboxTableIcon(False).png 5.5 swordl1 20.0 0.0 2.8 1.3× 1.0× 0% HitboxTableIcon(Clang).png HitboxTableIcon(Rebound).png Stab (effect) Sword (type) HitboxTableIcon(GroundedTrue).png HitboxTableIcon(AerialFalse).png L Slash SpecialsDirect.png All All HitboxTableIcon(Blockable).png HitboxTableIcon(Unreflectable).png HitboxTableIcon(Unabsorbable).png HitboxTableIcon(False).png HitboxTableIcon(False).png HitboxTableIcon(False).png
1 0 0 15.0% 0 AngleIcon270.png Standard 20 90 0 HitboxTableIcon(False).png 5.5 swordl1 20.0 0.0 2.8 1.3× 1.0× 0% HitboxTableIcon(Clang).png HitboxTableIcon(Rebound).png Stab (effect) Sword (type) HitboxTableIcon(GroundedFalse).png HitboxTableIcon(AerialTrue).png L Slash SpecialsDirect.png All All HitboxTableIcon(Blockable).png HitboxTableIcon(Unreflectable).png HitboxTableIcon(Unabsorbable).png HitboxTableIcon(False).png HitboxTableIcon(False).png HitboxTableIcon(False).png
2 0 0 10.0% 0 AngleIcon48.png Standard 58 73 0 HitboxTableIcon(False).png 6.0 swordl1 11.0 to 19.5 0.0 1.5 to 2.8 0.8× 1.0× 0% HitboxTableIcon(Clang).png HitboxTableIcon(Rebound).png Stab (effect) Sword (type) HitboxTableIcon(GroundedTrue).png HitboxTableIcon(AerialTrue).png M Slash SpecialsDirect.png All All HitboxTableIcon(Blockable).png HitboxTableIcon(Unreflectable).png HitboxTableIcon(Unabsorbable).png HitboxTableIcon(False).png HitboxTableIcon(False).png HitboxTableIcon(False).png
Late hit
0 0 0 10.0% 0 AngleIcon48.png Standard 58 73 0 HitboxTableIcon(False).png 4.0 swordl1 9.5 to 21.0 0.0 1.5 to 2.8 0.8× 1.0× 0% HitboxTableIcon(Clang).png HitboxTableIcon(Rebound).png Stab (effect) Sword (type) HitboxTableIcon(GroundedTrue).png HitboxTableIcon(AerialTrue).png M Slash SpecialsDirect.png All All HitboxTableIcon(Blockable).png HitboxTableIcon(Unreflectable).png HitboxTableIcon(Unabsorbable).png HitboxTableIcon(False).png HitboxTableIcon(False).png HitboxTableIcon(False).png
1 0 0 10.0% 0 AngleIcon48.png Standard 58 73 0 HitboxTableIcon(False).png 4.0 swordl1 9.5 to 21.0 0.0 1.5 to 2.8 0.8× 1.0× 0% HitboxTableIcon(Clang).png HitboxTableIcon(Rebound).png Stab (effect) Sword (type) HitboxTableIcon(GroundedTrue).png HitboxTableIcon(AerialTrue).png M Slash SpecialsDirect.png All All HitboxTableIcon(Blockable).png HitboxTableIcon(Unreflectable).png HitboxTableIcon(Unabsorbable).png HitboxTableIcon(False).png HitboxTableIcon(False).png HitboxTableIcon(False).png
2 0 0 10.0% 0 AngleIcon48.png Standard 58 73 0 HitboxTableIcon(False).png 4.0 swordl1 9.5 to 21.0 0.0 1.5 to 2.8 0.8× 1.0× 0% HitboxTableIcon(Clang).png HitboxTableIcon(Rebound).png Stab (effect) Sword (type) HitboxTableIcon(GroundedTrue).png HitboxTableIcon(AerialTrue).png M Slash SpecialsDirect.png All All HitboxTableIcon(Blockable).png HitboxTableIcon(Unreflectable).png HitboxTableIcon(Unabsorbable).png HitboxTableIcon(False).png HitboxTableIcon(False).png HitboxTableIcon(False).png

Landing[edit]

ID Part Rehit rate Damage SD Angle Angle type BK KS FKV Set weight Radius Bone Offset SDI× T% Clang Rebound Effect Type G A Sound Direct Hit bits Hit part Blockable Reflectable Absorbable Flinchless No GFX Heedless
Clean hit
0 0 0 5.0% 0 Sakurai angle Standard 70 70 0 HitboxTableIcon(False).png 2.5 top 0.0 2.7 6.5 to -6.5 1.0× 1.0× 0% HitboxTableIcon(NoClang).png HitboxTableIcon(NoRebound).png Normal (effect) Typeless (type) HitboxTableIcon(GroundedTrue).png HitboxTableIcon(AerialTrue).png M Kick SpecialsDirect.png All All HitboxTableIcon(Blockable).png HitboxTableIcon(Unreflectable).png HitboxTableIcon(Unabsorbable).png HitboxTableIcon(False).png HitboxTableIcon(False).png HitboxTableIcon(False).png
1 0 0 7.0% 0 AngleIcon53.png Standard 58 73 0 HitboxTableIcon(False).png 2.0 swordl1 3.0 to 24.0 -2.0 0.0 to 1.5 1.0× 1.0× 0% HitboxTableIcon(NoClang).png HitboxTableIcon(NoRebound).png Stab (effect) Sword (type) HitboxTableIcon(GroundedTrue).png HitboxTableIcon(AerialTrue).png M Slash SpecialsDirect.png All All HitboxTableIcon(Blockable).png HitboxTableIcon(Unreflectable).png HitboxTableIcon(Unabsorbable).png HitboxTableIcon(False).png HitboxTableIcon(False).png HitboxTableIcon(False).png
2 0 0 7.0% 0 AngleIcon53.png Standard 58 73 0 HitboxTableIcon(False).png 2.0 swordl1 3.0 to 24.0 -2.0 0.0 to 1.5 1.0× 1.0× 0% HitboxTableIcon(NoClang).png HitboxTableIcon(NoRebound).png Stab (effect) Sword (type) HitboxTableIcon(GroundedTrue).png HitboxTableIcon(AerialTrue).png M Slash SpecialsDirect.png All All HitboxTableIcon(Blockable).png HitboxTableIcon(Unreflectable).png HitboxTableIcon(Unabsorbable).png HitboxTableIcon(False).png HitboxTableIcon(False).png HitboxTableIcon(False).png
Late hit
0 0 0 5.0% 0 Sakurai angle Standard 70 70 0 HitboxTableIcon(False).png 2.5 top 0.0 2.7 6.5 to -6.5 1.0× 1.0× 0% HitboxTableIcon(NoClang).png HitboxTableIcon(NoRebound).png Normal (effect) Typeless (type) HitboxTableIcon(GroundedTrue).png HitboxTableIcon(AerialTrue).png M Kick SpecialsDirect.png All All HitboxTableIcon(Blockable).png HitboxTableIcon(Unreflectable).png HitboxTableIcon(Unabsorbable).png HitboxTableIcon(False).png HitboxTableIcon(False).png HitboxTableIcon(False).png

Timing[edit]

Attack[edit]

The move resets Sephiroth's horizontal momentum and first sets his vertical speed to 1 on frames 1-18, then sets it to -4.2 from frame 19 onward. Manual horizontal movement is also disabled during frames 1-46.

Initial autocancel 1-4
Clean hit 19-23
Late hit 24-39
Ending autocancel 55-
Interruptible 61
Animation length 73
FrameIcon(Lag).png FrameIcon(Lag).png FrameIcon(Lag).png FrameIcon(Lag).png FrameIcon(Lag).png FrameIcon(Lag).png FrameIcon(Lag).png FrameIcon(Lag).png FrameIcon(Lag).png FrameIcon(Lag).png FrameIcon(Lag).png FrameIcon(Lag).png FrameIcon(Lag).png FrameIcon(Lag).png FrameIcon(Lag).png FrameIcon(Lag).png FrameIcon(Lag).png FrameIcon(Lag).png FrameIcon(Hitbox).png FrameIcon(Hitbox).png FrameIcon(Hitbox).png FrameIcon(Hitbox).png FrameIcon(HitboxChangeS).png FrameIcon(HitboxChangeE).png FrameIcon(Hitbox).png FrameIcon(Hitbox).png FrameIcon(Hitbox).png FrameIcon(Hitbox).png FrameIcon(Hitbox).png FrameIcon(Hitbox).png FrameIcon(Hitbox).png FrameIcon(Hitbox).png FrameIcon(Hitbox).png FrameIcon(Hitbox).png FrameIcon(Hitbox).png FrameIcon(Hitbox).png FrameIcon(Hitbox).png FrameIcon(Hitbox).png FrameIcon(Hitbox).png FrameIcon(Lag).png FrameIcon(Lag).png FrameIcon(Lag).png FrameIcon(Lag).png FrameIcon(Lag).png FrameIcon(Lag).png FrameIcon(Lag).png FrameIcon(Lag).png FrameIcon(Lag).png FrameIcon(Lag).png FrameIcon(Lag).png FrameIcon(Lag).png FrameIcon(Lag).png FrameIcon(Lag).png FrameIcon(Lag).png FrameIcon(Lag).png FrameIcon(Lag).png FrameIcon(Lag).png FrameIcon(Lag).png FrameIcon(Lag).png FrameIcon(Lag).png FrameIcon(Interruptible).png FrameIcon(Interruptible).png FrameIcon(Interruptible).png FrameIcon(Interruptible).png FrameIcon(Interruptible).png FrameIcon(Interruptible).png FrameIcon(Interruptible).png FrameIcon(Interruptible).png FrameIcon(Interruptible).png FrameIcon(Interruptible).png FrameIcon(Interruptible).png FrameIcon(Interruptible).png FrameIcon(Interruptible).png
FrameIcon(Autocancel).png FrameIcon(Autocancel).png FrameIcon(Autocancel).png FrameIcon(Autocancel).png FrameIcon(Blank).png FrameIcon(Blank).png FrameIcon(Blank).png FrameIcon(Blank).png FrameIcon(Blank).png FrameIcon(Blank).png FrameIcon(Blank).png FrameIcon(Blank).png FrameIcon(Blank).png FrameIcon(Blank).png FrameIcon(Blank).png FrameIcon(Blank).png FrameIcon(Blank).png FrameIcon(Blank).png FrameIcon(Blank).png FrameIcon(Blank).png FrameIcon(Blank).png FrameIcon(Blank).png FrameIcon(Blank).png FrameIcon(Blank).png FrameIcon(Blank).png FrameIcon(Blank).png FrameIcon(Blank).png FrameIcon(Blank).png FrameIcon(Blank).png FrameIcon(Blank).png FrameIcon(Blank).png FrameIcon(Blank).png FrameIcon(Blank).png FrameIcon(Blank).png FrameIcon(Blank).png FrameIcon(Blank).png FrameIcon(Blank).png FrameIcon(Blank).png FrameIcon(Blank).png FrameIcon(Blank).png FrameIcon(Blank).png FrameIcon(Blank).png FrameIcon(Blank).png FrameIcon(Blank).png FrameIcon(Blank).png FrameIcon(Blank).png FrameIcon(Blank).png FrameIcon(Blank).png FrameIcon(Blank).png FrameIcon(Blank).png FrameIcon(Blank).png FrameIcon(Blank).png FrameIcon(Blank).png FrameIcon(Blank).png FrameIcon(Autocancel).png FrameIcon(Autocancel).png FrameIcon(Autocancel).png FrameIcon(Autocancel).png FrameIcon(Autocancel).png FrameIcon(Autocancel).png FrameIcon(Autocancel).png FrameIcon(Autocancel).png FrameIcon(Autocancel).png FrameIcon(Autocancel).png FrameIcon(Autocancel).png FrameIcon(Autocancel).png FrameIcon(Autocancel).png FrameIcon(Autocancel).png FrameIcon(Autocancel).png FrameIcon(Autocancel).png FrameIcon(Autocancel).png FrameIcon(Autocancel).png FrameIcon(Autocancel).png

Landing lag[edit]

Clean hit 1
Late hit 2
Interruptible 27
Animation length 68
FrameIcon(HitboxChangeS).png FrameIcon(HitboxChangeE).png FrameIcon(Lag).png FrameIcon(Lag).png FrameIcon(Lag).png FrameIcon(Lag).png FrameIcon(Lag).png FrameIcon(Lag).png FrameIcon(Lag).png FrameIcon(Lag).png FrameIcon(Lag).png FrameIcon(Lag).png FrameIcon(Lag).png FrameIcon(Lag).png FrameIcon(Lag).png FrameIcon(Lag).png FrameIcon(Lag).png FrameIcon(Lag).png FrameIcon(Lag).png FrameIcon(Lag).png FrameIcon(Lag).png FrameIcon(Lag).png FrameIcon(Lag).png FrameIcon(Lag).png FrameIcon(Lag).png FrameIcon(Lag).png FrameIcon(Interruptible).png FrameIcon(Interruptible).png FrameIcon(Interruptible).png FrameIcon(Interruptible).png FrameIcon(Interruptible).png FrameIcon(Interruptible).png FrameIcon(Interruptible).png FrameIcon(Interruptible).png FrameIcon(Interruptible).png FrameIcon(Interruptible).png FrameIcon(Interruptible).png FrameIcon(Interruptible).png FrameIcon(Interruptible).png FrameIcon(Interruptible).png FrameIcon(Interruptible).png FrameIcon(Interruptible).png FrameIcon(Interruptible).png FrameIcon(Interruptible).png FrameIcon(Interruptible).png FrameIcon(Interruptible).png FrameIcon(Interruptible).png FrameIcon(Interruptible).png FrameIcon(Interruptible).png FrameIcon(Interruptible).png FrameIcon(Interruptible).png FrameIcon(Interruptible).png FrameIcon(Interruptible).png FrameIcon(Interruptible).png FrameIcon(Interruptible).png FrameIcon(Interruptible).png FrameIcon(Interruptible).png FrameIcon(Interruptible).png FrameIcon(Interruptible).png FrameIcon(Interruptible).png FrameIcon(Interruptible).png FrameIcon(Interruptible).png FrameIcon(Interruptible).png FrameIcon(Interruptible).png FrameIcon(Interruptible).png FrameIcon(Interruptible).png FrameIcon(Interruptible).png FrameIcon(Interruptible).png
Legend (1 square = 1 frame)
Lag
Lag time
Hitbox
Hitbox
FrameIcon(HitboxChangeS).pngFrameIcon(HitboxChangeE).png
Hitbox change
Auto-canceling
Autocancel
Interruptibility
Interruptible


Trivia[edit]

  • The ID 0 and 1 hitboxes for the down aerial's clean hit are coded as extended hitboxes despite not actually extending, which prevents them from interpolating.
  • Despite the down aerial's late hit possessing three hitboxes, all of them cover the exact same space and hit the same targets, making the distinction between them pointless. This is also the case with the clean landing hit's ID 1 and 2 hitboxes.
  • This move and animation is a reference to when Sephiroth kills Aerith in Final Fantasy 7.